How To Walk On A Steep Roof (Step-by-Step Guide)
The American Academy of Orthopedic Surgeons reports that over 500,000 people receive treatment for ladder-related injuries per year. 97% of these injuries occur at a private residence and around 300 of them are fatal.
While the fatality rate in this statistic sits below 1%, the sheer volume of injuries that occur from inexperienced homeowners is alarming. You can safely walk on a steep roof to conduct repairs, replace tiles, or clean your gutters. However, it is imperative to use the right equipment and follow safety guidelines.
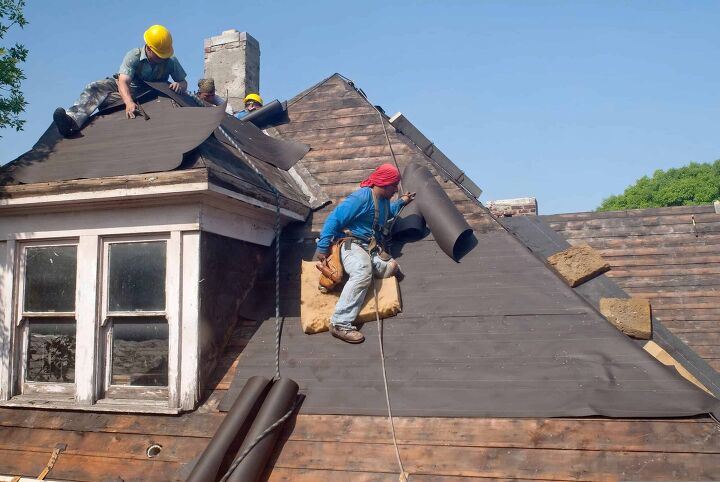
To walk on a steep roof, begin by properly securing a ladder with a 3-feet overhang to ensure optimal safety. To secure, use ladder leashes or a ladder hook. Next, set up your harness, in case you fall off the ladder. Lean towards the peak of the roof whenever walking. It is recommended to walk sideways.
If you do not have the proper equipment or renting equipment is not an option, it is best to hire a professional with ample experience navigating challenging roofing conditions. Your safety is important! If you feel confident that repairing your roof is a do-able task, follow the four steps below to ensure proper climbing safety.
Before You Begin
There are a few preliminary measures you should take to ensure your safety when walking on a steep roof. We recommend checking weather conditions before you begin your roofing project and select loose-fitted clothing with maximum mobility.
Check Weather Conditions
Under no circumstances should you work on your roof during a windy, rainy, or snowy day. Even the common morning dew can make for a slippery surface increasing the likelihood of a dangerous fall.
It is best to choose a warm, dry day – preferably after the dew from the morning has dissipated – to conduct any roofing repairs. Check the weather forecast on the morning you plan to climb your roof to ensure safe working conditions and prevent any unnecessary falls. If weather worsens while you are working on the roof, descend immediately and continue working when conditions permit.
If you must repair your roof during the winter months, you’ll want to know the benefits and disadvantages of working on your roof during the winter months.
Choose the Right Clothing
Walking on and repairing a steep roof is an arduous task that requires the right clothing. The best clothing for this project is comfortable, loose-fitted clothing; tight or uncomfortable clothing can impair your movement and create a hazardous situation. Make sure your clothing is not too loose-fitting that it can get caught on the ladder or roof tile.
Shoes with rubber soles and sturdy tread provide the best grip when scaling a roof’s surface, especially a steep roof. Thorogood, Irish Setter, Timberland, Caterpillar, and Cougar Paws are the top-rated brands for roofing shoes.
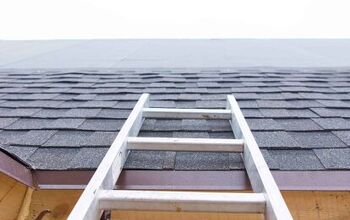
Step 1: Select Your Ladder
Selecting the right ladder for your roofing project is an important first step. You will need a ladder with the proper height and duty rating to avoid a precarious work environment.
Ladder Height
Your ladder needs to extend at least 3 feet above the roof ledge. If your ladder extension is any shorter than 3 feet, you run the risk of a dangerous fall stepping off the ladder onto the roof or missing a step when climbing back onto the ladder on the way down.
An extension ladder consists of 2 or more sections guided by brackets that allow your ladder to adjust to various heights depending on your need. You can either rent or purchase an extension ladder that adjusts to the height of your roof ledge.
The most popular ladder brands are Gorilla Ladders and Little Giant Ladders. Little Giant Ladders are more affordable and widely available with a 30-day money-back guarantee and lifetime warranty.
Ladder Duty Rating
Ladders have different duty ratings based on their weight capacity. A medium-duty ladder will hold up to 225 pounds, a heavy-duty ladder will hold up to 250 pounds and an extra heavy-duty ladder will hold up to 300 pounds.
Keep in mind not only your weight, but the weight of your clothing and any equipment you will have on your tool belt should factor into your ladder selection. When in doubt, select a higher duty rating to ensure your safety.
Step 2: Secure Your Ladder
Electrocution is one of the “fatal four” causes of death among construction workers causing 1 of every 10 construction deaths.
Avoid placing your ladder near or beside a power line. If you use a metal ladder, an accidental bump of the power line can cause immediate electrocution. If you cannot avoid placing your ladder near a power line, make sure to use a wooden ladder for safety.
Once you have placed your ladder a safe distance from any power lines, you should effectively secure your ladder by using ladder leashes and a ladder hook. If you do not have a ladder hook on hand, here’s how to make a roof ladder hook.
A ladder leash is an easy-to-use device that secures your ladder safely to the surface on which your ladder is resting. Ladder leashes prevent your ladder from wobbling while you climb.
Using a ladder leash is simple: wrap the leash around the ladder leg. Slide one end through the existing loop creating a face loop. Secure the end of the leash using the nail and nail plate to the surface on which your ladder is leaning. Repeat this on the other side of the ladder.
Step 3: Set Up Your Harness
A harness is a great tool for beginner or intermediate fixers. A harness serves as a safeguard in the event that you do fall from your roof or slip from the ladder.
A harness set will include a harness, a rope, an anchor, and a lanyard for adjusting the rope tension. If you have ever been mountain climbing, you have an advantage here!
If you have never used a harness, ask an employee at your local hardware store to walk you through the process or watch a step-by-step YouTube video. Make sure to practice using your harness on solid ground before climbing onto your roof.
To set up your roof safety harness, you want to first anchor the brackets to the roof. Your roof bracket comes with a label including detailed instructions, which you should follow closely. Strap on your safety harness, tightening the straps so that they fit snugly on your body and make sure all buckles are functioning properly before climbing onto the roof.
Step 4: Pull Your Equipment Up to the Roof
Carrying equipment or roofing tools with you as you ascend or descend a ladder can cause uneven weight distribution on your person. Uneven weight distribution can lead to imbalance and potentially cause a fall.
The safest way to bring equipment onto the roof is by a good old-fashioned rope and bucket. Place your tools in a 5-gallon bucket. Tie a long rope onto the handle of the bucket and pull the bucket up to the roof once you have safely positioned yourself on the rooftop.
Related Questions
How much does it cost to hire a professional to repair my roof?
General roofing labor costs will range from $150 to $300 per square or $1.50 to $3 per square foot. The specific cost of roofing labor can vary depending on the severity of the repairs needed and the cost of the roofing product.
What qualifies as a steep roof?
The Occupational Safety and Health Administration considers any roof with a rise: run ratio over 4:12 to be a “steep roof.”
How do you calculate the slope of your roof?
Architects generally calculate roof slopes in gradients (the tangent of the angle). The gradient is a Y:X formula where Y = the rise and X = the run. If you travel 4 inches vertically and 48 inches horizontally, you would have a 4:48 slope or a 1:12 slope.

We are a team of passionate homeowners, home improvement pros, and DIY enthusiasts who enjoy sharing home improvement, housekeeping, decorating, and more with other homeowners! Whether you're looking for a step-by-step guide on fixing an appliance or the cost of installing a fence, we've here to help.
More by Upgraded Home Team


![10 Best Cordless Leaf Blowers – [2022 Reviews & Ultimate Guide]](https://cdn-fastly.upgradedhome.com/media/2023/07/31/9070789/10-best-cordless-leaf-blowers-2022-reviews-ultimate-guide.jpg?size=350x220)