How To Use A Tap And Die Set (Step-by-Step Guide)
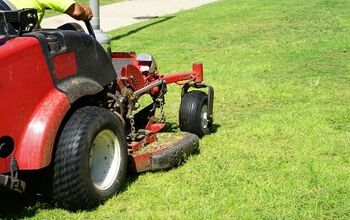
A tap and die set can be a beneficial tool to those who work in a repair business, garage, or for simply your average DIY homeowner. Whether you have a broken screw or bolt that needs to be removed, or you’re hanging a painting, repairing a lawnmower, or performing a do-it-yourself project in your home, your tap and die set will help you to create or repair threads when needed.
As you can see, there are a number of situations that may require the need for a tap and die set. The most common use is to remove the remnants of a screw. If the threads have become damaged inside, the tools in a tap and die set can allow you to cut new threads efficiently so that a new screw can be used in its place.
While the concept of these tools may seem complicated at first, especially if you are inexperienced, it is a skill that can be easily acquired with a bit of practice and patience. Just like any device, in order to get the most out of your tap and die set, you must know how to properly use it.
What is a Tap and Die Set?
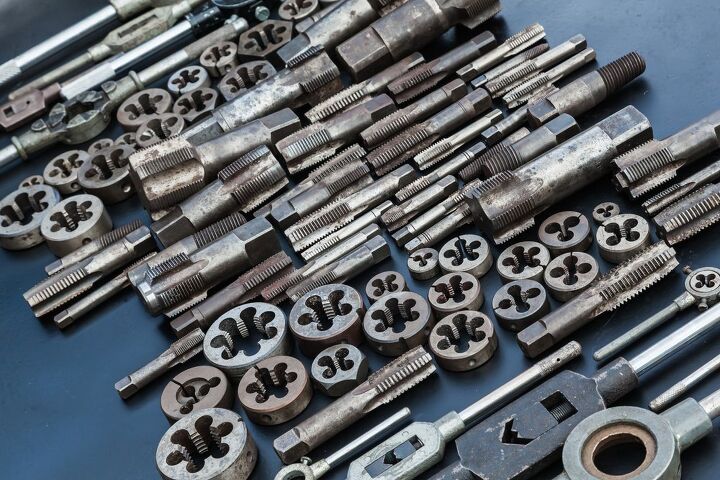
A tap and die set is a collection of tools that are used to create screw threads on blank stock or in holes. The threading is created using the cutting and forming tools found in the set. A tap is used to form or cut the female part of the mating pair, while a die is for creating the male portion. Tapping refers to the process of cutting or forming the threads using a tap, whereas the process that uses a die is referred to as threading.
Tap and die sets come with matching taps and dies in the most common screw sizes, along with various wrenches. The tap itself is a metal rod that resembles a drill bit with a sharpened edge. The die, however, is a round metallic device with a hole in the center. This hole has sharpened sides that help to form the male threads on a screw, or blank rod.
Depending on the particular tap and die set, these threads can be cut into a number of different materials including metal, plastic, and wood.
Choosing the Right Tap and Die Set
Before jumping into your next project and securing a brand-new tap and die set, you’ll want to ensure that you’re choosing the right set for your specific purposes. These sets range widely when it comes to the number of parts that are included. For example, a concentrated woodworking set may contain only three pieces, while a more comprehensive metalworking set could come with over 100 pieces.
To ensure that you’re making the right choice, you should be aware of the different types of taps, dies, and corresponding wrenches.
- Taper taps are used for the preliminary threading since the end tapers are a smaller diameter, making it much easier to begin a thread.
- Plug taps are the most widely used type, as they are suitable for both finishing threads and initial threading. However, they are a little more difficult to use for preliminary threading than taper taps and do not thread as completely as finishing taps.
- Finishing taps are the best choice when you need to finish a thread pattern. They offer the ability to cut completely to the bottom of the hole, permitting bolts to be threaded all the way own. These types of taps are not the ideal option for initial threading, as they have a small unthreaded end which makes it challenging to begin cutting threads.
On the other hand, when it comes to dies, they also come in more than one type:
- Circular dies are the most widely used type of die for cutting threads into the exterior of a bolt. Almost every tap and die set will come with circular dies.
- Split circular dies can either be split in half or have just a single split, which lets them to receive larger materials. The purpose of these dies is to cut shallow threads on the first pass, then deeper threads are achieved with as subsequent pass as the die is tightened around the bolt.
- Die nuts are a basic follow-up tool that serves to sharpen existing threads, but does not create any new ones.
To effectively use a tap and die set, you must have at least one basic tap wrench and one die wrench. However, a ratcheting tap and die wrench is best.
- A tap wrench appears like a thin, long bar with a rectangular opening and adjustable teeth for fastening around one end of the tap. That way, the tap can be used to cut threads without any slippage.
- A die wrench looks relatively similar to a tap wrench, except for the fact that the opening in the middle is designed to fit dies. The dies are then secured to the wrench with one or more sets of screws.
- A ratcheting tap and die wrench allows you to take some of the manual work out of the process. This wrench is designed to let you cut clockwise, but unless it is released, does not allow you to loosen the wrench when it is rotated counterclockwise. A ratcheting tap and die wrench works very similar to a ratcheting socket wrench. The logic behind this setup is so that you do not have to any tiring hand-over-hand clockwise cutting.
How to Use a Tap and Die Set
The first step in properly using a tap and die set is to choose the appropriate one. In addition to knowing the tools that come in a set, you also want to select one that is made of strong materials as they will be exposed to a lot of impacts and pressure. Sets made of soft materials such as aluminum are intended to be used with wood, and will not be suitable for cutting threads into metal.
Tap and die sets that are, instead, made of moderately hard materials such as alloy steel can work for most metals, but will struggle to cut into materials like stainless steel. As always, the stronger the better. Choose sets that are made of impact-resistant, harder metals like high-speed steel (HSS), carbon steel, cobalt, or titanium.
How to Use a Tap
The tap’s purpose is to cut or form the female threads into a variety of materials. To use a tap, start by selecting the appropriate drill size for the tap you intend to use. Most tap and die kits will come with a guide to aid you in this step and you can follow their charts to understand what is required. Once you’ve determined the correct drill size, follow these steps:
- Secure the material you intend to drill with clamps to prevent any movement while you’re making the thread cuts. This step is very important in order to achieve clean cuts and threads that work efficiently. Use either a clamp or a vice to hold your material in place.
- Select the proper bit size that corresponds to the hole size. It’s essential to start with drilling the hole before you start the tap process to cut the threads. Once you determine the bit size, fasten it tightly into your drill.
- Begin drilling slowly at first. If you are working with exceptionally hard materials such as steel or cast iron, you may want to use cutting oil to help ease the heat of friction. For best results, take your time and drill slowly.
- Once the hole is cleared, insert the tap into your ratchet. Then, place the tap into the hole and start slowly turning it clockwise. Continue turning until the tap has made a few threads.
- In order to achieve the cleanest cuts, make two turns clockwise, then back the tap out by a half-track the tap a half turn. This method helps prevent any broken material or small particles from damaging new threads as you proceed.
- Once you’ve finished tapping, turn the ratchet counter-clockwise to remove.
Make sure that the material you are cutting is flat, stable, and centered at all times with the tap level.
How to Use a Die
Die’s, on the other hand, are used to cut and form the male portion of the mating pair. Start by choosing the correct sized die for your particular project. This should be relatively easy to determine, so long as the dies are arranged in the correct order in your set. Simply select the one that looks the most suitable, and check if it fits. If not, adjust accordingly. Then, follow these steps to create the threads:
- Securely fasten the material you intend on cutting using a vice or clamps. It should be secured to prevent any possible movement during the process.
- Prepare the material by filing the end so that it is clean and square. Then, apply cutting oil as needed.
- Position the die, centered over the material. Turn the wrench clockwise and follow the same method as you did for the tap: two full turns and a half turn backward.
- Continue these steps until you’ve threaded the entire length of the material.
To finish, remove the die wrench from the material and brush away any debris. Using a tap and die set can save you a lot of time and money, making your own repairs at home. Though it may sound intimidating initially, it is a skill that can be easily learned with a little bit of determination and patience.

Jessica considers herself a home improvement and design enthusiast. She grew up surrounded by constant home improvement projects and owes most of what she knows to helping her dad renovate her childhood home. Being a Los Angeles resident, Jessica spends a lot of her time looking for her next DIY project and sharing her love for home design.
More by Jessica Stone


![Finishing Basement Without Permit [Is It Really Illegal?]](https://cdn-fastly.upgradedhome.com/media/2023/07/31/9070078/finishing-basement-without-permit-is-it-really-illegal.jpg?size=350x220)