


How To Tighten The Belt On A Troy-Bilt Riding Mower

Troy-Bilt mowers are excellent machines. There are times when you may have to do a bit of maintenance, though. Changing the spark plug, air filter, oil, and gasoline are essential to the running of your Troy-Bilt. However, you also need to know how to adjust your belt on the mower.
To tighten your Troy-Bilt riding mower, you will first need to ensure you have the correct tools. Once you have the right tools, you will need to remove the deck cover and blades in order to expose the belt. Then, you can adjust the belt as needed before reinstalling the blades and deck cover.
Tightening the belt on your Troy-Bilt mower may be one of the easiest maintenance jobs you can do. But you have to do it right. You will only need a few common tools and a little time to do this simple repair job. We have made it easy by listing the steps in order for you to follow.
Do You Need a Mower Repair Service?
Get free, zero-commitment quotes from pro contractors near you.

Tightening The Belt For Your Troy-Bilt Mower
Before you begin, make sure you have the necessary tools:
- Screwdriver
- Set of pliers
- Socket wrench
- Large plastic sheet
- Set of gloves
Ensuring you have the proper tools beforehand will save time in the long run. Also, it’ll make the job a lot easier for you.
Step 1: Find An Area To Work
It would help if you had an area that is flat and free of debris and other large objects. If you have an outdoor patio area or a nice flat space of lawn, this is the perfect place to work on your mower.
Step 2: Prepare Your Mower
Turn the mower off completely and disconnect the spark plug wire. Make sure you remove the spark plug to keep you lawnmower from accidentally starting. You will then need to empty the gas tank and check to make sure that the oil dipstick is tight. This will help keep your mower from leaking oil while you’re working on it.
Step 3: Remove The Deck Cover
The belt is under the deck cover and the blades, so you’ll have to start by removing the cover. Locate the frame of your lawnmower and loosen up the clamp bolts with your wrench. If the wrench doesn’t work, you can use the pliers. Remove the cover and make sure that you don’t press or pull too hard, so you don’t bend the cover.
Step 4: Remove Your Blades
Remove the screw that’s near the back tire so that you can access the blade. Then, find the retention bolt in the center of the blade. Use the wrench to unfasten it and pull the blade off.
Step 5: Access The Belt
You can see the belt now, but you need to access it. Unfasten the screws that hold your engine baffle to remove it. Now you can access the screws that fasten your belt cover onto the deck. Remove these screws and then proceed by removing the spring between the belt cover and transmission pulley.
Step 6: Adjust The Belt
The belt is the black rubber piece that connects the drive wheels and the engine. You will need to manipulate the engine pulleys and the transmission. Keep an eye out for the cap screw that is located in the center of the pulley and loosen it. Now, pull the belt as tight as you need it to be. Now, you will need to replace the screw.
Step 7: Reinstall And Test
Now, you can reinstall everything and make sure your mower is working correctly!
Other Problems
Of course, your Troy-Bilt Mower may be experiencing other problems. If tightening the belt didn’t fix the issue then there may be several other problems with your mower. Therefore, here are just a few more common problems, as well as the steps to fix them.
Rod Not Engaging Properly
Get Your Tools Ready
All you should need is a wrench and some pliers, but you may need to remove any gas from the tank to be extra safe. So, grab a siphon and a container to collect the fuel too. It is also a good idea to have some gloves and a few rags to clean up any spills.
Step 1: Safety First
The first thing to do is to park it on a flat surface. Activate the parking brake and remove the key from the ignition. Some experts tell you to disconnect the battery while others say it is best to unhook your spark plug wire. The best thing to do is whichever one makes you the most comfortable. Or you can go ahead and do both.
Step 2: Engage The Blade
The parking lever, also called the power take off (PTO) lever, is the lever that engages the blade. It is just to the right of the driver’s seat by the fender. Move it all the way forward into the drive position.
Step 3: Check The Blade Engagement Rod
You will need to lift the mower deck to the highest position. The lever to lift the deck is next to the parking lever. Make sure the rod to the blade engagement shifts away from the parking bracket while it is in the highest position.
Step 4: Check Other Positions
Move the parking lever until it is in the off position. Make sure that the protrusions touch the parking bracket in this position. If either one of these settings is not right, you will have to adjust the rod.
Step 5: Adjusting The Blade Engagement Rod
Put the parking lever in the off position and put the deck as low as it will go. Loosen the nut holding the rod in position. Move the other end of the rod forward until it connects with the adjustment slot. Tighten the nut while holding the rod in place.
Step 6: Check The Adjustment
Repeat steps three and four to make sure the adjustment is correct. If the rod is still not engaging properly, try adjusting it again. If it engages, you are ready to move onto the next step.
Step 7: Finish Up
If you removed the spark plug wire, lift the mower deck back to the mowing position again and hook the spark plug back up. If you unhooked the battery, go ahead and hook that back up too.
Changing The Spark Plug
While you are at it, why not go ahead and replace that spark plug? A new plug can never hurt the performance of the mower and you should do it once a year anyway. The steps for this are pretty easy too.
Step 1: Get The Correct Spark Plug
Make sure you have the exact right spark plug before starting this job. There are so many spark plugs that look alike so you need to know the right part number before getting the plug.
Step 2: Get The Right Tools For The Job
To change the spark plug, you will need a spark plug wrench and a gapping tool or feeler gauge. You may also need some brake cleaner to clean the old plug so you can check it for signs of engine trouble.
Step 3: Remove The Old Spark Plug
Unhook the spark plug wire. Use the spark plug wrench to loosen the plug by turning it counterclockwise. Clean the end of the plug that was inside the motor with brake fluid and take a look at the tip.
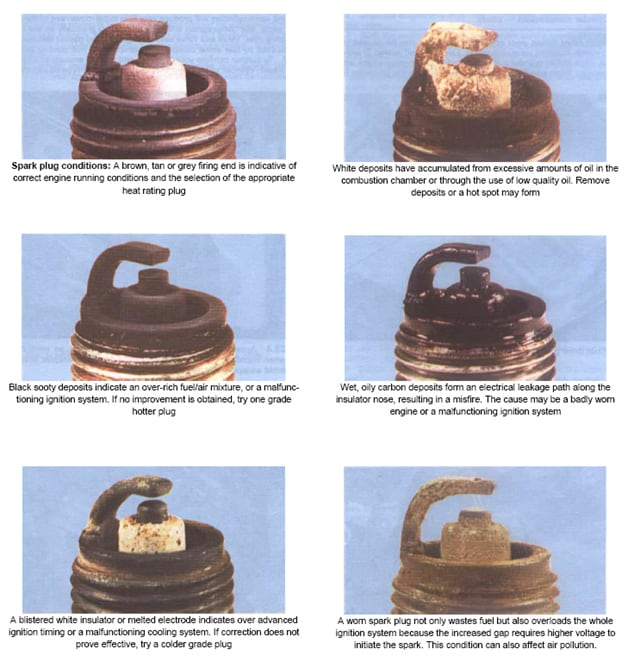
Step 4: Check Tor Signs Of Engine Trouble
- There are several types of damage to the tip that can give you an idea if there is anything wrong with your motor. Some of these include:
- White deposits on the tip may mean you need to change the oil
- Black soot on the tip can indicate a malfunctioning ignition
- Having an oily tip could mean a worn engine or ignition system
- Blistered white insulators may be a sign of a malfunctioning cooling system or bad engine timing
Step 5: Setting The Gap
Check for the correct gap in your owner’s manual. If you don’t have a manual, you can find it online. Use the gap tool or feeler gauge to set the right gap on your new plug.
Step 6: Installing The Plug
Put the new plug into the cylinder head by hand. Do not force it. Make sure you do not cross the threads. If you feel any resistance, remove it and start again. Tighten it hand tight.
Step 7: Hooking It Back Up
Use the spark plug wrench to tighten up the plug. You can make sure it is tight but do not over-tighten it. Replace the spark plug wire to the plug and you are good to go.
You Might As Well Check The Air Filter
Since you are already in there, go ahead and check the air filter to see if it is dirty or clogged.
- Disconnect the spark plug again
- Remove the wing nuts from the air filter assembly
- Take the whole assembly off and remove the foam part
- Wash the foam in mild detergent and water and let it dry
- Put a few drops of engine oil on the foam and then squeeze it out
- Replace the foam and paper elements to the assembly
- Tighten the wing nuts
- Reconnect the spark plug wire
Checking The Oil
If your mower is still not running properly, check the condition of your oil. Take a look at the consistency and color of the oil. If it is black, change it. If the level is low, add some oil. Make sure it is the correct type and weight. Your owner’s manual or Google can tell you the right one to use.
Maybe Your Mower Has Bad Gas
If your lawnmower is still acting strange, change the gas. Fuel can go bad in as little as a month. Dump the fuel into a container you can seal and dispose of properly. Add fresh gas and some fuel additive to help get your motor going. These additives clean deposits and gum out of the motor.
Do You Need a Mower Repair Service?
Get free, zero-commitment quotes from pro contractors near you.
If Your Mower Still Does Not Run Properly
If you still have trouble with your Troy-Bilt riding lawnmower, you will need to take it in to get serviced. It could be something simple that can be repaired easily and be relatively inexpensive.
Or, it could be something major that will cost more than replacing the mower. If your mower is old and you have gotten over 500 hours on it, you may just want to think about getting a new one.
Related Guides

I am a DIYer who loves writing about anything home-related. When I am not writing, you can find me studying for my PhD in Psychology, photographing nature, and swimming at the lake with my grandkids.
More by Patricia Oelze


![How To Reset A Whirlpool Cabrio Washer [In 5 Easy Steps!]](https://cdn-fastly.upgradedhome.com/media/2023/07/31/9076531/how-to-reset-a-whirlpool-cabrio-washer-in-5-easy-steps.jpg?size=350x220)


