How To Test A Dryer Heating Element (Step-by-Step Guide)

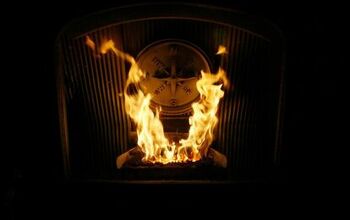
One of the significant parts of a dryer is the heating element. Without this element, your dryer will eventually stop running altogether. So, when your clothes come out halfway dry after an hour-long cycle, you may want to take the time to check this component just in case.
To diagnose a heating element problem, you’ll need essential tools such as a flat head and Philips screwdriver, as well as a multimeter. Always remember to unplug your dryer from the outlet before examining your dryer’s inner workings, or else you could suffer from a severe electrical shock.
This article will describe the process of checking your dryer’s heating element. Just as well, we’ll explain how the multimeter works to check your heating element so you can better understand the goals of this project.
Do You Need Appliance Repair Services?
Get free, zero-commitment quotes from pro contractors near you.

Is Something Wrong With Your Heating Element?
When we come to rely on a dryer as a tool we use every day, and suddenly refuses to perform as we expect it to, it can turn into a major inconvenience. It’s always better to call a qualified person when dealing with a faulty appliance, but there are a few easy ways you can check the heating element inside your dryer yourself.
A multimeter can be used to inspect the heating coils and thermostats of an electric dryer. The same tool can be employed with a gas dryer to assess the igniter, thermal fuse, and radiant sensor. Should any tests reveal that one or more elements are broken, you could have a go at installing new parts. You’ll most likely be ready to try anything to get your dryer back in operation!
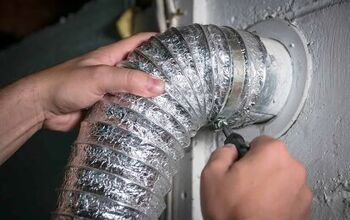
Examining An Electric Dryer
It’s essential to disconnect your dryer from the electricity supply before carrying out any tests. You’ll find a thick wire connected to the wall socket at the back of the unit. Unplug this so that, as you’re checking the various parts of the dryer, you won’t get a shock.
Note that the sockets of laundry appliances are not the same shape as traditional sockets. As an additional precaution, turn off the circuit breaker.
Instructions
- Take off the heating coil panel. Using a screwdriver, take off the heating coil panel. Again, with a screwdriver, take off every screw lining the coil panel’s side, which resembles a metal box.
- Locate the heating element. The heating element can be located at the rear of the dryer, level with the unit’s right side. Detach the two screws that connect the heating element to the dryer and let the panel glide out. After doing this, you should see three red wires, or leads, which are typically connected to the bottom of this panel on the left-hand side.
- Connect the probes. Connect the multimeter probes (which are black and red) to the leads on the heating coils. Set the multimeter at 200 ohms of resistance.
- Test the continuity of your element. This is the most accurate method of testing continuity in an electric dryer: First, take the metallic ends of the multimeter leads and press them on top of the two leads located on the top of the heating coil. Observe the multimeter screen—if it produces a numerical display, this signifies that your leads are working, and there’s no need to replace them.
Additional Tips
If you are not sure about where specific parts are located, refer to the manufacturer’s guidelines for your particular model. Suppose you don’t have a hard copy of the user guide, look online for a digital copy.
If you discover any breaks in the wires of the heating coils, you can reconnect them with a nut, bolt, and two metal washers. Press the damaged ends of the broken wire together, then squeeze them tightly between 2 metal washers. After this, place a push a small, round screw through the hole in the washers and fasten it tightly with a bolt.
Check Your Thermostat
Check the thermostat to determine whether it is giving an accurate reading. Since you’re in this area, and you have the multimeter, you might as well check the thermostat while you’re at it!
Instructions
- Locate the thermostat. To locate the thermostat, take off the back panel of the dryer. Typically exterior dryer panels can be unscrewed with a flathead screwdriver or electric drill attachment. The thermostat resembles a pronged, round piece of metal, with a rectangle in the middle.
- Disconnect any wires or leads connected to the thermostat. You can do this by pulling firmly.
- Use your multimeter. Put your multimeter on the lowest ohms setting. Let the black and red probes touch the ends of the prongs. If the multimeter reading shows as 0, this indicates that you need to replace the thermostat.
- Put the unit back together. Once you have fixed any damage to the heating coils or installed a replacement thermostat, put the unit back together by performing the steps you’ve already taken, in reverse. Ensure all screws are fastened tightly. Finish reconnecting the electric cable and switching the circuit breaker back on.
There you are- and it’s time to deal with all the drying that’s been mounting up!
Additional Tips
- On occasions, the problem can be something as simple as a damaged or defective power cable. If you can’t seem to find a problem elsewhere, buy a replacement and see if that does the trick. You’ll find them at every DIY and hardware store, as well as online retailers.
- If you don’t feel confident in carrying out any part of these processes, you have two options. Either contact the manufacturer’s support team for advice or call a local technician specializing in dryer repairs.
- While a multimeter is useful, it is quite an expensive tool if you’re not going to need it often. A more economical option to consider buying is a continuity test. Although not as sophisticated as a multimeter, this probe uses the same technology and can be purchased at a much lower price.
Cost To Replace A Heating Element
Cost To Replace Heating Element | |
Brand | Price |
GE | $15 – $40 |
Maytag | $40 |
Samsung | $20 – $120 |
LG | $45 – $50 |
Whirlpool | $40 |
Kenmore | $20 – $45 |
The cost to replace a heating element depends on the brand of dryer that you have. The price for this component will range between $15 and $120. However, this does not include the cost of hiring a professional.
If you decide to hire someone to do this job, you are looking at paying anywhere from $45 to $200 per hour. However, some professionals will charge you a flat rate. It’s much more budget-friendly to purchase the part and do the labor yourself.
Related Questions
Do You Need Appliance Repair Services?
Get free, zero-commitment quotes from pro contractors near you.
Wrapping It Up

Heather is a passionate writer who loves anything DIY. Growing up, she learned everything from home repairs to design, and wants to share her tips with you. When she's not writing, she's usually hiking or searching for her next DIY project.
More by Heather Robbins