How To Solder A Copper Pipe With Water In It

Plastic pipes are more prone to cracking up; thus, copper-based tubes are the go-to pipes for plumbing applications owing to their ability to withstand corrosion.
Despite the positive qualities, it is not uncommon for these pipes to develop a leak or two, and remedying the situation is not exactly straight forward either, as you are attempting to solder a copper pipe with water in it.
That said, it’s doable, and here is how you go about it: Along with the standard stuff, i.e., fuel, torches, gloves, safety goggles, tube cutters, flux, wire brushes, sandpaper, etc. use a pipe plug, and turn off the water supply. Also, use a rag to protect joints, and a sizeable torch to produce adequate heat.
Read on to know everything to do with copper pipes and how to solder them efficiently.
Do You Need to Hire a Plumber?
Get free, zero-commitment quotes from pro contractors near you.

Properties And Application Of Copper Pipes
Copper pipes are high in demand because of their versatility – they are known to be excellent thermal conductors – and their corrosion-resistant properties make them last a long time with little to no maintenance.
There are two types of copper pipes:
- ACR – air conditioning/refrigeration tubes
- Plumbing tubes
In both categories, you get annealed tempers and drawn tempers, where the latter is for hard applications, and the former is for soft.
Plus, they come in various thicknesses and diameters, starting from 1/8 of an inch up to 12 inches. This makes them an ideal pick for a variety of applications, which include, but are not limited to:
- Water distribution systems
- Heating systems
- Chilled water mains
- Underground water and gas services
- Drainage and vent systems
- Non-flammable medical-gas systems
- Fuel-oil systems
- Oxygen systems, etc.
Simply put, you can use them for all sorts of liquid and gas applications that work on low or high pressures.
The Problem At Hand
The availability of water within the pipe makes it hard to solder joints because the torch steams the water, which in turn diminishes the heat’s intensity to a level that is not adequate for sweating copper.
How To Solder Copper Pipe With Water In It
Sure it’s a tedious task, but with the right set of tools, equipment, and techniques, you can be great at it. However, you cannot wing the process. Follow the below-mentioned techniques to solder without damaging the piping.
But before you begin, make sure the following items are at arm’s length:
- Artificial or regular water plugs
- Propane torch
- Wire brush
- Sandpaper
- Amery cloth
- Tinning or paste flux
- Damp rag
- Tube cutter
- And other essential items!
Now let’s begin:
Step 1: Copper Cutting
Use a tube cutter to cut the copper pipe. Mount the cutting wheel on the line, tighten it, and then rotate it. You have to repeat this step at least eight times until the tube falls off.
The good thing is that copper is not that hard to cut; a tube cutter capable of cutting up an inch of pipes is perfect for standard water supply lines. However, if you need to cut pipes with a larger circumference, use a hacksaw.
Maintain caution while using the tube cutter – tighten and rotate at a slow, steady pace – because faster speeds may lead to a dented copper pipe.
For your information, here is a step by step guide on how to cut copper pipe with a Dremel.
Step 2: Remove Burrs
You may have executed step 1 without a problem, but you still need to go a step further and remove the left-behind burrs. These are the hardly-noticeable inward-facing ridges created by the tube cutter’s wheel.
Take care of these on the spot to avoid any water flow issues.
Wire brushes can be used to deburr; this has to be done very carefully. You have to be gentle with the process, otherwise, there is a chance you can significantly reduce the inner diameter of the pipe.
Step 3: Clean The Outside
Apart from cleaning the inside – to have leak-proof joints -it would be best to clean all portions that could be affected during the process of soldering.
Use an emery cloth or sandpaper to clean the outer surfaces. This has to be done, even if the pipe is a recent purchase. The reason behind this is to enhance the solder’s adhesiveness, so it sticks well to the copper pipe.
Step 4: Apply Water Plugs
The Soldering process needs to be carried out when the pipe is dry; therefore, you have to stop the water flow temporarily. You can buy a pipe plug off the market or create your own dampener. You can also DIY the plug using paste-like materials such as chewing gums, wax capsules, or even bread.
Push the material into the pipe by using a pen or pencil, and make sure that it doesn’t enter the pipe’s valves. Ideally, it would be best to close the water supply before beginning to avoid pressure buildups.
The best part is that these home-made plugs are lightweight, therefore easy to flush — once soldered, reinstate the water flow, and the pressure will divert them to the drain.
On the other hand, store-bought plugs are easy to apply, thanks to the provided applicator tubes. A plug that can restrict water to ½-inch or to 3/4-inch of the pipe is good enough for home-based applications.
Once the copper has sweat, place the propane torch right under the plug to dissolve it.
Step 5: Use A Wet Cloth
A damp cloth plays two roles: it absorbs heat and protects against flames. Simply get a cloth nice and wet, and wrap it on to the pipe connectors.
Since they absorb excessive heat and keep the temperature in check, the solder won’t melt or damage the pipe.
Step 6: Flux It Up
Once all the preparatory steps have been carried out, now comes the time to layer the copper pipe and fittings with soldering paste, aka flux.
Apply it liberally and spread it around so that no surface involved in the soldering process is left unattended. Due to the material, the flowing water passage becomes smooth, and all current and potential leaks are treated. Ensure that the applied solder is lead-free. Lead contamination is dangerous and can lead to lead poisoning.
For instance, if a solder wire product has a 50/50 ratio, it is not lead-free, and hence, is dangerous. Another reason for applying flux is that it helps in preventing corrosion of filler material and base metal.
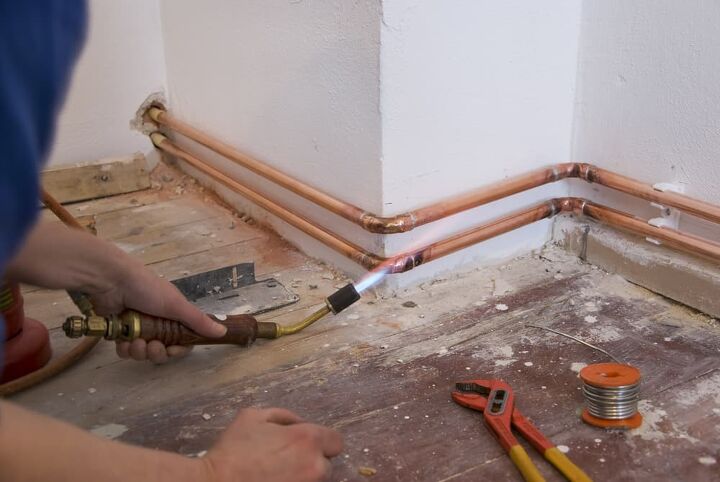
Pipe Sweating
The Type Of Used Torch
A pencil torch coupled with igniters is a good pick for copper pipes of½-inch, or even 3/4-inch. When operating the torch, make sure that you are not soldering at very high temperatures as that may lead to a severed flux and, subsequently, a damaged copper pipe.
Plus, if not handled with care, chances of you causing a fire are high.
Acceptable Temperatures
The bigger the pipe, the more heat it requires for efficient soldering. That said, keep a check on the wattage, as it helps to indicate the temperature of the soldering iron.
A 40-watt device can produce a minimum of 800 degrees Fahrenheit of heat; thus, a 15-watt one can easily provide 550 degrees Fahrenheit of heat. Heat output signifies how quickly the temperature can make it to the tip of the iron.
Ideally, a 750-degrees Fahrenheit to 800-degrees Fahrenheit of soldering temperature will lead to promising results. You can get the job done at lesser temperatures; however, it may take longer.
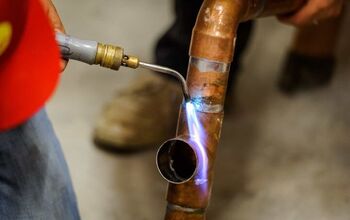
Soldering
It’s time to apply heat to the flux:
Start by applying it for five seconds. To have a uniform heat spread, torch up the opposite side for five seconds as well. To test whether the required temperature has been reached, place the solder wire on top of the pipe. If it melts, the temperature has gone to its optimal point.
While the copper pipe is hot, apply a bit of solder to the exposed joints, and with the help of the damp rag, wipe away any left-behind flux.
Step 6: Testing For Leaks
Lastly, you need to check to see if your hard work paid off. If any leaks remain, put some lead-free flux, and reapply some heat. Keep repeating this till you are sure no leaks are left-behind.
Once the pipes have cooled down, turn the water back on to ensure that your copper pipe plumbing is entirely leak-proof. If you have store-bought plugs in-place, apply some heat to dissolve them, whereas home-made plugs will be washed away with the water pressure.
Check out this piece to know how to re-solder a copper pipe joint without removing it.
Do You Need to Hire a Plumber?
Get free, zero-commitment quotes from pro contractors near you.
Related Questions
Can I Solder Over An Old Soldering?
Yes, you can, by heating up the old solder. Keep the torch near it, and have an even spread of heat. When you notice that the solder has started to melt, with the help of channel locks, pull apart the fittings.Next, use a wet cloth, and remove all the left-behind old solder. Once satisfied, begin the process of reapplying new solder, starting with cleaning, then adding the flux, and finally torching it up.
Can You Overheat Copper Pipe When Soldering?
If you raise the temperature beyond acceptable levels, the copper pipe will significantly heat up. This will damage the flux and render it unusable. Overall, too much heat can lead to your copper pipes being damaged and the flux dissolving.
How Do You Store Solder?
If you want to stow away your solder for an extended period, it would be best to keep it refrigerated at temperatures ranging between 32 degrees Fahrenheit and 50 degrees Fahrenheit.An ideal storing place would be in a cold room or a fridge.
Ian Haynes is a digital marketing specialist and has successfully written hundreds of home improvement guides. Outside of his work, Ian likes fixing old bikes and exploring Brooklyn with his Labrador.
More by Ian Haynes