How To Remove The Drum From A Samsung Top Loader Washing Machine
When your top-loading washing machine breaks down, it can feel like a major hassle. And that is because you will oftentimes need to remove other components before you can get to the one causing the problems.
Samsung makes a pretty reliable line of washing machines but even those are not immune to issues. When it comes time to take out the drum, there are a few things to be done. You’ll have to take out the agitator, the splash guard, and the locknut at the center of the drum, among other things. This guide will show you the necessary steps towards removing the drum of your Samsung top loader washing machine so that you can get to other components.
Do You Need Appliance Installation or Replacement?
Get free, zero-commitment quotes from pro contractors near you.

Removing the Drum from a Samsung Top Loader Washing Machine
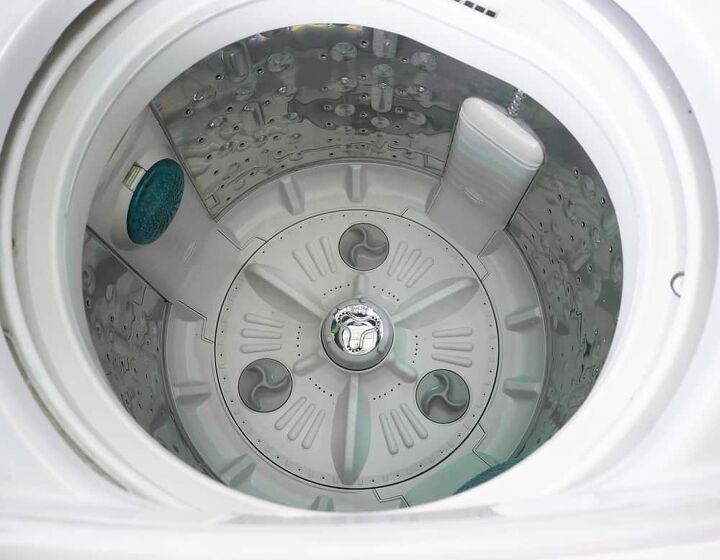
Step 1: Remove the Agitator
In just about any top loader washing machine, there is a component known as the agitator. This is the piece that is located right in the middle of your washing machine’s drum. Most agitators should come topped with some kind of softener dispenser or lid.
Take the softener dispenser or lid off and you should see a seal and a stud. Use a socket wrench (you’ll probably need an extension) to remove the stud and then the seal right afterwards. The agitator should lift out easily. If it doesn’t, make sure that the stud has been subsequently loosened (you probably won’t be able to take the seal off without it).
Step 2: Remove the Splash Guard
This can depend on the model of your Samsung washer, but there is generally a splash guard that rests right at the edge of the drum. The splash guard usually looks like a large ring. If you are having trouble locating it, check the user manual on your machine.
You will need to take the splash guard off before moving on to the next step. You can remove it by opening up the tabs. Depending on your model, those tabs could be metal clips. If they are metal clips, you will have to pry them off using a screwdriver. Do so gently so as to not break the clips. If you break the clips, you will need to replace the splash guard.
Step 3: Remove the Locknut
For this step, you will want to wear proper safety equipment like gloves and goggles. The goal is to take out the locknut that is in the center column of your drum. Remember, the center is where the agitator would normally sit.
You will need a hammer and either a spanner wrench or drift punch to successfully remove the locknut. Also, take the utmost care to not hit the side of the drum using your hammer. Hitting the drum can potentially damage it. You should be able to lift the center column out when the locknut has been removed.
Step 4: Remove the Drain and Water-Level Hose
There are two components that will require removal here: the water-level air hose and the drain hose. You will have to unclamp them first in order to properly remove them. The drain hose is quite thick and will run to the side of the drum, attaching to the bottom of the washer.
The water-level air hose, meanwhile, is much thinner than the drain hose. This hose will attach to either side of the drum. Both should be unclamped carefully while removing. Damage to either hose means needing to replace one or both before putting everything back together.
Step 5: Remove the Springs
While it is a good idea to keep your safety goggles on throughout, this step in particular requires them. The goal is to take out the springs that are at the bottom of the drum. Springs have been known to launch themselves when pressure is relieved; don’t catch on in the eye by surprise.
Use a locking wrench to loosen the springs. You can then unscrew the spring brackets as well. This should unscrew the drum from the brackets and, thus, the frame of the washing machine.
Step 6: Lift the Metal Drive Block
The final step is to lift the metal drive block completely away from the agitator shaft (where the agitator would sit on top of the center column). If the metal drive block is stuck and won’t move, typically due to rust, there is a solution.
Using heat from a propane torch, you can loosen the drum and then tap upward gently using a hammer. Don’t just pull on the drum; rock it side to side to eventually jimmy it loose. This step will take time and patience if the drum is rusted and doesn’t move quite like it should.
Cleaning A Samsung Top Loader Washing Machine
How Do I Clean a Washing Drum in Automatic Mode on a Samsung Washing Machine?
Depending on your model of Samsung washing machine, there may be a couple of ways that you can perform cleaning in automatic mode. This will help prevent the buildup of debris or rust in the drum, facilitating the need for further repair.
Using Cleaner Course/Eco Tub Clean
Again, this depends entirely on your model of Samsung washing machine. Some of them come with a feature known as either eco tub clean, washing tub clean course, eco drum clean course, or clean tub. To use this option, there are a few steps to follow.
- Press power. Power on the washing machine. Can’t do anything if it isn’t on. Select the cleaning course available on your machine. Again, it could be any one of those names so look for one of them on your display panel.
- Add detergent if needed. If you aren’t familiar with the cleaning courses on your washing machine, consult the manual first. Some require detergent, others don’t. If you are supposed to add detergent here, add it.
- Push start/pause. Start the cycle. How long the cleaning takes depends on your machine. When you push the start/pause button, it should launch the cleaning cycle.
If Your Machine Doesn’t Have Cleaning Courses
Of course, there is the chance that your washing machine doesn’t have the aforementioned cleaning courses. Don’t worry, there is still a way to perform a drum washing on your Samsung machine. Just follow these steps:
- Turn on the power. Power makes things go, after all. Then, press the manual button one time and select the soaking option.
- Select the highest water level. You will need to select the highest available water level. This can be done by using the water height selection button on the display panel.
- Add detergent (if needed). Check your manual if you aren’t sure whether or not to add detergent. If you do, this is where you add the detergent into the washing tub. Then, press start/pause and let it go to work.
It is a good idea to run these cleaning courses every once in a while to keep your drum clean and healthy. Grime, gunk, debris, and rust can build up on the drum, making it stick and work inefficiently. Run this cleaning course to keep it working optimally for a long time to come.
Do You Need Appliance Installation or Replacement?
Get free, zero-commitment quotes from pro contractors near you.
What Does the Drum Even Do?
Your washing machine has a lot of moving components to it. Many of them have names that seem confusing and you can be left wondering just what each of them are and what they do. The drum is one of those components.
The evolution of washers. Drums have changed a lot over time. Initially, they were vertical only. But now, they can also sit horizontally. Washing machines that have a vertical drum are traditional top-loading washers. These models have the aforementioned agitator, which is finned and sits in the middle of the drum to move the clothes through the force of the water.
Impellers vs agitators. Some washing machines make use of an impeller instead of an agitator. The impeller rotates the hub at the base of the drum, creating turbulence during the washing process. The impeller is meant to move your clothes through the water a bit more gently than the agitator does, preserving your clothing.
The role of the drum. The drum is simply meant to hold your clothing and spin it. It works in tandem with the agitator or impeller to create turbulence in the water that disrupts the dirt from clothing. These parts need to all work together in tandem to do an effective job.
Related Guides

Ryan Womeldorf has more than a decade of experience writing. He loves to blog about construction, plumbing, and other home topics. Ryan also loves hockey and a lifelong Buffalo sports fan.
More by Ryan Womeldorf