


How To Remove Silicone Caulk From Fiberglass Shower Stall

Bathroom maintenance can be a chore. Due to their susceptibility to water, bathrooms attract bacteria like a moth to a flame. Moisture can accumulate in the nooks and corners of tiles, bathtubs, and cubicles of your bathroom and attract mildew spores, dirt, and soap.
The unsightly and smelly mildew can become a real nuisance. A common site for mildew growth is the silicone caulking around your bathtub or shower stalls. However, there are several ways you can remove silicone caulk, using heat, using scraping tools, or using chemicals.
To remove silicon caulk from a fiberglass shower stall, begin by thoroughly cleaning the surface of the shower. Next, use a putty knife to gently scrape and loosen the caulk. Use a hairdryer on low heat for 30-40 seconds on the caulking area. Use pliers to pull off the caulk. Repeat as needed.
Silicone caulk is a sticky gel-like substance used to fill the gaps along with two connected fixtures. It is routinely used to seal doors and windows. In bathrooms, it is used to fill the gap between the tiles and the bathtub or shower cubicle. Since it is used to fill gaps, it is especially sticky, so removing it can be difficult.
Do You Need Handyman Services?
Get free, zero-commitment quotes from pro contractors near you.

Removing Silicone Caulking Using Heat
Caulk removers can be expensive. Or you may be allergic to chemicals. If you fall into that category, don’t worry. We’ve got an easy fix for you to remove the caulk that doesn’t involve bleach or caulk removers.
All you need is:
- A heat gun or a hairdryer
- A putty knife
- Rubbing alcohol
- Needlenose pliers
- Dry rag
- Gloves
Steps to Remove Silicone Caulk with Heat
- Step 1: Before starting, wear gloves as a precautionary measure.
- Step 2: It is best to clean the surface thoroughly with soap to get rid of any residual oils, as these will contaminate the surface and may impede our decaulking process
- Step 3: Grab a putty knife and slide it under the caulking to bring it loose. Be careful not to apply force to avoid damaging the fiberglass surface.
- Step 4: Plug the hairdryer in and keep it set to a lower heat. Too much heat can damage the fiberglass and possibly melt it. Keep it at 200-250 degrees and do not exceed that limit.
- Step 5: Direct the hairdryer on the caulk and keep it there for 30-40 seconds. Aim the dryer directly against the bead of the caulking you want to remove. Wave it around 3-4 inches of the bend to make sure you heat all the caulking.
- Step 6: Within a minute, the heat from the hairdryer will have partially melted the caulk, causing it to become loose.
- Step 7: If the caulking doesn’t seem to be melting, turn the heat on a bit higher and redirect it onto the bead.
- Step 8: Using your needlenose pliers, grab onto the loose end of the caulking with them and proceed to peel the caulk back. Try not to tug or twist the caulking, or you’ll break the strand and end up with pieces of caulking stuck to the surface.
- Step 9: Vacuum away any remnants on the floor and use a dry rag to clean the surface of the fiberglass.
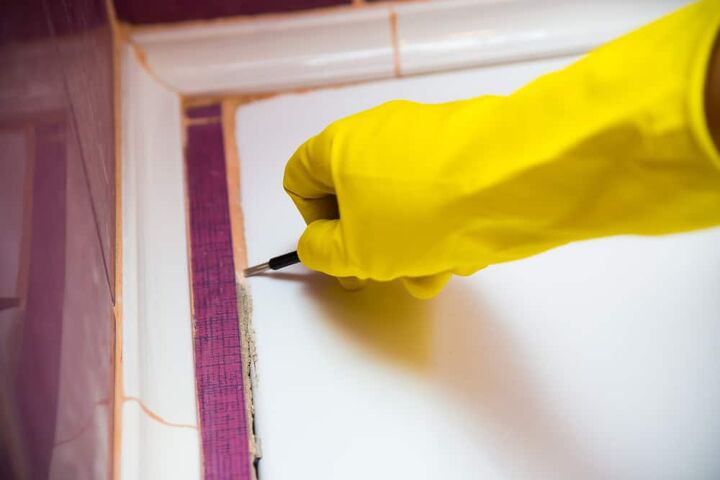
Removing Silicone Caulk Using A Scraper
If you don’t have a hairdryer or heat gun, we’ve got another fix for you.
All you will need is:
- Caulk remover tool (preferred) or a utility knife
- Gloves
- Needlenose pliers
- Rubbing alcohol
- Dry rag
- Putty knife
A good tool you can use for scraping is the Homac caulk removal tool. It comes with an angled tip to prevent any scratching.
Scraping The Caulking Off From Your Fiberglass Shower Stall
- Step 1: Before starting, ensure safety by wearing gloves.
- Step 2: Grab your utility knife, hold it at a 45-degree angle, and begin scraping along the length of the bead of the caulking. If you have a caulk removal tool, use that instead of the knife. It’s specifically designed for this task, and you don’t have to worry about damaging your fiberglass surface.
- Step 3: Be careful not to use excessive force; drag your knife lightly along the surface of the entire bead. If you jab it in the bead too hard, you may damage your fiberglass and end up with a scratched surface.
For safety reasons, it’s best not to use a loose razor blade. A utility knife will offer you precision.
- Step 4: Chances are that you still have a few individual pieces of caulk stuck to the surface. Grab a putty knife and wedge under your caulk. Move it around gently in short strokes and scrape off any remaining bits of caulking that are still stuck there.
- Step 5: Alternatively, use rubbing alcohol to remove any residual caulk that is still left. Remember to keep any sources of ignition away as the alcohol is flammable. Dab some alcohol on a rag and rub the surface with it.
- Step 6: Vacuum away the pieces of caulking and use a dry rag to clean the surface
Removing Silicone Caulk Using Chemicals
If heat or scraping does not work for you, it’s best to use this method.
All you need is:
- Caulk remover (mineral spirits or lacquer thinner)
- Utility knife or painter’s tool
- Bleach
- Gloves
- Toothbrush
- Abrasive pad
- Rubbing alcohol
Here’s how you remove caulk using chemicals:
- Step 1: Wear gloves before starting this job. As you are dealing with chemicals, it’s essential to wear gloves. Mineral spirits and thinner can irritate the skin.
- Step 2: Take a sponge or an abrasive rag and dab it into the caulk remover container. Apply it directly to the caulking. If there is mold growing on the caulking, use bleach instead of spirits.
- Step 3: Let the cleaner sit for 5-10 minutes, allowing it to eat away at the caulking.
- Step 4: If the caulking is particularly stubborn, dab with alcohol and let it sit overnight. Both spirits and bleach give off harmful fumes; thus, it would be best to open up the windows or find a better method for ventilation.
- Step 5: Scrub the surface gently with a putty knife, or your finger, to remove the loosened up caulk. It may take some time and effort to get all the loosened caulk off of the surface
- Step 6: Vacuum the pieces of caulk and clean the surface with a dry rag.
You can also use acetone to dissolve silicone caulking.
How to Remove Mold Residue
After decaulking the silicon, there is still a possibility of mildew spores being left behind. Cleaning them is necessary before reapplying caulk as they will grow again right away.
Here’s how to make sure you get rid of any mildew residue:
- Wash the decaulked surface with warm water.
- Mix 4 cups of bleach to a gallon of water.
- Apply this mixture on the surface and leave it for 5-10 minutes.
- Rinse it off with water and let it dry.
Learn how to paint over non-paintable caulk.
Mildew Proof Caulking
Most silicone caulks are designed to prevent mildew growth, with fungicides already added into the solution. But it is best to check the packaging before purchasing it. Check for terms like ‘mildew-proof’ and ‘for bath/shower’. Also, check how long the caulk can hold on against mildew.
Learn which kind of bathroom fixture finish is better and more durable.
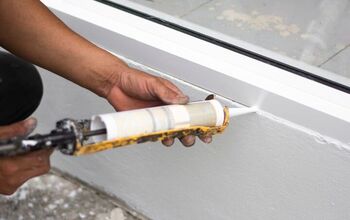
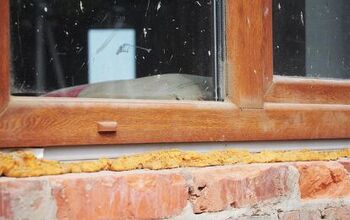
Reapplying Silicone Caulk
Before beginning the recaulking process, there are a couple of prerequisites:
Choose the right kind of caulk for your job. For dry areas, vinyl latex works best while for wet areas, silicone caulk is the best. We would suggest silicone or silicone latex caulks for all interior caulk jobs.
It is also important to buy the right kind of caulking gun for your job. Caulks are available in squeeze tubes or cartridges that are fitted into a caulking gun.
Once you have acquired both, locate where to begin recaulking and start:
- Paste painter’s tape on both sides of the caulking area to avoid getting on the wall or flooring. Use long straight pieces of tape and leave enough space between it for the caulk to seep in.
- Cut the nozzle of the caulk tube at a 45-degree angle using a knife and puncture the seal with a pin.
- Take the caulk gun and apply it to the surface, holding it at a 45-degree angle between the horizontal and perpendicular. Draw the tube along the length of the surface and let it seep in the gaps.
- Dab some rubbing alcohol or water on one end of a rag. Use the rag to press on the caulking and smooth the joint. Wipe away any excess caulking and press it evenly throughout the length of the surface.
Learn more about replacing a shower handle valve here.
Types Of Caulking
There are many variants of silicon caulking available. Here’s how to know what kind of caulking to choose:
- Use pure silicone caulking if you want a caulk job that will last you long. This kind of caulking is waterproof, flexible, and resistant to thermal expansion and rot. It will last you decades. However, it is more expensive and is difficult to paint over.
- Silicone latex/acrylic caulk is easier to apply and less expensive than pure silicon. It is, however, less resistant to moisture and thermal expansion and does not last so long.
Do You Need Handyman Services? Get free, zero-commitment quotes from pro contractors near you: FIND LOCAL CONTRACTORS.
Related Questions
Does WD 40 Remove Silicone Sealant?
WD-40 is a good choice for removing silicone sealant. Be sure to wipe off any WD-40 before reapplying silicone sealant as it is reactive to silicone. Several materials can be used to dissolve silicone caulking.
Can You Melt Silicone Back Together?
You cannot particularly glue silicon rubber back again, but you can bond silicone rubber to itself and other substrates.
Does Acetone Remove Silicone?
Yes, acetone can remove silicone caulking.
Ian Haynes is a digital marketing specialist and has successfully written hundreds of home improvement guides. Outside of his work, Ian likes fixing old bikes and exploring Brooklyn with his Labrador.
More by Ian Haynes


![The 10 Best Table Saws - [2022 Reviews & Buyer's Guide]](https://cdn-fastly.upgradedhome.com/media/2023/07/31/9070645/the-10-best-table-saws-2022-reviews-buyer-s-guide.jpg?size=350x220)


