


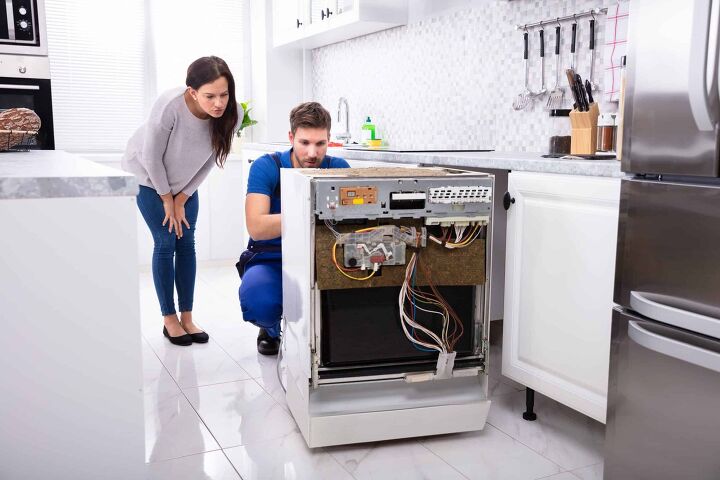
How To Remove A Hardwired Dishwasher
Having a dishwasher makes rigorous manual scrubbing a thing of the past. No wonder 80 million U.S. homes have dishwashers.
But like all things mechanical, these have a lifespan and need regular maintenance and upkeep to stay in working order. If repairs are required, the chances are that you’ll need to remove the dishwasher that’s hardwired into place.
Pulling it out requires a reasonable amount of strength. You’ll also need towels, a pair of gloves, and knowledge on how to remove the power cord and piping without damaging any of them. If done right, you will have your hardwired dishwasher removed in no time!
To help you out, we have defined when hardwired dishwasher removal is necessary and have provided a step-by-step guide for unmounting it.
But first, let’s quickly explore the differences in the wiring of hardwired and plugged-in dishwashers.
Do You Need Handyman Services?
Get free, zero-commitment quotes from pro contractors near you.

Hardwired Vs. Plugged-In Dishwashers
When working with a plug-in dishwasher, you have to use a three-prong outlet to connect the provided pigtail switch. But, this switch cannot be right behind the unit; instead, it needs to be within a cabinet next to it. Make a small incision on the cabinet to pass the cord, and then connect it to the outlet.
On the other hand, when it comes to hardwired dishwashers, the wires are connected right into the bay where the machine sits. The 12/2 cable should be reinforced with metal sheeting, and wire clamps should be used to prevent accidental disconnects.
Remember, you can move a hardwired dishwasher only as far as the wire’s length; any more and you will break the connection.
The Similarities
No matter which of these you install, these three connections are necessary:
- The connection to the electric circuit
- The hot water connection made using the shutoff valve for the kitchen sink outlet
- A drain that connects to the sink drainage via a special connection
A dishwasher requires 120-volt power, and the terminals to connect it are on the back. The hot wire may be black along with a brass screw, the neutral wire will be white with a silver screw, and finally, the grounding screw is green.
Reasons For Removing A Hardwired Dishwasher
Here are several instances when removing your machine to get it repaired becomes necessary:
Dishes Remain Dirty
Before bringing in the big guns, run a cycle with just the dishwasher cleaner and no dishes. Also, carefully inspect sprayer arms, strainer, and door gasket; and remove residual food grains.
If the problem persists, you have to remove the dishwasher and inspect its back to ensure all connections are as needed.
Won’t Turn On
Possibly the door latch or its switch is acting up, and your unit won’t start till it’s sure that the door is completely shut.
If such is not the case, then the power cord within the wall has been disconnected; and you have to remove the dishwasher from its place to connect it.
Inconsistent Water Level
You may come across an issue when the machine doesn’t fill with water, or it keeps filling past the required volume.
This may be because of a defective inlet valve, float, or float switch. Inspect these, and make necessary repairs to restore the water flow.
Read through this piece to know more about why your dishwasher is not filling with water. Also, refer to this article to see if you have a bad water inlet valve.
Leaks
Leakage can be caused by a variety of reasons, such as a severed gasket, drainage hose, pump, or the pump seal. Get it resolved at the soonest because seepage can damage your kitchen.
Water Won’t Drain
You have a malfunctioning check valve, and if not repaired or replaced in due time, your kitchen is likely to flood.
Wet Dishes Left Behind
The problem is with the heating element, and to check its efficiency, you may need to use a multi-meter.
However, since a heating element is involved, which can be dangerous, it would be best to leave it a professional.
Damaged Past Repairs
If you have a unit that’s way past its expected life; you have to replace it.
Minor cracks and wedges can introduce soapy water to the power outlet and other connections, which can be downright dangerous.
Here is a detailed article on when it makes sense to run repairs, and when it doesn’t.
How To Remove A Hardwired Dishwasher
Required Tools
Have the following items close when attempting removal of your dishwasher:
- Shallow bowl
- Voltage tester
- Philips Screwdriver
- Standard Screwdriver
- Adjustable wrench
- Small bucket
- Cloth or blanket
The removal process of a dishwasher, be it the plug-in model or directly mounted one, is almost identical.
Follow these steps to get it done at the soonest:
Step 1 – Disconnect the Water Connection
The water connection shutoff valve is on the inside of the cabinet beneath the sink—switch it off.
Step 2 – Turn Off The Power
Also, turn off the power coming to the dishwasher. You’ll find the switch on the main electrical panel of the house; flip it in the opposite direction.
Step 3 – Remove the Frontal Cover
There is an access cover right on the front bottom. Removing it might just require some force as clips may secure it, or you may need to unfasten some nuts to pull it off.
Step 4 – Locate Junction Box
There is a metal junction box that holds all wires on the bottom right of the dishwasher. Look for it, and remove its cap. You might need to remove a few screws to do it right.
Step 5 – Wire Removal
A nut holds back two white wires, and another one secures two black ones — remove both to disconnect the cables. Also, remove the strain-relief plate that has everything together and the ground wire.
Step 6 – Remove The Water Supply
The copper-based water supply is typically on the left side of the machine. Use an adjustable wrench to loosen the nut, and put a few rags underneath to catch leaks or drips.
Step 7 – Drain Disconnection
Remove the drain hose from the sink’s drainage with the help of a screwdriver to remove the metal plate. To avoid a mess, put the other end of the drain in a bucket, so all leftover water goes right in, and not the floor.
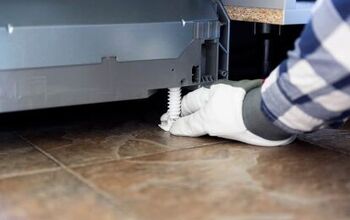
Step 8 – Unfasten Metal Tabs
Two metal tabs keep the dishwasher grounded to the counter. Remove the screws to free the tabs, so nothing holds back the hardwired dishwasher.
Step 9 – Pulling Out
Once all the above steps have been followed precisely, you can now pull out the dishwasher. Keep a sizeable soft cloth, towel, or blanket on the floor right in front, to avoid damages when placing the unit.
Do You Need Handyman Services?
Get free, zero-commitment quotes from pro contractors near you.
Related Questions
Do Dishwashers Need Their Own Circuit?
Considering the amount of power needed, i.e., 115-volts to 120-volts, it would be best to have a separate 125-volt 15-ampere circuit.
Can You Hardwire A Plug-in Dishwasher And Vice Versa?
Yes, to both, you can hardwire a plug-in dishwasher by cutting off the plug and directly connecting the two wires to the wires inside the junction box. On the other hand, you can add a three-pong pin to a hardwired dishwasher to connect it to a wall outlet.
What Is The Expected Life Of A Dishwasher?
Depending on your usage, a dishwasher will last you anywhere between six to ten years.

We are a team of passionate homeowners, home improvement pros, and DIY enthusiasts who enjoy sharing home improvement, housekeeping, decorating, and more with other homeowners! Whether you're looking for a step-by-step guide on fixing an appliance or the cost of installing a fence, we've here to help.
More by Upgraded Home Team


![10 Most Dangerous Neighborhoods in Baltimore [Updated]](https://cdn-fastly.upgradedhome.com/media/2023/07/31/9075655/10-most-dangerous-neighborhoods-in-baltimore-updated.jpg?size=350x220)
