How To Paint Anodized Aluminum (Quickly & Easily!)

Anodized aluminum is highly common in today’s world, but what happens if you want to switch up the look a little bit? If you don’t want to restore your anodized aluminum again, you can always paint it. But how exactly do you paint it?
To paint your anodized aluminum, you first need to clean the surface. Next, sand the metal surface until it’s smooth. After you sand, apply the self-etching primer and then sand until it is smooth again. Then you apply the paint and apply the sealer.
Painting regular aluminum versus painting anodized aluminum are two entirely different processes. This guide has all the information you need, including step by step instructions for you to follow to paint over the anodized aluminum.
Do You Need Painting or Staining Services?
Get free, zero-commitment quotes from pro contractors near you.

What Exactly Is Anodizing?
The process of anodizing includes an electrochemical process that was developed over 100 years ago. This helps to form a protective coating on any aluminum surface. The protective coating is made of aluminum oxide.
Aluminum oxide is a weather-resistant, durable substance that helps to protect any base metal that it’s applied to. You can color the coating by dying it or pull out some bronze tones through the diffraction phenomena.
The coating is created from the base metal that it’s applied to through an electrochemical process, and it cannot flake or peel off. There is a multitude of hexagonal pores that, when filled with a seal, it hydrolyzes the pores and fills them with something called inert aluminum oxide.
Tools And Materials You Will Need
Of course, you will need a few materials before you begin, which includes:
- Degreasing detergent
- Wire brush
- Sandpaper
- Self-etching spray primer
- Enamel Sealant
- Drop cloths
You can get any of these items at a home improvement store or another storefront such as Walmart.
How To Paint Anodized Aluminum
Follow the steps below to paint the aluminum surface correctly.
Step 1: Clean The Aluminum
First, you need to find a work area that has a significant amount of ventilation and lay out the drop cloths to protect the surface you will be working on. Then, take the time to clean the surface of your aluminum thoroughly.
To clean your aluminum, you can use a bucket and fill it up with some warm water. Then, add in a few squirts of the degreasing detergent or whatever other product that you choose. Dawn dish soap also works great for cleaning aluminum.
After you’ve created your solution, you can dip an old rag into it and start wiping away the dirt from the aluminum. However, if there is a layer of rust or peeling paint, then you will need to remove this by using a wire brush. If you don’t, then it may keep your paint from sticking to the surface. Let the aluminum dry before moving on.
Step 2: Sand The Metal
When the aluminum is dry, it’s time to smooth the surface so that your paint will stick to it. Before you begin this step of the process, you will need to put on some protective gear such as:
- Goggles
- Dust mask
- Gloves
These will help you protect yourself from exposure to metal dust particles. If you don’t protect yourself, then this can cause severe lung and eye damage.
Use either a sanding block or sandpaper to sand every corner and crevice of the object. If you’re sanding something more extensive like a metal table, you can do this with a power sander to make the process go faster.
However, you will need a coarse type of sandpaper that’s 80 to 100 grit, whatever tool you use. When you sand a second time, you will need a finer grit that’s either 400 or higher. After standing, wash the aluminum with warm water, and a degreasing agent to remove the dust and fully dry the surface.
Step 3: Apply Self-Etching Primer And Sand A Second Time
One critical step of this process is using a self-etching primer. It’s a special type of agent that’s formulated to micro-etch the aluminum so that it bonds as best as possible. The plus side is that it’s extremely easy to use.
Make sure you get the self-etching primer in spray paint form. You can get this from places like Lowes or Home Depot, and even an auto specialty store. Follow the instructions on the can to apply the primer in thin layers on the metal surface.
Let the primer dry according to the instructions, and then sand the aluminum again with 400 grit sandpaper. Then you can wipe away the dust that is left by using a microfiber rag.
Step 4: Apply The Paint
For a metal surface, you want either latex or acrylic paint. If you are painting an outside object, you will want to make sure that you get exterior grade paint. Don’t use high gloss paint since these aren’t good for painting aluminum. They will only highlight any scratches or dents that are common in lightweight metals. Get a paint with a satin or matte finish.
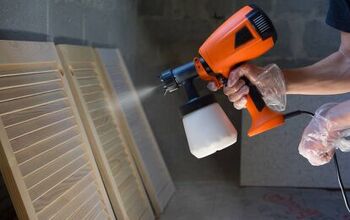
You will then need to choose how you are going to apply the paint. You can either brush it on or spray it on. The method you choose will highly depend on the size of the job that you have. Follow the instructions that came with the paint for how many coats you are to use. You may need to sand in between the coats.
Step 5: Apply Sealer
When your paint has completely dried, you will want to apply two coats minimum of enamel sealer. The layer of sealer helps to protect the paint on the aluminum from scratching, fading, or chipping over the years. Check the instructions for cure times so that you can prepare accordingly.
After the first coat has dried, you can apply another coat. Check for any areas that you may have missed, and you are finished!
Restoring Anodized Aluminum
Over time, the anodized area will eventually oxidize and fade, making it unappealing. If you don’t want to paint the aluminum, you can always restore it by using Everbrite™. The Everbrite is a protective coating that has no color. It will help to luster up dull aluminum and brighten the color. It will also help any aluminum that is stained and also protect it from corrosion, oxidation, and any other types of damaging elements.
You can also use this process to refurbish oxidized or faded aluminum objects such as:
- Window frames
- Storefronts
- Patio furniture
- Curtain wall
- Tables
- Chairs
- Rails and more
Preparing For Restoration
There are Everbrite prep pads that are available for this project, as you will need to use one that is approved for restoration projects. For this, you will need an aluminum restoration kit anyway, so this should be included in that. Or you can use a white or blue ScotchBrite pad.
Materials You Will Need
- Chemical protective gloves (Rubber gloves will be too sticky)
- Clearcoat applicator
- A fan if needed for ventilation if you’re indoors
- Metal application pan
- Everbrite™ protective coating.
Instructions
- Clean the object. Use the approved prep pad with the preparation solution to remove any oxidation, dirt, chalk, or mold from your object.
- Rinse off the solution. Next, you will spray the object with water until the water begins to sheet off of the object. It’s essential that the cleaner doesn’t dry on the surface as it will be extremely difficult to remove. Pay attention to how the aluminum looks wet, as this is how it will look when you are finished applying the coating, only that the surface will be dry. If you see any areas that aren’t clean, stop, and clean them. You do not want to coat over any dirt or oxidation.
- Dry the surface. Use a microfiber cloth to dry the surface. For larger areas, you can air dry, but you will need to watch for any water spots.
- Apply the coating. If the metal has been directly in the sun or feels hot to the touch, don’t apply the coating. If it’s in the shade, then that’s fine. Polish the coating on and take your time while doing so. Check afterward to make sure you’ve hit every surface. If you wish, you can apply a second coat, and you’re done!
DIY Or Hire A Professional
It is unnecessary to hire a professional to either paint or restore your anodized aluminum. It will cost a large amount of money to hire a professional to do something that you can easily do on your own. As long as you ensure you have the proper protective gear, then you will be fine executing this entire process.
Do You Need Painting or Staining Services?
Get free, zero-commitment quotes from pro contractors near you.

Wrapping It Up
Oxidized metal is extremely unappealing to the eye, which is why some people decide to spiff it up by painting it. Painting over aluminum is easy as long as you sand it down and prepare it correctly. By following the steps in this article, you will have a nicely painted, beautiful aluminum surface. However, it is essential that you take your time doing it to ensure a job well done.

Heather is a passionate writer who loves anything DIY. Growing up, she learned everything from home repairs to design, and wants to share her tips with you. When she's not writing, she's usually hiking or searching for her next DIY project.
More by Heather Robbins


