How To Melt Aluminum Cans With A Propane Torch (Do This!)

Do you have an abundance of empty aluminum cans at home? You can express your creativity with their help by using them in all kinds of DIY projects. However, you have to process the cans first before you can make use of their aluminum content.
To be more specific, you need to melt the aluminum cans first before you can use their material yield better. Some may be surprised to learn that melting aluminum cans is surprisingly easy. You can even pull it off using a propane torch.
Work on melting the aluminum cans by crushing them with a hammer first then place them inside a heat-safe container. Place the first container inside a larger heat-safe container before melting the crushed cans with the torch. Pour the melted aluminum into your mold of choice and let it cool down before handling it again.
Melting your aluminum cans is a great way to eliminate waste, repurpose materials, and potentially even make money. Find out how to process your spare aluminum cans safely and correctly by continuing with this article.
Do You Need to Hire a Professional Welder?
Get free, zero-commitment quotes from pro contractors near you.

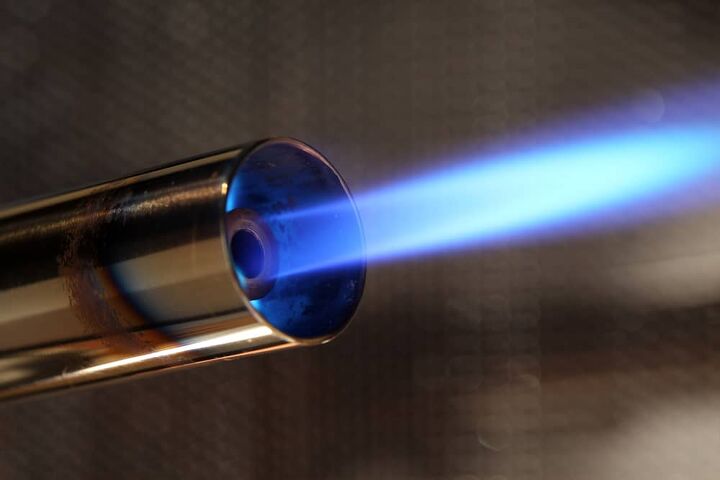
Which Propane Torch Should You Use to Melt Aluminum Cans?
Propane torches are among the most versatile tools you can own. You can use them for all kinds of repairs or creative projects. They are even suitable for melting aluminum cans. So, do you need to go out and purchase a special propane torch to melt your spare aluminum cans? That won’t be necessary.
The melting point for aluminum is 1220 degrees Fahrenheit. Propane torches, even the weakest ones available, can produce over 2200 degrees Fahrenheit.
Don’t worry about your propane torch potentially not being powerful enough to melt the aluminum. If anything, using an overly powerful propane torch is not recommended here because you’re only looking to melt the cans.
Safety Measures to Take before Melting the Aluminum Cans
Safety is always a concern whenever you’re working with fire. That becomes an even greater concern here because you’re dealing with fire and molten metal. Melt the aluminum cans safely by following the precautionary measures detailed below.
Select Containers That Don’t Melt Easily
Your only goal here is to melt the aluminum cans. Everything else you’re working with should remain intact. Understanding that, you should take the time to choose the containers you’ll be using carefully.
Cast iron skillets or stainless steel bowls are good to use for this project. Both cast iron and stainless steel have higher melting points than aluminum. That means they’ll be able to withstand the heat you’re applying to the cans.
Titanium bowls that you may have used during your last camping trip work great for this particular application. Titanium has an even higher melting point than both cast iron and stainless steel. Feel free to use it if you already have one available.
Find a Clear Area Outside to Use as Your Workspace
Look for a spacious area outside before working on this project. Hopefully, you’ll be able to find that spot on your property. You don’t want to be near anything that can catch fire easily.
The fumes coming from the molten aluminum can also cause you to feel dizzy. Avoid prolonged exposure to them by working outside.
Keep a Fire Extinguisher on Standby
Many hobbyists keep fire extinguishers inside their workshop. You probably have one already so just keep it close by while you work on melting the aluminum cans.
Use Tongs to Move the Aluminum Cans
The working surface will get hot after you’ve been working for a while. It’s not a good idea to let your hands get too close. Use the tongs to move the cans while you’re working to protect yourself better.
Wear Safety Gear
One more thing you should do before you start working is put on safety gear. For this job, you’ll need heat-resistant gloves. Kevlar gloves are preferred here.
Safety goggles are also required because you want to shield your eyes from any stray aluminum. When it comes to shoes, choose the ones that provide a thick layer of protection over your feet. Long pants and long-sleeved shirts are also recommended and feel free to use overalls if you have them.
Melting the Aluminum Cans with Your Propane Torch
Let’s now discuss how to melt the aluminum cans properly. This project may take a bit of time so make sure your schedule is clear too.
Step 1: Prepare Your Tools
The items you will need here include the cast iron or stainless steel container, tongs, a hammer, and your safety gear. Consider using two containers to protect your working surface better. You can go with two differently-sized bowls or one bowl and a skillet.
You cannot forget about the torch too. A propane-butane torch offers more than enough heat for this project, but you can still use whichever one you have.
Go ahead and prepare a mold as well. All kinds of molds can work here. Just don’t go with a mold made from a material with a lower melting point than aluminum.
Step 2: Make the Aluminum Cans More Compact
Get the hammer now and start smashing the aluminum cans. Your goal here is to make them as compact as possible. Crushing the cans with the hammer allows them to melt faster. If you don’t have a hammer, you can use the cast iron skillet to crush the cans.
Step 3: Prepare the Working Containers
You can now arrange the working containers you’ll need for this project. If you’re using the bowls, place the smaller one inside the larger one. If you’re using the bowl and skillet, place whichever one is smaller inside the bigger container.
For those who are using two bowls, you may want to use other materials to keep the setup stable. Perhaps you could place some soil from your yard inside the big bowl. Bury the smaller bowl partially into the soil to keep it from moving around.
Step 4: Start Melting the Aluminum Cans One by One
Take one of the cans now and place it inside the smaller container. Focusing on one can before adding another allows you to melt the aluminum more effectively.
Turn your torch on now and start focusing the flame on the can. Don’t crank it too high. Remember that even a moderate flame from the propane torch is already hot enough to melt aluminum. After melting the first aluminum can, use your tongs to place another one inside the containers. Continue working until you’ve melted all the cans.
Step 5: Transfer the Molten Aluminum to Your Chosen Mold
With the cans melted, you can now transfer the molten aluminum to the mold of your choice. Be sure to pour the liquid aluminum carefully.
Step 6: Allow the Aluminum to Cool
The last step is simply allowing the aluminum to cool. This can take a while, but you must resist the urge to touch the aluminum until it has completely set.
Do You Need to Hire a Professional Welder?
Get free, zero-commitment quotes from pro contractors near you.
Related Questions
Can You Polish the Aluminum Chunks You Made from the Melted Cans?
As long as the melted aluminum was allowed to set correctly, you should be able to polish it with no problem. Different items can be used to polish aluminum. You can purchase commercial polishes or use household items for this job.Household items that can be used as aluminum polish include vinegar and cream of tartar. Use either whichever item you prefer, mix it with some water, then apply it to the aluminum with a cloth.Toothpaste also works pretty well for this job. Simply apply some toothpaste on to an old toothbrush, then work that into the aluminum carefully.
How Much Aluminum Can You Get from Melting Cans?
The exact numbers may vary a bit, but 40 aluminum cans should yield about one pound of aluminum. That’s a good amount to use for your projects or to sell for some extra money.
Is Melting Aluminum Foil Worth It?
The yield from aluminum foil is smaller than what you’ll get from aluminum cans. You can extract some of the metallic substance if you melt enough foil, but it will take a lot of work. It’s up to you to decide if investing your time in that project is worth it.
Gary Evans is passionate about home improvement. He loves finding out how to make improvements in the easiest, most practical, and most affordable ways. Upgrading his home kitchen is one of his ongoing hobbies. Gary is also a long-time content creator and enjoys spending his free time tending to his hydroponic vegetable garden.
More by Gary Evans


![10 Best Zero Turn Mowers – [2022 Reviews & Ultimate Buyer's Guide]](https://cdn-fastly.upgradedhome.com/media/2023/07/31/9070522/10-best-zero-turn-mowers-2022-reviews-ultimate-buyer-s-guide.jpg?size=350x220)