How To Make A Dust Bag For A Miter Saw (Quickly & Easily!)
If you use a miter saw, you know the dust problem associated with these functional tools. Apart from the sawdust’s health hazards, the aggravation the accumulated dust can cause in your workshop is the best reason for adding a dust bag to your miter saw.
Adding a dust bag to a miter saw requires making a connecting fitting to attach the bag to the saw, constructing a suitable bag from proper material, and ensuring that the collection system and bag operate safely with the saw.
The best method of adding a dust collection bag to your miter saw is to order a factory-made dust bag built for your saw. If your saw is out of production or the manufacturer out of business, the solution is to construct a custom-built dust bag.
How To Make A Dust Bag For A Miter Saw
Following a few simple steps can help you manage the dust from your miter saw more efficiently and effectively.
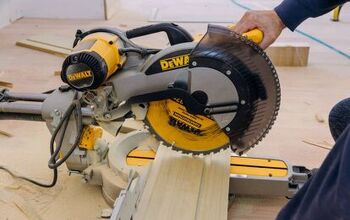
Step 1: Examine your Saw
The first step is to take a good look at your miter saw. The dust collection port is usually on the back of the blade housing. The dust port usually points downward at an angle from the saw. Dust ports come in two styles. One style requires you to insert the dust pickup inside the dust port. The other style allows the dust pick up to slip over the protruding dust port.
Step 2: Measure the Dust Port
If the dust port on your miter saw protrudes, measure the outside diameter of the tube. If your miter saw requires the dust pickup to slip inside the dust port, measure its inside diameter.
Step 3: Gather the Materials
Gather all the materials for your dust collection system before you start construction. You will need:
- Find a short length of plastic tubing of the proper diameter. For protruding dust ports, the inside diameter of the tube should be slightly larger than the dust port’s outside diameter. For dust ports requiring an inside fit, the tubing’s outside diameter should be smaller than the dust port’s inside diameter.
- Find the material for the dust collection bag. Tightly woven synthetic materials work best. Remember that the sawdust you create can be fine and will penetrate loosely woven fabrics.
- Get a zipper for your dust collection bag. At the end of the bag, a zipper makes emptying much quicker and easier than removing the sawdust through the collection tube.
- You will need a clamp to attach the bag to the collection tube. Some people use automotive-style crew clamps. Clothes dryer vent clamps will work in some applications. Plastic cable ties are an alternative, although you must use a new one each time you remove and replace the dust collection bag.
Step 4: Cut the Tubing to Fit
The tubing length for your dust collection system depends on the configuration of the dust port on your saw. You don’t want the tubing too long or it will become a problem behind the saw. If the tubing is too short, it becomes difficult to attach the dust collection bag to the tubing. You should consider where and how you use your saw and how the tubing fits your saw to decide on the best length.
Step 5: Make the Dust Collection Bag
The best method of making a dust collection bag is to make a pattern. If the original dust bag is available, pattern your new bag on the original. Looking at pictures of different dust bag models for miter saws will give you a good idea of the proper shape.\
Sizing your dust bag is important. If the bag is too large, it will become heavy and make your saw hard to use. If the bag is too small, you will need to empty the bag which can be counter-productive.
Step 6: Attach the Bag to the Tube
When the dust collection bag is complete, attach it to the collection tube. Some people opt to use a drawstring to attach their new bag to the tube. Others use some form of a mechanical clamp. In any case, the fit should be tight and secure to be safe and prevent dust particles from escaping.
Step 7: Attach the Dust Collection Tube to the Miter Saw
Slip the dust collection tube into or over the port on your miter saw. Examine the whole installation carefully. You must make sure that the bag or tubing doesn’t interfere with the miter saw arm’s movement. The bag should be far enough bag that there is no danger the blade will snag the bag.
Step 8: Test and Refine
Use some scrap wood and make a few test cuts. Check the connections between the bag and the saw for leaks. Inspect the dust port on your saw. Make sure that the new dust collection system doesn’t impede the flow of dust into the bag.
Why Collect Sawdust?
There are several good reasons to refine the dust collection system in your shop, not just on your miter saw. Many woodworkers fail to consider the implications of not collecting sawdust. Understanding why it is important to collect sawdust makes you a better woodworker and can have long term rewards.
Safety and Sanitation
Perhaps the biggest and best reason for collecting sawdust is safety. Sawdust presents several hazards, some of which include:
- An Enjoyable Workspace – A clean workspace is a much safer place. Sawdust accumulations can impair visibility and mask hazards. We all know how much more pleasant it is to work in a clean, dust-free shop.
- A Safe Workspace – Accumulated sawdust can present numerous hazards in the workshop. Sawdust in and around electrical outlets and fixtures can be a fire hazard. Piles of sawdust on the floor create slip and fall dangers. Sawdust in the air can cause explosions.
- Tool Life and Maintenance – Sawdust is invasive and will get into the tiniest cracks and openings. Allowing sawdust to build up in and on tools can shorten their life. Sawdust laying against metal tools may also encourage rust.
Your Health – The Best Reason to Collect Your Sawdust
Many home and hobby woodworkers are not aware of the potential health hazards associated with woodworking and sawdust. Protecting yourself against the dangers of inhaling sawdust is much more important than protecting your tools and your workspace.
The Potential Hazards of Inhaling Sawdust
Sawdust can be a danger to anyone who is allergic or has become sensitized to the sawdust. Some species of wood are extremely irritating or even poisonous. Before you start sawing exotic species of wood, research any known dangers from handling the wood or breathing the dust.
The Effects Sawdust May Have on You
Sawdust can affect you in various ways. Some of the more common health issues associated with wood dust include:
- Respiratory Effects – Sawdust can cause inflammation and irritation of your respiratory tract. This irritation can include sneezing, coughing, watering of the eyes, and excessive mucous production. Your eyes can also become inflamed and irritated by the sawdust.
- Skin Irritation – Some species of wood can cause an almost allergic reaction to the skin. The reaction, called dermatitis, can result in red skin that is itchy or dry. Blisters may form on the irritated skin. You may develop a sensitivity to the sawdust, which results in allergic-type reactions that can affect your whole body.
- Long Term Dangers – Ong term exposure to sawdust can have serious health implications. Inflammation of the lungs and asthma-type symptoms are common. In some cases, the sawdust’s toxic materials are suspected of causing cancer and other serious health problems and illnesses.
Take the Best Precautions
Following a few basic rules can help you avoid many of the problems associated with sawdust.
- Know and understand the potential health hazards of the type of wood you are using.
- Reduce sawdust production. Install dust collection systems on your tools. Keep the blades sharp.
- Wear a respirator if necessary. Don’t forget to protect yourself when emptying your dust collection systems or sweeping up sawdust
- Shower and change clothes after woodworking. Don’t carry the sawdust into your home if possible.
- Never use your compressor to blow sawdust off tools or work materials. Using compressed air to clean surfaces only suspends them in the air for you to breathe.
- Wear proper protective equipment. Eye protection is a must. A good industrial respirator will protect your respiratory system. A proper work apron will help keep you from transferring sawdust into your home.
- Wear gloves to protect your hands
Making your Miter Saw a Safer Tool
Adding or replacing a dust collection bag on your miter saw makes it a safer tool to use. Reducing the amount of sawdust sent into your shop keeps you safer. Creating a dust collection bag for your miter saw (and other tools) will create a safer and more enjoyable workspace in your woodshop.
In the end, you will get more enjoyment out of your miter saw, have a better place to work, and be safer with a good sawdust collection system. Our simple steps to building a sawdust collection bag for your miter saw can be the first step toward making your woodshop safer. Work smart and be safe.

Dennis is a retired firefighter with an extensive background in construction, home improvement, and remodeling. He worked in the trades part-time while serving as an active firefighter. On his retirement, he started a remodeling and home repair business, which he ran for several years.
More by Dennis Howard