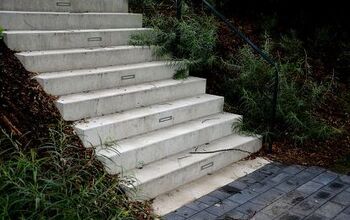
How To Lay Paving Slabs On A Slope (Step By Step Guide)
Paving slabs can make a pathway or driveway look fantastic with just a little bit of hard work. We are going to show you the ins and outs, of laying down paving slabs on a sloped surface. Since not all properties are perfectly flat, it’s essential to know how to do this, especially if your property is on a slope!
You start with preparing the ground, by removing any sod, and raking the ground to make it as smooth as possible. Next, you will spread out gravel and compact the ground. Then lay down your pavers, starting at the bottom of the pathway, each paver moving up small degrees, to match the grade.
The process for laying slabs on a slope just takes a few extra steps, other than that, it’s not that different from laying flat pavers. By moving the stones upwards by degrees to match the grade, you gradually follow the slope with your path. This guide will help to walk you through the necessary steps so that you can lay your paving slabs easily!
Do You Need Brick and Concrete Patio Paver Installers?
Get free, zero-commitment quotes from pro contractors near you.

Can Pavers Be Installed On A Slope?
Paving slabs can be installed on a slope, by gradually moving the stones with the grade. You may have to cut the stones, to help define the slope. By defining the slope, the paver can then lay on it the correct way without causing any issues without looking off or weird.
By using the pavers and the paver pieces, you can make your path follow the slope, and then complete the process of finishing. While this may seem complicated, it can be achieved with a little bit of know-how, and patience.
Types Of Paving Slabs
There are many types of paving slabs. From square slabs to brick-shaped slabs. Smaller slabs are easier to put in place, while more massive square slabs will require more cutting.
Types of slabs:
- Concrete pavers
- Indian stone pavers
- Granite pavers
- Limestone pavers
- Colored stone pavers
Pavers come in all shapes and sizes. Some are basic, and others have a decorative shape, that can make your pathway pop. Colored stone pavers, such as black and gray pavers, can give the walkway an exciting look.
You can also use bricks as pavers, for a walkway, or driveway. Many old towns still have brick roads, where bricks were laid as pavers for driving on.
Tools And Materials You Will Need For The Job
You’re going to need some tools and materials to lay paving stones down on a slope. These tools will be used to help keep areas flat, and to cut, and lay down the pavers. You will need to have some experience with using these types of tools.
Tools for the job:
- Spray paint
- A straight 3’ 2×4 board
- Hammer
- Shovel
- Yard rake
- Wet saw
- Plate compacter
- Coarse sand
The spray paint is used to mark out your desired area for the pathway. The straight 2×4 will be used to make sure surfaces are flat, with no edges sticking up. The rake and shovel are used to remove the sod and spread out gravel evenly.
The wet saw is used for cutting the pavers. The wet saw cuts through the pavers’ dense materials, and the hammer is used to knock off pieces. The plate compactor compacts the ground, making sure there is no loose soil.
Steps For Laying Paving Slabs On A Slope
Now that you know what tools it requires, let’s look at the steps involved, for laying paving slabs on a slope. When you start placing slabs down, you are going to need to make sure that none of the edges are raised, creating a hazard.
Step 1: Decide Your Path
Start by deciding exactly where your pathway will go and mark that area with spray paint. If you are building your walkway, in a straight line, you may consider using string and stakes, to mark your consecutive lines on both sides. You can also use a ruler to ensure that your path is the same width throughout the entirety of it and place the takes the correct width apart.
If you want your pathway going down the slope, to have a curve, you can use a garden hose to lay out your angle, and then add flour to mark it, or spray paint. Or, you can also purchase or use a rope to curve your pathway. However, make sure again that the width stays the same between both sides.
Step 2: Remove Debris
The next step is to prepare your pathway, by removing any sod, rocks, or roots. You will need your surface to be free of any debris. You will also need to use a rake to make sure the dirt is evenly spread. Leaving large holes will cause water to build-up underneath your pathway. If water builds up, this will need to be removed, and you may find yourself removing and reinstalling your slabs.
Step 3: Install Your Border
Now you will install your border on each side of the pavers. Plastic landscaping borders work well and have a nice looking rounded edge. This helps maintain the edge and keep grass from growing into your walkway. If you’re looking for something better, there are other types of landscaping borders as well, such as wood. However, before you use the wood, you can use the plastic ones temporarily.
Step 4: Add Gravel
In step four, you will add crushed rock, or coarse gravel, down onto the pathway. This will need to be about two inches deep. You will need to use the rake, to spread them out evenly, and then you will use the plate compactor, to tamp the crushed rock down.
The plate compactor is a piece of equipment that tamps down and presses the dirt and gravel into the ground until it is smooth and flat. Make sure that everything is entirely even and that the gravel is compact before you add your pavers.
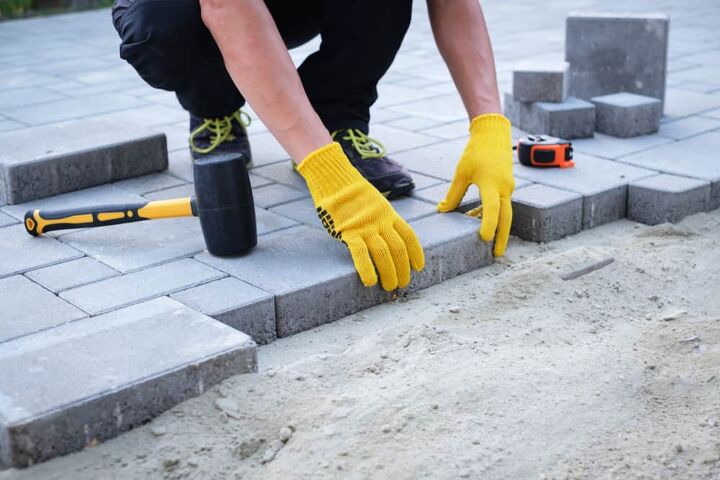
Step 5: Lay Your Pavers
Now you will start laying down your pavers. Start at the bottom of the walkway, and work your way up. When you put your first slabs down, start in the center and work your way out to the sides. You will use the wet saw to cut pieces. Use the straight 2×4 to make sure that all areas are flat. If you come across any areas where the pavers are sticking up, you will need to remove it, dig out a little, flatten it, and replace the paver. Raised edges can be a safety hazard.
Since there is a slope with a grade, you will gradually raise the pavers by small degrees, to go with the slope. You may have to use smaller cut pieces to achieve the grade of the slope. You will need to cut any pavers at both sides, to fit in the border.
Technically, you do not need to know the exact grade of the slope; make sure that your stones are gradually making the grade. Finish this process until every stone is in place.
Step 6: Spread The Sand
Once your paver slabs are all in place, you will spread coarse sand across the pathway. Make sure that you use enough that all of the cracks are filled with sand. Using paving stones for a driveway requires using a concrete sand mix. You ultimately want to seal the cracks so that water cannot get in between them. Water may turn to ice, causing cracks in your pathway.
This guide is for a basic slab pathway, you may need to use extra techniques, and take precautions, if a vehicle will be driving over it. There’s a whole other process for laying a driveway as opposed to applying a pathway. If you are driving any cars on it, then the pathway needs to be load-bearing.
Step 7: Brush The Top
Finally, you will sweep away the coarse sand from the very top, leaving only the sand in the crevices. You can also use a water hose, to get rid of any sand, or dirt left on top of the stones.
And that’s it; you will have a beautiful looking pathway that will hold up well over time.
Related Questions
Can I lay paving slabs on soil?
You would only want to lay paving slabs on soil that is very well compacted. The surface needs to have no holes, or areas that can take on water, and can not be loose, or the pavers will move over time. We suggest using the gravel.
Are paving slabs hard to cut?
You will be using a wet saw to cut your paving slabs. This takes some skill and safety measures, such as wearing safety glasses. If you do not have access to a wet saw, you can use a scorer, to score the slabs, and then use a chisel and hammer, to break them off.
Do You Need Brick and Concrete Patio Paver Installers?
Get free, zero-commitment quotes from pro contractors near you.
Wrapping It Up
Laying paving slabs on a slope is a lot easier than it sounds. You need to make sure that you’re following the instructions correctly and cut the slabs the right way to slopes with the grade. Additionally, you will want to fill the gaps of the pathway so it doesn’t slide and so that it keeps water out of the concrete.
Related Guides

I'm a writer that is passionate about home improvements, remodeling, and renovating. I enjoy learning new skills and techniques and sharing them with others.
More by Chad Kilpatrick