How To Install A Sump Pump In A Crawl Space (Do This!)

Many homes have crawl spaces to hold essential utilities and piping throughout the house. Unfortunately, they are not typically prepared with a vapor barrier and can easily accumulate moisture from the ground.
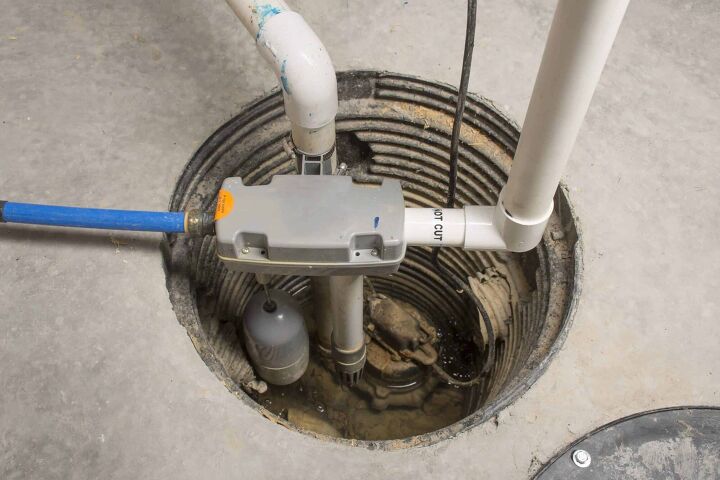
Those of you who have crawl spaces know how important it is to keep them dry. Moisture in a crawl space can cause severe issues, like mold or rot, to the rest of your home. A sump works by collecting that water in a basin and then pumping it out a safe distance away from your house.
To install a sump pump in a crawl space, start by planning the best location for the basin and your drainage line. Once decided, dig a hole and a drain trench, and install the basin, drains, and pump. Finish off your crawl space with ample aggregate rock, and test your new system.
Do You Need to Hire Sump Pump Installers?
Get free, zero-commitment quotes from pro contractors near you.

Tools and Materials You Will Need
Tools:
- Demolition hammer
- Shovel or trowel
Materials:
- Sump basin
- Sump basin cover
- Sump pump
- Sump check valve
- Drainage line (PVC piping)
- PVC Sealant or Caulking
- Drain tile (optional)
- Aggregate rock
Step One: Plan
The first thing you need to do is decide the best place to put your sump pump. There are a number of important factors to consider.
Accumulation Area
The first thing to figure out is where the lowest part of your crawl space is located. It is sometimes easier to build a house on concrete pillars than to level a whole foundation. This is how crawl spaces come to be. Therefore, your crawl space will likely have some slope to it.
You wouldn’t want to install your sump at the top of this slope because other areas would still flood. To create an effective sump system, find the lowest part of the crawl space and designate that for the sump.
You can also use drain tile to help water flow more easily across the space. This gets it to your sump basin and out of your house quicker. Tiles are recommended for larger crawl spaces with multiple possible flood zones.
Drainage Plan
The second thing to factor in is your drainage plan. Once the water has collected in the basin, where will it go? The pump will be connected to a drainage line that exits the crawl space and carries the water from your home.
You want to make sure it is far enough away that it will not cause your home damage. This is, after all, the whole reason for installing the sump. You also want to ensure that the drainage is not going to flood your yard. Finally, find an inconspicuous area that won’t be an eyesore.
Power Supply
The final consideration is access to power. The pump is an electrical unit, so it needs to be plugged into an outlet. You want to avoid using an extension cord if possible. If it’s necessary, make sure you wrap the connection point well to waterproof it.
Once you have decided on the best location for your system, prepare to dig! Flip the basin upside down and mark the hole where you need to dig. Then, extend that area four inches on all sides to allow aggregate rock to fill in around the basin.
Step Two: Dig All Holes and Trenches
Use a demolition hammer or drill into the concrete foundation. You will need to drill a hole for the sump basin and pump. (The submersible pump will sit at the bottom of the basin.) You will also need to dig out a trench where the drainage line will go.
If you plan to include drain tile, you will need to dig out trenches for these as well. Make sure to include extra space below and around these for more aggregate rock. Lastly, do not forget to slope the trenches and tiles downward toward the sump basin.
Step Three: Add Aggregate, Prepare and Install the Sump Basin
Before putting the basin in the hole, fill a couple of inches with your aggregate. When choosing an aggregate, keep in mind that anything too small could get into your basin and clog it. However, anything too big will create an unstable foundation for the basin. Therefore, we recommend using river rock or pea gravel.
When you install the basin, consider how water will enter it in order to be drained. We highly recommend a cover, since open sumps can clog easily (more on this below). Instead, drill holes in the sides of the basin near the top. You can also connect trench piping to these holes if you need it to drain faster.
Next, put the basin in the hole and connect any trench piping to the basin. Finally, add more aggregate rock around the sides of the basin until it is securely in place. Stop a couple of inches below the top of the basin to make sure you have room for the cover.
Step Four: Install Drain Tiles
If you are adding drain tiles, now is the time to do so. We recommend starting at the basin and working your way out. This way, you can make sure all the drain trenches have the necessary slope to end at the basin. As mentioned earlier, be sure to add aggregate rock below and around the drain tiles, too.
Step Five: Install Sump Pump and Attach the Basin Cover
Place the sump pump in the basin and connect the first bit of drainage piping. This small piece should go straight up and all you to attach the basin cover after. If your local building codes require a vent pipe, now is the time to install that, as well.
We recommend that you have a cover on your sump basin. When basins are not properly protected, they accumulate dirt and debris, which can clog the pump. Not only will this require ongoing maintenance, but also it could damage your pump and prevent it from draining. Before covering the basin, make sure to clean out any debris collected during installation.
Step Six: Connect the Drainage Line
Once the cover is on, you can connect the pump to the rest of your drainage line. Once it is all in place, seal the line at the basin hole and where it exits your home. This will keep it securely in place and also make sure it is waterproof. It also provides easy drainage of nearby water into the sump basin.
Finish the drainage line’s installation with extra aggregate for stability anywhere you dug too much. Once this is complete, the crawl space should look done.
Step Seven: Connect to Power
Lastly, connect your sump pump to power and turn it on. You should fill up the basin and test that the pump works. After all, you would not want to learn that you made a mistake during the next big storm.
Be careful not to run the sump pump without water for an extended period of time. While this is a simpler way to test that it works, the pump can easily overheat.
Do You Need to Hire Sump Pump Installers?
Get free, zero-commitment quotes from pro contractors near you.

Related Questions
How else could I keep my crawl space dry?
A vapor barrier prevents ground moisture from entering the crawl space. While this is a larger project than a sump pump, there are added benefits. Since it also resists airflow, this crawl space is more temperature-controlled to keep your home warmer in the winter. Finally, vapor barriers prevent harmful gases in the soil, like radon, from entering your home.A dehumidifier is another way to capture moisture from the soil as it enters your crawl space. This can help with semidry regions to prevent mold, but it will not be enough for floods.
Why is my sump pump running every 30 seconds in cold weather?
During winter, the drainage line can get too cold and freeze up. If this happens, the pump will not be able to drain properly and continue running. To clear it, you can pour boiling water down the drainage line and melt the ice. You might also consider a space heater pointed at the drainage line to prevent it from happening again.

Benjamin is a freelance writer and graphic designer. He is passionate about DIY projects and finding creative ways to upcycle things headed for the landfill. Based in Oakland, CA, Benjamin enjoys playing guitar and gardening.
More by Benjamin Panico






![The 10 Best Table Saws - [2022 Reviews & Buyer's Guide]](https://cdn-fastly.upgradedhome.com/media/2023/07/31/9070645/the-10-best-table-saws-2022-reviews-buyer-s-guide.jpg?size=350x220)

