How To Install Subway Tile Backsplash Corners
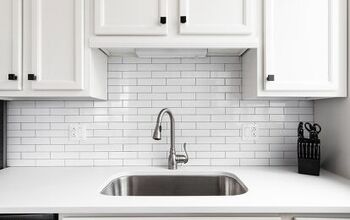
If you’re looking for a different kind of tile for your backsplash, subway tile is hard to beat. It has that classic, timeless look that can be appealing regardless of the time period. Not only that, getting white subway tile is usually a pretty cost-effective way of changing up the backsplash.
There has been some question as to the proper method for installing the corners in particular. This how-to guide will show you the best way to get those subway tiles hugging the corners tightly without that unsightly gap that can permeate the walls.
Do You Need to Hire Tile Installers?
Get free, zero-commitment quotes from pro contractors near you.

Step 1: Cutting Your Tiles to Alternate Lengths
One of the biggest issues with laying subway tiles is that they can sit unevenly in the corners. That gap, even if it is just ¼-inch, can be an eyesore. So, how do you combat that gap in the tile that can ruin an otherwise great looking backsplash?
Start by cutting the tiles in alternating lengths. A good idea is to one full tile then one-half tile and alternate as you go up the wall. Before you start actually laying the tile on the wall, cut out all your pieces beforehand. This will ensure that you have the proper number of tiles and that they are matching lengths.
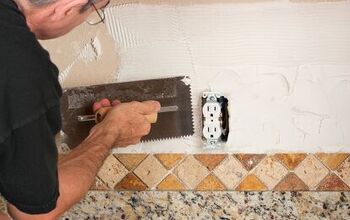
Step 2: Apply Adhesive
It is highly recommended that you use a notched trowel to lay down your adhesive before ever putting the tiles down. Make sure that you apply the adhesive using even, smooth strokes in order to prevent any lumps from forming on the surface of the adhesive.
By having the adhesive down first, you can simply position the tiles without having to worry about an additional mess as you go. Even if some of the adhesive does poke out onto the surface of the tile, you can just quickly wipe it away.
Step 3: Lay One Side First
The most effective method of laying a subway tile backsplash in the corners is to start with one side and work up the entire height of that side. Doing this will allow you to get flush with the corner and provide a better method of closing the gap between the two tiles.
Remember to alternate as you go up, using a half tile followed by a full time and so on. When you have one side of the corner in place, you can easily put the other side of the corner into place. If you try to place the entire corner piece in at once, there’s a good chance that it will not sit evenly, and you’ll be stuck with an unsightly gap.
Step 4: Lay the Other Side
With the initial side in place, all you need to do is mirror the look on the opposite side of the corner. Pay attention; far too many do-it-yourselfers wind up mismatching their tiles and end up with something that looks out of place.
Carefully push the tiles together so that there is very little in terms of gap. Creating a perfect seal is just that easy.
Step 5: Applying the Grout
Make sure that you wait at least 24 to 48 hours before you start mixing and applying your grout. You need to give the tile the proper amount of time to adhere to your adhesive mix before applying the grout itself. If you don’t wait, you run the risk of the tiles shifting out of place and needing to go back through, correcting as you go.
When your grout mixture is ready, just push it into the gaps between the tiles. This will provide a better overall aesthetic and will provide another layer of adhesive for the tiles to bind together. When you’re done, make sure to wipe away any of the excess grout using a damp sponge. Give the tiles the chance to dry and you will have a brand-new finished backsplash.
Where Do You Start Tiling a Backsplash?
The good thing about backsplash tiling is that you will always start out in the same place. The place to start is right at the base of your backsplash, along the lip or edge of the countertop if it goes up the back of your wall at the central point of the countertop.
Starting in the middle allows for a symmetrical appearance as you work outwards towards each side. It also means that your backsplash will look even when you get to the countertop line or the end at the cabinet.
Do You Grout Inside Corners?
A common mistake is applying grout on the insider corners. You don’t want to use grout here; go with a grouting caulk on the insider corners instead. You would do this after you have grouted the entirety of the backsplash and wiped away the excess.
It is also important that you not overfill the void in the corners. Doing this will just make it that much harder for you to clean and tool. Not only that, inside corners that are grouted will develop cracks over time that need to be repaired.
Using Large Subway Tiles
The larger the tiles you go, there are more installation options at your disposal. Instead of traditional vertical and horizontal tiling, you can even split the rows into thirds to get the kind of look that you are hoping to achieve.
Moreover, you can install the larger tiles in short order, providing a trendy and fresh look for your kitchen backsplash. The only downside is that subway tile isn’t the flashiest. They are popular because they install easily and have a classic look to it. If you can, find a bit of subway tile with some color and personality to it. That will hold up best over time and keep it from feeling dated.
Using Mirrored or Metallic Finish Tiles
One of the trendier backsplash options out there is the use of a metallic or mirrored finish. These are great because they reflect light back into the kitchen, making it seem bigger and brighter. They can make quite a dramatic statement, providing a bright “wow” factor.
The only downside is that those mirrored subway tiles are not the easiest to install. You will need a professional-grade tile saw to prevent uneven cuts or bending. The tiles have to be installed on as even a plane as you can manage because the imperfections will become quite apparent when the light reflects off of them.
Go with a pro if you plan on getting metallic or mirrored tiles because it is far too easy to screw up the installation.
Do You Need to Hire Tile Installers?
Get free, zero-commitment quotes from pro contractors near you.
Are Glass Subway Tiles Out of Style?
Glass tile seemingly never goes out of style. The best thing about glass tiling is that it can be applied throughout the rest of the home. Whether you want to use it in the kitchen, for tub surrounds, accent walls, or shower walls, glass is a perfect choice that won’t fade or chip like paint tiles will. Best of all, they will be fashionable for a long time as glass has been around for decades without waning popularity.
Glass also allows for a simpler installation than some of the more unique tile styles out there, allowing for do-it-yourself applications that can save money in the end.

Ryan Womeldorf has more than a decade of experience writing. He loves to blog about construction, plumbing, and other home topics. Ryan also loves hockey and a lifelong Buffalo sports fan.
More by Ryan Womeldorf