How to Install Rubber Pavers (In 3 Easy Steps)
In recent years, rubber pavers have become very popular as a choice for outdoor and indoor flooring. Due to their absorbent qualities, high slip resistance and eco-friendly design, they are an excellent choice for paving environments such as children’s playgrounds, nursing homes, some shopping centers, garages and even your home gym.
They are lightweight, very versatile and relatively simple to install yourself. Rubber pavers also come in a wide array of color options making it easy to find one that will match your particular design plan. Crafted to resemble real brick or stone, this paving option can elevate your outdoor space and add an additional layer of style to your home.
The process for installing rubber pavers is relatively similar to other types with a few less steps involved. After planning out your design and picking your materials depending on the project area you may need to excavate and lay down a base material before physically installing the pavers themselves. However, if you’re installing them on concrete, the process is even simpler.
We’ve outlined everything you need to know in order to properly install your rubber pavers. Whether your paving project is an outdoor patio or a home gym in your garage, we’ve provided all the steps to ensure successful project completion. With our help and depending on the size of your plan, you’ll have your rubber pavers quickly installed over a weekend.
Related Guide: Can You Put Rubber Pavers Directly On Grass?
Do You Need Pavers for Driveway and Floors Installed?
Get free, zero-commitment quotes from pro contractors near you.

What are Rubber Pavers?
Rubber pavers are a popular paving alternative to traditional stone or brick materials. They are manufactured using recycled tires. This paving option is built to look a lot like the more conventional materials, but require less work to install and are wear-resistant.
Rubber pavers can be easily installed onto a number of existing surfaces such as wood, stone or concrete. With some additional steps, they also provide the option for installation outside on a grass or level dirt surface. This makes the installation process simple and hassle-free.
Advantages of Rubber Pavers
The use of rubber pavers in your home improvement project can provide a number of benefits. These include:
- Safety – This is arguably the biggest advantage to rubber pavers. They have a much higher shock absorbency when compared to more traditional stone or brick pavers. This fact makes rubber pavers an ideal choice for surfaces that children and elderly people will frequently come in contact with.
- Slip-resistance – Aside from the general safety benefits, when compared to other paver materials, rubber pavers have less of a likelihood to cause slippage when wet. The materials they are made of are porous and absorb water to create a slip-resistant surface.
- Eco-friendly – Since a large majority of rubber pavers are made of used tires and other recycled rubber they are a great, sustainable paver option.
- Long-lasting – With rubber pavers, you’re less likely to experience cracking and breakages over time. They are durable, require less maintenance and will have a significantly long life-span.
- Affordability – Rubber pavers are a much more cost-effective option when compared to other paver materials.
Things to Consider about Rubber Pavers
While there are very little disadvantages or downsides to the use of rubber pavers, there are a few things to keep in mind when planning your project.
- Before installation, rubber pavers cannot get wet. Because of their porous nature, they will absorb water and expand making installation very difficult.
- Do not allow your rubber pavers to absorb much sunlight. If your rubber pavers are left out in the sun for too long, it can result in thermal expansion or contraction. This will ultimately lead to the development of gaps within the structure of the pavers.
- If there is additional work nearby your project site, your rubber pavers should be covered with a protective material. They have an open surface that, aside from being absorbent to water, is also absorbent to dust and paint.
If you factor these few considerations into the prep and planning of your project, you should run into little to no issues during the process.
How to Install Rubber Pavers
The steps for installing rubber pavers may vary slightly depending on the location of your project area. Regardless, rubber pavers can be installed on virtually any surface. Follow the steps outlined below to easily and efficiently complete your paving endeavor.
1. Assemble Your Materials
Begin by taking measurements of your project area. You will need these numbers in order to create a unique building plan and determine how many blocks of rubber pavers you need. The blocks per square foot that you need to complete your project will vary on the shape and size of your preferred pavers.
Take very careful measurements in order to determine exactly how much of the materials you will need. When ordering, make sure that the number of pavers you select does need surpass the amount needed to fill the area by more than 5%.
2. Prepare the Project Area
The tasks needed to properly prep your project area for the installation will largely depend on the original surface you will be working with. If you’re building a patio or other project type on dirt, it’s important to start with a good base. Once you’ve thoroughly excavated the area, add a layer of crushed stone (or consider using Brock PaverBase panels) to ensure that the base allows for moisture to flow freely.
If your project area is on a more solid existing surface like concrete, the preparation is slightly different. First, you’ll want to have a clean surface to start with. Sweep away any debris and hose off any mud, mold, or other stains. Make sure that the area is completely dry before beginning the rest of the installation process.
To create drainage for your concrete surface, dig about a 1-foot trench around the concrete. Cover the entire concrete surface with crushed stone and create a slope angling away from your home. Then, using a 2×4 piece of wood, level off the area, filling in any holes.
Note: Keep in mind that if your concrete has been recently poured, you need to wait 4 weeks for it to cure properly before continuing on with the rubber paver project.
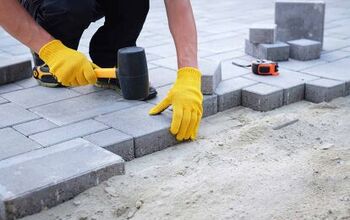
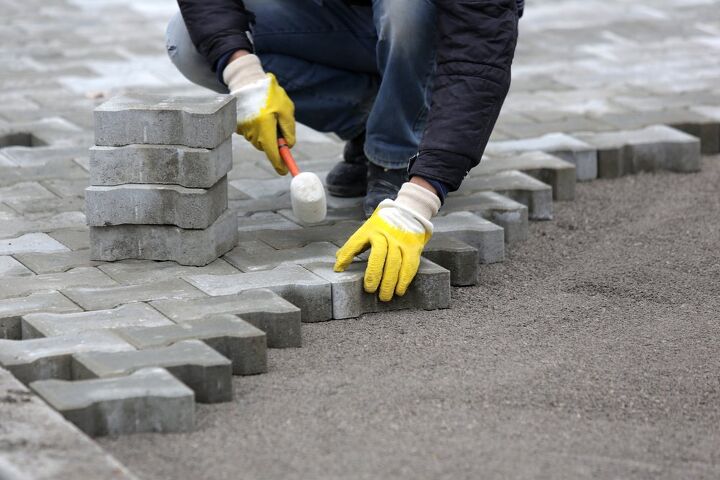
3. Lay the Rubber Pavers
Now that you’ve established the proper base, you can begin the process of laying the pavers. Whether you decide to begin from a corner or the middle, establish a starting point. However, starting in the middle will require you to ascertain where it is by driving a stake into the ground at each corner and using string to create an “X.”
If your pavers are being laid outdoors, they will typically require an adhesive because of temperature variations. In order to be effective, the adhesive must be applied to a dry surface and remain dry until it has cured. Apply the adhesive, assemble the first row and continue the process until all of the surface is completely covered.
Rubber Paver Maintenance
In regards to maintenance, rubber pavers require very little. Although it can be as simple as a quick mop with warm water, we recommend that outdoor pavers get a little more attention. Give your rubber pavers a good high pressure wash every few months to clean and break up any dirt or grime that can accumulate in the seams.
Do You Need Pavers for Driveway and Floors Installed?
Get free, zero-commitment quotes from pro contractors near you.
Wrapping it Up
The safety, slip-resistance, durability, long life-span and sustainability of rubber pavers make them an excellent choice for a paving material. It’s no wonder that they are becoming increasingly popular residentially and among commercial locations.
Depending on your starting surface, the steps for installing rubber pavers will vary slightly. Regardless, they can be very easily installed by yourself or done quickly by a professional.
For more paving tips, check out “ What Is the Least Expensive Patio Material?”

Jessica considers herself a home improvement and design enthusiast. She grew up surrounded by constant home improvement projects and owes most of what she knows to helping her dad renovate her childhood home. Being a Los Angeles resident, Jessica spends a lot of her time looking for her next DIY project and sharing her love for home design.
More by Jessica Stone