How To Install Hurricane Straps With An Existing Roof
Each year hurricanes produce devastating damage, but some of it may be mitigated with the right knowledge. It is possible to reduce the risk with hurricane straps on an existing roof, as long as you remove the soffit first. Follow along as we explore all of the key steps in installing hurricane straps.
If you are considering replacing your roof, get a quote from local contractors in your area here.
Hurricane straps can potentially prevent the total destruction of your home if they’re installed at the right time. These devices are capable of withstanding immense wind speeds, keeping your roof securely attached to the rest of your home. With some know-how, you can decide whether or not installing hurricane straps is right for you.
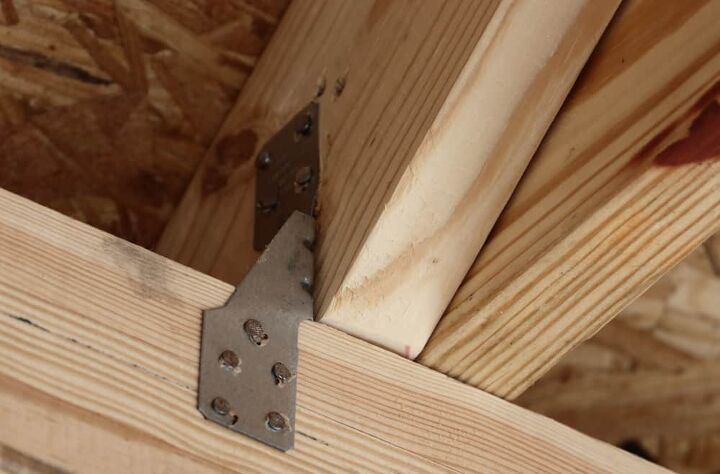
Hurricane straps are metal connectors used to secure the roof’s rafters to the frame of the house. They provide increased protection against hurricanes and tropical storms.
To install hurricane straps on an existing roof, you’ll need to remove the soffit. Once removed, you’ll need to secure the connectors at every wall to rafter connection. To do so, secure nails in every hole from the side and front of the strap. Be sure to use joist hanger nails to remain up to code (often stamped 28 on the top of the nail).
In many cases, it is preferable to install hurricane straps during construction once the frame of the house has been completed. In other instances, hurricane straps can be installed during a roof replacement or re-roofing.
Make sure to secure floor to floor connection by making sure each floor is connected to the floor below with the straps. While we recommend hiring a professional to do this, we provide step by step instructions if you are the DIY type.
Should You Hire A Contractor Or Do-It-Yourself?
Installing hurricane straps on an existing roof can be a difficult process. Most professionals recommend doing it during construction or while the roof is being replaced. This is because of the difficulty of accessing the necessary parts of the house after the roof is in place.
If neither of those is an option for you, you may decide to take the project on yourself. Keep in mind that it isn’t as simple as installing the hurricane straps in the attic, though. Installing hurricane straps on an existing roof takes time.
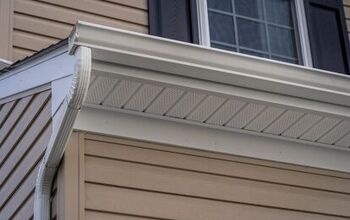
It involves removing the soffit on the outside of the house or parts of the drywall on the inside. Because removing and reinstalling drywall can be messy and expensive, the soffit approach is ideal.
The actual installation doesn’t require much skill, however. If your wary of the amount of effort or any inexperience you have, it might be best to consult a professional.
Steps To Installing Hurricane Straps On An Existing Roof
Installing hurricane straps involves three basic steps.
Tools You’ll Need
After planning for the installation, you’ll need the following tools:
- Hammer
- Ladder
- Utility belt
Here’s a list of materials that you’ll need:
- Galvanized ring shank nails (at least 1 ½ inches long)
- Galvanized hurricane straps (multipurpose or timber)
It’s important to have someone to assist you during this process. A friend or neighbor can hold the ladder while you are hammering. This decreases the likelihood that you will get injured while installing the hurricane straps to your home.
Additionally, a utility belt can make the process faster by giving you access to your supplies and tools without having to climb down the ladder.
Why Ring Shank Nails Are Best
Ideally, ring shank nails that are at least 1 ½ inches long work best. This type of nail is designed to provide more grip. Ring shank nails will decrease the likelihood that they will move or get ripped out.
Galvanized nails and hurricane straps are preferred for this project. They won’t rust, which would result in potential cosmetic damage and weakening of the connections.
Once you have all of your supplies together, these are the steps to installing hurricane straps to a house with an existing roof:
- Remove The Soffits
- Attach The Hurricane Straps
- Replace The Soffit
Step 1. Remove The Soffit Outside Of The House
The first step to installing hurricane straps on an existing roof is to remove the soffit on the outside of the house. This is the panel that goes between the roof’s eaves and the walls of the home. It comes in various materials, including vinyl, aluminum, and wood.
Removing the soffit is simple. Starting at the edge of the roof, slide the soffit towards the end of the eaves. The individual pieces should come out quickly.
You can also gently pry the soffit from the channel it sits in, allowing you to pull the pieces out without sliding them. This route does run this risk of damaging the soffit, mainly if it’s aluminum, so you may not be able to reinstall the existing pieces.
Wood soffit cannot be removed this way and will require additional steps.
Step 2. Install The Hurricane Straps
Once you’ve got all of the supplies together, you can begin installing the straps. With someone holding your ladder, it’s as easy as placing the hurricane strap at the proper junction and hammering it into place.
Be sure to use the right nails. Nails that are too short will be functionally useless and provide little to no assistance during a hurricane. Most hurricane straps come with at least four nail holes per attachment point. A nail should be inserted into each of these to ensure maximum hold.
This will be a slow process because of the awkward angles involved. This is part of why it’s recommended to install hurricane straps during a new roof installation.
Step 3. Replace The Soffit Around Your House
Once you’ve successfully installed the hurricane straps, you can begin replacing the soffit that you removed. If any pieces were damaged, they’d need to be replaced. Finding a matching color, especially if your home is old, can be difficult. Keep that in mind when getting the replacement pieces.
Vinyl and aluminum soffit can be installed by sliding it into the channel and then gently pushing it into place. If any facia had to be moved to get it out, this can be replaced once you have the soffit back in place.
If you had to remove a wooden soffit, this might be an excellent opportunity to install a new one. Vinyl soffits are the most recommended because they allow for better ventilation. However, there are plenty of options available that may better suit your home.
Getting The Right Kind Of Hurricane Straps
To get the right number of hurricane straps, count out the number of intersections where the rafters and trusses meet the studs of the walls. For maximum effectiveness, a hurricane strap must be installed at each of these points.
Multipurpose or timber hurricane straps are ideal for homes with existing roofs. These types of hurricane straps are designed for a variety of applications. Your local supply store will be able to help you determine which will work best for your application.
You’ll need to remove the soffit around your home before you can determine how many straps you need to purchase. Each home varies, so being able to count the intersections of rafters and studs is important.
Cost of Hurricane Straps
Hurricane steps cost between $0.35 and $0.95, depending on the store and location. This difference often has little to do with the quality of the strap, so try shopping around.
Related Questions
Does My Home Need Hurricane Straps?
Not all homes need hurricane straps. If you are not in an area that receives frequent storms, you may be better off saving this project for a different time. However, homes located in areas with large volumes of hurricane activity would do well to have hurricane straps installed.Additionally, some states require homes to have hurricane straps before selling. Contacting your county or city is essential if you aren’t sure about this requirement.
Can I Install Hurricane Straps If I Have A Brick Home?
Yes! In most cases, the bricks on the outside of a home are a veneer that stops just below the roof. Because of this, the process should be very similar to the installation described above.If you’re unsure or wary about removing the soffits without knowing that this is the case, reaching out to a contractor is a good idea. They can answer any questions you have about the composition of your home.
Do Hurricane Straps Go On Both Sides?
Most hurricane straps are one-sided, so they only need to go on one side of the rafter. Some types are two-sided, however. If you have any questions about this, ask before purchasing.Either option will work. However, you will likely find that a one-sided strap is ideal because it requires less labor.
Related Guides
UpgradedHome participates in affiliate programs. When you purchase through our links, we may earn a commission.

We are a team of passionate homeowners, home improvement pros, and DIY enthusiasts who enjoy sharing home improvement, housekeeping, decorating, and more with other homeowners! Whether you're looking for a step-by-step guide on fixing an appliance or the cost of installing a fence, we've here to help.
More by Upgraded Home Team


![Cost To Drill A Well [Pricing Per Foot & Cost By State]](https://cdn-fastly.upgradedhome.com/media/2023/07/31/9074980/cost-to-drill-a-well-pricing-per-foot-cost-by-state.jpg?size=350x220)