How To Install Bifold Doors In A Rough Opening

Bifold doors offer modern convenience because they are quite efficient at space management. Many homeowners prefer these for creating unobstructed access to their closets. When installing these types of doors, you don’t need professional help, as this is a DIY friendly project.
If you want to install bifold doors in the rough opening, you need enough space for the jambs, drywall, and hardware. Ensure you have all the necessary tools, as you will have a lot of measuring to do. Measure the opening to ensure the doors will fit. Install the doors by drilling pilot holes and then securing the door to the space.
This guide will explain how you can install your bifold doors, whether you choose drywall or jamb. We also list all of the tools you will need so you don’t need to go searching for this information elsewhere.
Do You Need to Hire a Framing Contractor?
Get free, zero-commitment quotes from pro contractors near you.

Before You Begin: Gather All Tools And Hardware
The tools needed for installing bifold doors are:
- A measuring tape
- A claw hammer
- Chisels
- Screwdriver
- Combination Square
- A Cordless drill with a drill bit set
- A driver bit
- A spirit level
- Pincers
- A handsaw
- Builder’s ruler
- A stepladder
- Screws
- Nails
- A pencil
- Ear, dust, and eye protection gear
The hardware you will need for the bifold door includes:
- Spanner
- Jamb bracket
- Bottom pivot
- Top pivot guides
- Knob and screw
- Assorted screws
- Head track and trims
- Bifold leaves
After gathering all the necessary brackets, start the procedure.
First, Decide Between Drywall Or Jamb
Bifold doors can be installed with just the drywall. However, some homeowners like to add jambs to the border of the door slab. The flat jambs will need to be smaller in dimensions than the rough opening to fit in the wall. You can choose which one you want and then follow the instructions pertaining to that specific type.
Instructions For Installing A Bifold Door With A Jamb
If you’ve chosen a jamb, follow these instructions thoroughly. However, you will still follow these same steps for a drywall installation. However, a couple of actions will be slightly different. You can find the differences in the section below this one.
- Measure the opening. Measure the rough opening by increasing the bifold door’s height by 2 inches and width also by 2 inches. Thus, for a rough opening of 48 x 80 inches, the jamb opening will be 50 by 82 inches.
- Drill the pilot holes. Use the handsaw to cut the flat jamb. Pre-drill the pilot holes. Then, drive the screws in the holes to create a jamb frame. Insert the jamb frame into the rough opening. Make sure that the jambs are slightly smaller in dimension than the rough opening. Drill the pilot holes on the sides of the jamb to the rough opening.
- Insert the packers and drive nail the jamb. Insert the packers between the jamb and the rough openings where you drill pilot holes. Then, drive nails in the holes using a claw hammer.
- Check the level. Align the spirit level on the jamb vertically to check its level with the ground. If the level is not right, insert the packers in the required areas and recheck them.
- Measure the opening. Use the measuring tape to check for consistency in the height and width of the installed jambs. Use these measurements to get yourself the right bifold door slabs.
- Mark the points. Mark the centerline of the top or pivot jamb for the head track. Repeat the process for the bottom jamb bracket as well. Make sure that both markings are lining up in the center. Extend the centerline across the jamb.
- Position the track. Cut the head track to the correct length to fit in between the side jambs. Additionally, the track needs to be firmly placed against the pivot jamb. Drill the pilot holes in the head track after positioning it correctly and insert the screws to mount it in place.
- Install the bottom bracket. Position the jamb bracket at the marked line at the bottom. Drill the pilot holes and insert the screws to mount the bracket.
- Insert the pivots. Most bifold doors that you purchase at a local store will have predesigned holes for the pivots. If not, then you might have to drill the pivot holes first. Insert the bottom pivots in the holes. You might need to hammer the pivot a little bit to fit them inside. Insert the top pivots as well.
- Adjust the bottom bracket. Before installing the bifold door, make sure to adjust the bottom jamb bracket’s position by loosening the adjustment screw. Additionally, you need to adjust the height of the bottom pivot using the nut present on it.
- Adjust the pivot socket. Repeat the procedure to adjust the socket on the head track. For this, you might have to check the manufacturer’s instructions to set the correct distance before mounting the bifold door in place.
Different Steps You’ll Need For A Drywall Opening
When you first measure, you will measure the rough opening size by increasing the bifold’s height by 2 inches and width by 1 inch. For a rough opening of 48 x 80 inches, the drywall opening will be 49 x 82 inches.
Something to note is, if you do not have a preference between jambs and drywall, you can choose a larger jamb opening. That way, you can trim it afterward with lumber or jambs irrespective of the size.
Mounting The Bifold Door Slabs
While the slabs are folded from the hinges, position the bottom pivot over the bottom jamb bracket while holding the door in place at the bottom, press down the top pivot, and insert it in the socket. Release your finger from the top pivot, which should snap automatically in the socket.
If everything is followed correctly, the base bi-fold door slab should mount perfectly in between the top pivot socket and the bottom jamb bracket. Then, press the guide pivot on the second door slab and insert it into the head track. Release your finger to let the pivot snap in between the track system.
Make The Necessary Adjustments To The Bifold
If the bifold door does not sit properly in between the hardware, make the necessary adjustments to the top pivot socket and the bottom jamb bracket.
Fit The Architraves Over The Opening
To fit the architraves, mark out on the top opening and cut the trims of relevant lengths to fit in place. Start with the top opening first, and then move to the sides. Make sure that you install the trims on the opposite side of the door hinge.
Install The Door Knob
Mark the correct position for the doorknob on the bifold door. You can refer to the manufacturer’s instruction manual for the right position for the knob. Drill a pilot hole and drive the screw in it. Attach the doorknob.
If the above steps have been followed correctly, your bifold door should be installed correctly in the rough opening. Do note that the above steps have been provided for a standard two-leaf bifold door. For a more heavy-duty and complicated multifold model, you might need to refer to a different guide.
When Should You Use A Bifold Door?
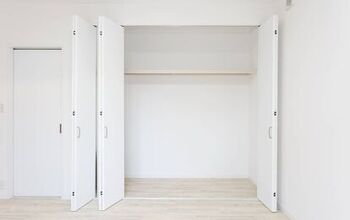
Bifold doors are quite efficient at managing space. Unlike a standard door, which swings open, bifold doors open in a confined space due to a track system that slides and folds the doors to create an opening. These are preferred for small closet areas in bedrooms so that there is enough space to enter the room and store your belongings.
It is also not obligatory to use a bottom track for a bifold door. The installation steps discussed above only use a head track to support the door in place efficiently. For internal bifold doors, plastic, and wood doors, a bottom bracket is not a necessity.
Related Questions
How much room do you need for a bifold door?
Do bifold doors need a frame?
How much does it cost to install a bifold door?
Do You Need to Hire a Framing Contractor?
Get free, zero-commitment quotes from pro contractors near you.

Wrapping It Up
Installing a bifold door can be a bit of a hassle, so we recommend that you have a friend or family member assist you with this project if you decide to do it on your own. Whether you’re installing a jamb or just doing drywall, the steps are pretty similar, although you’ll follow a different measuring technique to install for drywall. Regardless, be careful, and go slowly so that you don’t’ have to go back and redo anything later.

We are a team of passionate homeowners, home improvement pros, and DIY enthusiasts who enjoy sharing home improvement, housekeeping, decorating, and more with other homeowners! Whether you're looking for a step-by-step guide on fixing an appliance or the cost of installing a fence, we've here to help.
More by Upgraded Home Team


