How To Install A New Window In A House With Vinyl Siding

Installing a new window anywhere in your home can seem like a daunting task. Just the thought of putting a hole in the side of your home may make you cringe. However, if done correctly, installing a new window in a house with vinyl siding can be almost as easy as installing a replacement window in an existing space.
The procedure for installing a new window in a house with vinyl siding is as simple as removing the interior, framing the window, prepping the window space, fitting the window, sealing, installing, and patching the vinyl siding.
You will need about six to eight hours for this job so make sure you have everything ready to go bright and early. Check the weather forecast to make sure it is not going to rain or snow. And make sure you have all the correct tools and parts that you need before beginning.
Do You Need Window Replacement Services?
Get free, zero-commitment quotes from pro contractors near you.

Gathering Your Tools and Materials
There is nothing more annoying than being in the middle of an important job and realizing that you forgot an essential tool or part. Having to stop your work and make a run to the hardware store can mean the difference between the job getting done that day or having to postpone the job.
So, try to make sure you have all the tools you need before starting on this window job. Here are the materials and tools you should need:
Materials
- A new construction window (NOT a replacement window)
- Two-inch roofing nails
- Three-inch deck screws
- One or two eight-foot-long 2×4
- A half-inch-thick sheet of plywood larger than the window
- Moisture barrier material
- Vinyl siding to match the existing siding
Tools
- Table saw
- Jigsaw
- Staple gun
- Caulk gun and caulk
- Basic carpentry tools (hammer, utility knife, level, square, chalk line, tape measure, wood chisel)
- Cordless drill
- Nail gun
How to Install a New Window in a House with Vinyl Siding
This job takes a bit of carpentry skills and quite a few tools so be sure you are up to the task by reading over all of these steps before deciding whether to do it yourself or call a pro. That being said, if you follow the instructions outlined below carefully, you should be able to install a new window in your home as long as you do not run into any complications.
Step One: Removing the Interior
Remove any drywall and other wall covering and insulation to get to the studs. Determine which studs you will have to cut to install the new window frame and which you can keep. Make a king stud the same length as the existing studs.
For the top, measure from the floor to the top with the header size plus the window jamb height, and 30.5 inches (or however big your sill will be plus ½-inch) for the new window. Mark the studs in those spaces. For the bottom, measure up 27 inches and mark the studs.
Using a square, draw a line on both faces and the exposed edges of the studs. Place 2x4s under the top place to support the wall and use a handsaw to cut the stud all the way to the siding. Remove the studs.
Step Two: Framing the Window
The framing process takes the longest time because you have so many parts to assemble and install. Cut two cripple studs and wedge your king stud with the cripple studs between the top and bottom plates.
Make a header from two 2x6s by measuring the width of the jamb and adding three inches for the jack studs and one inch for wiggle room. Nail the two pieces together with a piece of ½-inch plywood in between. Cut one or two pieces of the 2x4s to length for the sill and screw it in place. Attach one of the pieces to the top of the cripple studs.
Be sure to square up the pieces as you go along. Drive the screws in to attach the jacks to the king studs on the sides. Measuring between the two jack studs, cut two more pieces of 2×4 to that length for the rough sill. Nail them together and put them between the jacks. Fasten them using toenailing.
Step Three: Preparing the Window Space
From the inside of the home, drill holes at each corner all the way through the siding using a 5/8-inch bit to mark the outside for cutting. Setting a level on the marks where the window will be, draw lines for the frame.
Measure from each of the holes you drilled to the width of your saw baseplate. Fasten a guide board to the siding and cut the siding with a jigsaw, using the guide board to guide your blade. Move the guide board for each side, top, and bottom as you cut. Be sure to use your level to check that everything is squared up before moving on to the next step.
Step Four: Fitting the Window
Place the window into the opening to make sure that it fits. The opening should be just a bit bigger than the window. The manufacturer should have instructions on the window to tell you how much space to use. Cut it again if the measurements are not perfect. The window has to fit perfectly and be completely level and square.
Step Five: Sealing the Window
Go ahead and line the window opening with strips of moisture seal about eight inches wide. Then tuck them into the siding.
Slit the corners a bit with your utility knife and fold those ends toward the interior. Trim them if needed. They should just extend a bit past the interior edge. Staple it all with a staple gun working from the bottom to the top.
Place two ½-inch spacers at the bottom of the window opening just about ½-inch from the sides. Check to be sure they are level. Use shims if you need them to make everything level. Use caulk or nails to keep the shims in place and make sure they are flush with the siding.
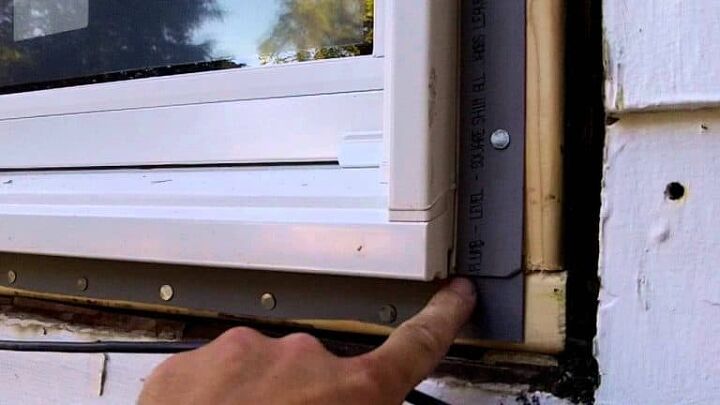
Step Six: Installing the Window
From the outside of the house, push the window carefully into the space. Make sure it is right side up so the weep holes work properly. Drive a nail halfway through the trim at one of the upper corners. Check that everything is level. Make any needed adjustments to the shims.
Recheck that it is level and then drive the nail all the way through. Drive nails through all corners and then along the perimeter.
Use shims in the top and middle of the window until the window is plumb. Be sure that the window is working before you secure it with nails into the casing. Apply the flashing and caulk to the outsides of the window to seal it in.
On the inside, use shims to make sure everything is snug and level. Use a nailset and nails to set the shims. Add insulation and make sure the shims are flush with the wall. Apply any decorative molding or casings inside.
Step Seven: Patching the Siding
The last step is to patch the siding with matching siding around the window. Make sure the colors match and use as much of the old siding you removed as you can. You want the siding to look as much like the old siding as possible.
You may have some painting or touch-ups to do afterward just for aesthetic purposes. That can be done to your discretion.
Wrapping Things Up
As always, wear protective goggles, gloves, and take special precaution when using power tools or any other kind of tool. If you get stuck or are in doubt on any step of this process, call a professional. You do not want to leave a hole in the wall overnight so start as early as possible.
Do You Need Window Replacement Services?
Get free, zero-commitment quotes from pro contractors near you.
Related Questions
Can you replace a window without removing exterior siding?
In order to avoid removing the siding when you are replacing one or more windows on a vinyl-sided house, the existing window frame, jambs, and sill cannot be rotted or damaged. However, if you’re installing a new window into a house with vinyl siding, removing the siding is inevitable.
What is the best time of year to replace windows?
In an ideal world, it’s best to perform window replacements when the weather is warm, such as summer or spring. This allows you to avoid chilly drafts from entering your home and costing you more money to heat your living spaces. When caulking the windows, you should apply the product in temperatures that range from 41 degrees to 68 degrees Fahrenheit.However, there are benefits to installing windows in fall and winter when hiring a professional. This is considered “off season” for window installers and you can expect them to have more availability, offering reduced wait times to get your project finished.
Should windows be installed before siding?
Ideally, you should install windows and siding at the exact same time. However, when this isn’t possible, it is best to install the windows before the siding.

I am a DIYer who loves writing about anything home-related. When I am not writing, you can find me studying for my PhD in Psychology, photographing nature, and swimming at the lake with my grandkids.
More by Patricia Oelze


![Finishing Basement Without Permit [Is It Really Illegal?]](https://cdn-fastly.upgradedhome.com/media/2023/07/31/9070078/finishing-basement-without-permit-is-it-really-illegal.jpg?size=350x220)


![The 5 Best Angle Grinders – [2022 Reviews & Buyer's Guide]](https://cdn-fastly.upgradedhome.com/media/2023/07/31/9071326/the-5-best-angle-grinders-2022-reviews-buyer-s-guide.jpg?size=350x220)


![Cost To Drill A Well [Pricing Per Foot & Cost By State]](https://cdn-fastly.upgradedhome.com/media/2023/07/31/9074980/cost-to-drill-a-well-pricing-per-foot-cost-by-state.jpg?size=350x220)