How To Fix The Gap Between A Stove And Countertop
When you are cooking, crumbs and ingredients are bound to fall into the gaps between your stovetop and counter. Instead of always pulling the stove out from the wall to clean underneath, you can quickly fill these spaces. But, what can you use to fill these gaps?
To fix a gap between a stove and countertop, you can either use silicone, a plastic tube, or a pre-made gap cover. Silicone is the easiest and most practical material to use, but stainless steel and metal are great options as well. You can purchase a roll of plastic T-molding to perfectly measure the cut.
In this article, we will explain why you should take the time to fill these gaps. We will also give you basic instructions for each option; this process will take you less than five minutes to complete. So, what are you waiting for? Let’s get to it!
Do You Need Handyman Services?
Get free, zero-commitment quotes from pro contractors near you.

Why You Should Cover The Gap
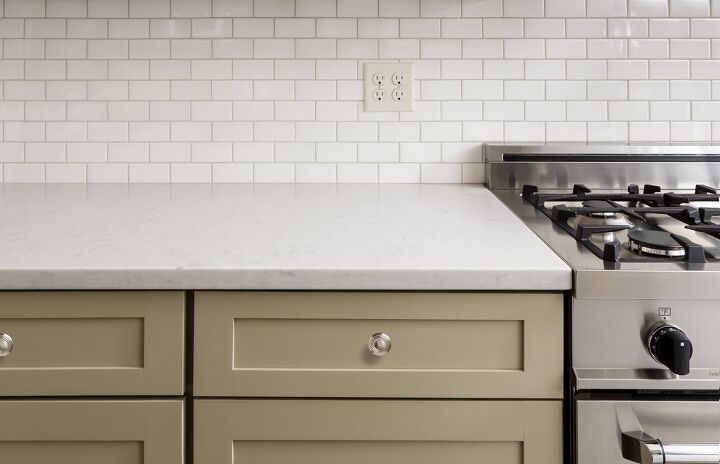
The gap between your stove and countertop typically goes unnoticed, that is until you drop food down there and can’t get it out. The opening is so small; you can’t scrub the sides of both surfaces. Leaving rotting food will eventually attract unpleasant presences, such as:
- Rodents
- Pests
- Insects
- Mold
Covering the gap will help to avoid food falling in between your counter and stove. You won’t have to pull the stove out to clean anymore (assuming that you do). It’s convenient for you, and it’s cheap to do, so why not do it? You won’t have to spend the money to fix any worn-out spots from the damage the food causes.
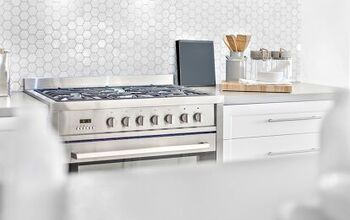
Use A Premade Gap Cover
Gap covers are long T-shaped pieces of plastic or silicone, commonly found in hardware and DIY stores and online retailers. The lowest part of the ‘T ‘slots into the gap between the stove and the counter. The ‘T’ covers the gap between your stove and the adjoining countertop.
Gap covers are available in a whole range of materials, including plastic and stainless steel, and there are many different colors to choose from. If there is a disparity in height between the top of your stove and the countertop, use a silicone material as it’s more flexible and adapt to the shape better.
Instructions To Fit The Cover
- Place the cover into the gap. You can insert the bottom arm from above or let it slide in from the front. The top line of the ‘T’ shape should create a tightly closed seal, which will stop any food debris or liquids from falling into the gap.
- Maintain your strip. When you notice that the cover has become visibly soiled, remove it and wash by hand with dish detergent in a sink. Ensure the cover is completely dry before replacing it into position. If it’s not completely dry, food and crumbs will cling to it. Also, mold may begin to grow over time, which would ultimately defeat the covering’s purpose.
Should the top of the cover not fit tightly, the strip at the bottom will stop anything from falling into the space. If any food debris enters, wipe away with a cloth.
Fill The Gap With Plastic Tubing
Use a ruler or a tape measure, take the exact width of the gap in order to select tubing of the correct size. If you’re filling gaps on both sides of your stove, be sure to measure both of them as there’s no guarantee they will be the same size.
Buy transparent PVC tubing, which is 1⁄4 inch (0.64 cm) wider than the gap. The clear plastic tube will create a virtually invisible barrier between the counters and the stove. By selecting a tube that is a little thicker, you’ll create a firm seal that won’t fall or slide down easily.
Installation Instructions
- Press the tube into the gap. To install, using your fingers, simply press the tube into the gap between the stove and countertop until it is perfectly level.
- Check the positioning. Ensure the end of the tube is pressing against the wall before you secure it in place. Keep it level with your countertops because if you push too far down, you’ll be creating a trap for crumbs that fall onto the tubing.
- Maintain your tube. When it gets dirty, remove the tube, and wash it in a sink full of warm soapy water. Ensure it is thoroughly air-dried before replacing it.
Using T-Molding
An alternative is to buy a roll of plastic T-molding to which complements the style of your countertops. Transition molding, or T-molding, which is available in various colors and styles, is most often used in floors to cover any gaps or spaces.
Installation Instructions
- Measure and trim your molding. Before installing, measure from the edge of your counter to the back of the stove and cut the molding to the exact length required. Trim it carefully with a utility knife or a pair of molding shears so it perfectly fits the length of the gap.
- Wrap duct tape around the bottom arm. If you need a tighter fit, you can create one using duct tape, if necessary. Should the molding fit loosely in the space, use duct tape to wrap the bottom (vertical) arm and make it thicker. Keep wrapping more tape until the molding fits tightly into the gap.
- Test the fit. With each layer of tape, test to check whether the T-molding is holding it firmly in place. Work neatly to ensure that none of the sticky side of the duct tape is left exposed.
- Clean your molding. When the molding gets dirty, it can be cleaned with a cloth and soapy water. Should this prove inadequate, take it out, soak it in soapy water, then scrub with a non-abrasive sponge or cloth. Once it has thoroughly air-dried, it can be replaced.
Cleaning The Gap Between Your Stove And Counter
It goes without saying that if there is already food or other debris in the space between your stove and the counter, this needs to be removed before closing the gap.
If the food is left there, you may find it starts to have an unpleasant odor or even that it will attract pests. It could attract unwanted insect pests and even vermin. How you clean this area will depend on the width.
Instructions For Narrow Spaces
- Scrape debris out with a butter knife. Keep the blade facing away. Insert the knife into the gap between the stove and cupboard and use it to gently ease any waste towards you for disposal.
- Wipe the area down. Next, spray a kitchen cleaner or all-purpose disinfectant onto a paper towel or microfiber cloth and wipe the site to ensure it’s spotless. Repeat as many times as necessary.
Instructions For Wider Spaces
- Improvise a tool or use your vacuum to pull up food. Twist a microfiber cloth around a plastic spatula or stick and use this tool to collect out any debris. If there’s space, you can use the narrow attachment on your vacuum cleaner to ensure that the area is perfectly clean.
- Dry the area thoroughly. Make sure that it’s entirely dry before using any electrical appliance close by.
Related Questions
How do you fill the gap between countertops and refrigerators?
Filling a gap between your counters and the fridge is the same as filling a gap between your stove and your counters. While a T mold wouldn’t work in this case, plastic tubing will. Follow the instructions for plastic tubing in this article to fill your gap.
How much space do you need on each side of a stove?
While gaps can be annoying, they are necessary. You will need at least 1 inch on each side of your stove. This is so that it can breathe and so that the heat doesn’t warp the material of your counters over time.
Do You Need Handyman Services?
Get free, zero-commitment quotes from pro contractors near you.
Wrapping It Up
We understand how frustrating it is to drop food in the crack between your stove and counters while cooking. It’s even more annoying when you have to figure out how you’re going to get it out, and even then, you won’t get all of it.
Perhaps it’s a good idea for you to cover this gap to bypass the unnecessary cleaning. Covering the opening will allow you to spend less time cleaning and more time spending your energy elsewhere.

Heather is a passionate writer who loves anything DIY. Growing up, she learned everything from home repairs to design, and wants to share her tips with you. When she's not writing, she's usually hiking or searching for her next DIY project.
More by Heather Robbins


![10 Best Electric Lawn Mowers - [2022 Reviews & Top Rated Models]](https://cdn-fastly.upgradedhome.com/media/2023/07/31/9070486/10-best-electric-lawn-mowers-2022-reviews-top-rated-models.jpg?size=350x220)