How To Fix A Crumbling Asphalt Driveway

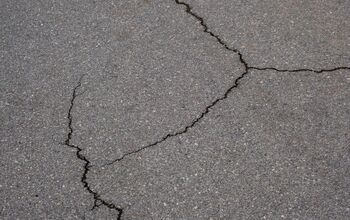
Driveways are supposed to be a place where your car can feel at home…and where your car’s wheels won’t get too banged up. When you first kick off your driveway’s life, the asphalt is smooth and accommodating. Unfortunately, wear and tear can happen. If left for too long, asphalt cracks turn into crumbles, and then you’ve got a mess to deal with. So, how do you fix this problem?
To put things simply, to fix your crumbling asphalt driveway, you will need to clear out the cracks, clean the pavement and remove the debris that’s crumbled away. After that, you’ll need to add filler to the areas that were cleaned out. You will then need to get rid of dips and potholes by adding filler. Once that’s all done, you’re going to have to add sealant to lock your new asphalt in.
Though this is usually a job that’s left for handymen and paving crews, it is possible to do it yourself if you have the right tools at your disposal. If you’ve been wondering whether it’s a job that you want to do, here’s what you’re going to need to know to fix things up.
Do You Need Asphalt Paving Repair or Patching?
Get free, zero-commitment quotes from pro contractors near you.

Before You Begin: Is This A Job For A Pro?
Let’s just be honest here. There are cracks and crumbles, and then there are driveways that are barely driveways anymore. If your driveway is just starting to crumble or has a couple of cracks, then you can do a DIY job without much issue. On the other hand, if your driveway is almost entirely crumbled, you will need to do a full re-pave to get the smoothness you want.
If you are not sure that you will be able to do this job, or you don’t have the tools, you should consider consulting a specialist. Now that we’ve gone over that let’s get to getting rid of those crumbles!
How Much Does It Cost To Fix A Crumbling Driveway?
This all depends on whether you do it yourself as well as the size of your driveway. If you choose to hire a professional, getting your driveway repaired will typically cost between $850 to $3,100.This is about $6 to $10 per square foot, depending on what you’re patching up. If you choose to go the DIY route, you will need to spend about half that much. Whether the labor is worth the cost-saving is up to you to decide.
How To Fix A Crumbling Asphalt Driveway
Fixing a crumbling asphalt driveway isn’t going to be easy. Rather, it’s a tedious process that will require you to be pretty darn careful when it comes to the details. Thankfully, a little elbow grease can help you save big. Here’s how you can fix your asphalt.
- First things first, clean your driveway. Remove any crumbled asphalt that’s fallen into cracks, as well as any debris that is found in depressions or potholes. You can use a shop vacuum, a broom, or brushes to get it all out. Dispose of the debris according to your local ordinances.
- Then, wash down your driveway with a garden hose and a pressure nozzle. This will help rinse off any excess oil or grime that could be stuck to your driveway. Let your driveway dry until it’s damp but doesn’t have pools of water on it. If your driveway is heavily soiled, you might need some cleaning agents to clear it all out.
- Now, you’re going to need to be able to fill in your asphalt driveway. To do this, you’re going to need to figure out whether the crumbles are happening due to potholes, dips, or cracks. Here’s to fix each of these:
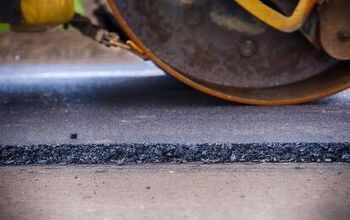
Cracks. Cracks can be fixed by applying asphalt filler deep into the cracks.Depressed Areas. Dips will need to be filled in with patching material. Once you’ve patched in the filler, you’ll need to prime the area and apply a layer of liquid asphalt to it. Then, use a trowel to spread the cold patching material evenly so that it matches the other areas. Then use a metal tamper to tamp it in. Wait for 24 hours before you go any further in your fixes.Potholes. Prime the area, then add cold patching material two inches deep. Tamp it in, then add another two inches, then tamp t again. Keep at it until you have overfilled the pothole, leaving a slight mound over the area. Tamp it in as much as you can, then let it cure for 24 to 36 hours before you go any further.
- Once you’ve done all the fixes, you’re going to have to clean up the driveway. This starts by cleaning up your driveway once more. It may be monotonous, but you will need to clean up the driveway again. Otherwise, you run the risk of not having the seal work well. Use a broom or a vacuum to get rid of significant debris.
- Wipe down your driveway with a cleaner to remove any fine particles or oils. Fine particles can wreck an otherwise excellent repair job. A quick wipe down is all you need to make the driveway ready for its sealant, so don’t get too crazy when you clean it up. If your driveway is still moist, it’s okay to continue onto the next step.
- Stir your sealant. You want to make sure that it is well-mixed before the next step. If you notice any streaks, you should keep stirring. You want it to be a uniform consistency before it’s applied anywhere.
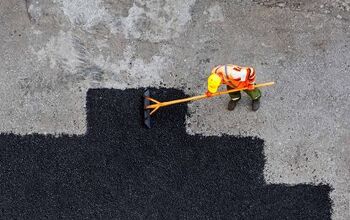
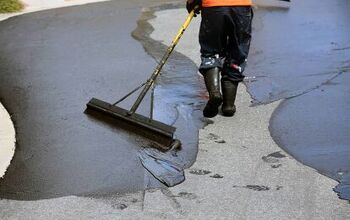
- Use a roller to apply the sealant to the driveway in small patches. Doing this piece by piece will help you ensure that you don’t miss a spot and will also let the adhesive soak into the areas where cracks occurred.
- Once your driveway is covered in the sealant, you will need to put up some barriers to prevent cars from coming in. Sealant is the final step in the process, and it’s literally what locks everything in. In order to ensure that you have your driveway correctly sealed in, you will need to let your driveway sit for at least 24 hours. After that, you can remove the barriers and enjoy a freshly patched driveway.
What Causes Asphalt Driveways To Crumble?
There are several things that can lead to your asphalt driveway crumbling, such as:
- Weather changes
- Asphalt that is not sealed properly
- Wear and tear
However, regardless of the reason, you need to take immediate action and fix the asphalt as soon as you see the crumbling or cracking. This will help make it to where it doesn’t worsen. Below, we will explain these causes in detail so that you can best prepare yourself.
Weather Changes
Asphalt isn’t strong enough to withstand nature’s effects, mostly if the asphalt is laid in a state where it rains a lot, such as Washington and Oregon. The water will sink into the asphalt and freeze, which then causes it to crack. This makes the asphalt weak and prone to wear and tear over time.
However, on the other hand, heat can also make the asphalt weak. So, places like Arizona and New Mexico are more prone to crumbling asphalt. If you live in an area with lots of rain, or lots of heat, keep an eye on your asphalt or use a different product.
Asphalt Isn’t Sealed The Right Way
If asphalt wasn’t cured before seal coating, this could cause issues as the asphalt was not sealed the correct way. Actually, you may even have to wait up to a year to even seal the asphalt in the first place, or else, the flexible nature of the asphalt will disappear. This will then lead to cracking and crumbling.
Excessive Amounts Of Wear And Tear
If you provide excessive amounts of wear and tear to your asphalt, this will lead to cracking and crumbling. Examples of excessive wear and tear include:
- Parking heavy machinery or equipment
- Turning wheels back and forth repeatedly
- Letting lawn chairs create dents from sitting
Eventually, repeatedly doing these things will lead to crumbling. By being proactive, you will be able to keep your asphalt in tip-top shape for longer. However, remember that it is asphalt, and eventually, you will need to repair it somewhere later on down the line.
Do You Need Asphalt Paving Repair or Patching?
Get free, zero-commitment quotes from pro contractors near you.
Our Final Take
Every asphalt driveway will eventually reach a point where cracks start to appear. It’s a natural part of the lifespan of a driveway. Though the cracks, potholes, and dips can be aggravating, the truth is that they can be fixed relatively easily as long as you know what to do. With most minor cracks and straightforward issues, it’s possible to turn your asphalt repair into a DIY endeavor.
The thing that most people don’t like about repairing their own driveways is that the process can be monotonous and tedious. It will involve cleaning your driveway multiple times, layering your asphalt patching, tamping things down, and then wiping down your driveway again before you even begin putting sealant on it. This can lead a lot of homeowners to reconsider the DIY route in favor of a professional job.
That being said, if you have the tools and the patience, there’s no reason why you can’t repair your own driveway. It’s up to you to decide what’s right for your budget as well as your home.

Ossiana Tepfenhart is an expert writer, focusing on interior design and general home tips. Writing is her life, and it's what she does best. Her interests include art and real estate investments.
More by Ossiana Tepfenhart