


How To Fix A Bad Drywall Job (That Has Been Painted)
There are many different types of drywall, and using drywall in your home can make your room look both finished and beautiful. However, when drywall is installed incorrectly, it can make your room look less than ideal. If your drywall was installed incorrectly, it is possible to fix it.
You will need to replace the drywall and repaint the wall. This can be done by preparing the wall, priming the damaged area, coating the damaged area with drywall joint compound, replacing the nails, coating the seams with mud, sanding the area, applying texture, applying drywall primer, and repainting the wall.
Do You Need Drywall Repair Services?
Get free, zero-commitment quotes from pro contractors near you.

What is Drywall?
Drywall is commonly referred to as wall board or sheetrock. Sheetrock is a brand of drywall. Drywall comes in panels and can attach to studs in order to create walls. Drywall is made of gypsum plaster. It comes in a wide variety of sizes and thicknesses.
Drywall was invited in 1916, but it did not become popular until the 1940s. During the baby boom, drywall became very popular as more new homes were built across the country in order to accommodate for the millions of babies born.
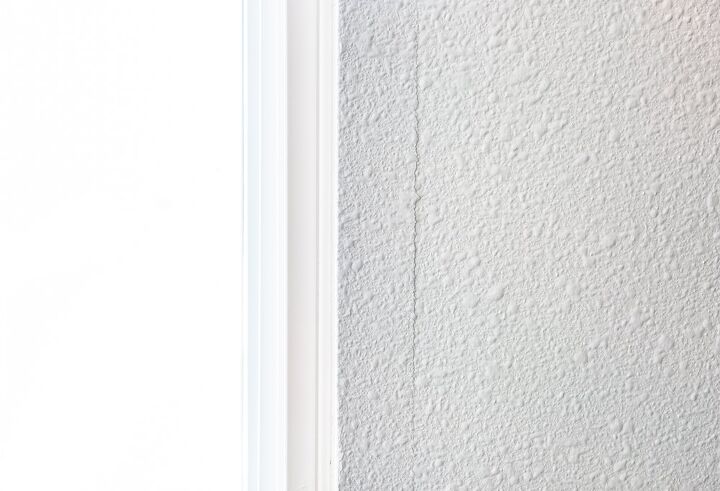
Signs of a Bad Drywall Job
Some signs of a bad drywall installation job may include a leftover mess, sagging ceilings, crooked panels, unsmooth surfaces, uneven corners, visible nail and screw holes, or visible joints.
You can tell a bad drywall job when you see one – that is, your naked eye will be able to pick it up. If you are noticing any of the above signs, it is time to consider fixing your drywall to look more finished and professional.
Signs of Toxic Drywall
It’s also important to note that some drywall could be toxic. There are signs that are important to pay attention to that may indicate you have toxic Chinese drywall in your home. These signs can include the smell of sulfur, which smells like rotten eggs. Some other signs can include light bulbs burning out a faster rate, silver jewelry or utensils becoming tarnished, failure of satellite TV receivers, and failure of information displays on microwaves and the television.
How to Fix Bad Drywall
By following the steps below, you can repair your drywall that was installed incorrectly.
Step 1: Prepare the Wall
The first thing you will need to is take a sponge and dampen the wall with a mixture of warm water and a strong detergent. Use a paint scraper to chip off any loose drywall. If there are any bubbles, puncture them with the corner of the scraper. Brush off any mud.
Then, take off the section you wish to repair with a utility knife. If there is any loose mud or dust, remove it with a dry paintbrush.
Step 2: Prime the Damaged Area
Them, apply drywall primer to the part of the wall that needs repair. It should dry completely before moving on to the next step.
Step 3: Coat the Damaged Area with Drywall Joint Compound
Coat the seams with either the drywall joint compound or mud. Joint compound is a gypsum-based mixture that can help to give your wall a seamless look. After it is damp, place paper drywall tape on the mud. Repeat this step and make sure it is scraped flat.
There are different types of joint compound to choose from including both the setting-type and premixed. The size of your drywall repair will help you choose from the two options listed below.
Setting-Type: Setting-type joint compound comes in a powdered form that is packaged in a plastic-lined paper bag. This helps to preserve freshness. This type of joint compound is recommended for repair work and patching small holes. It dries quickly. Keep the powder dry; once it is mixed with water, it cannot be reused.
Premixed: Premixed joint compound has the water already mixed in, and it comes in 1 or 5-gallon buckets. If you need to use it again later, this type of joint compound can be saved for future used.
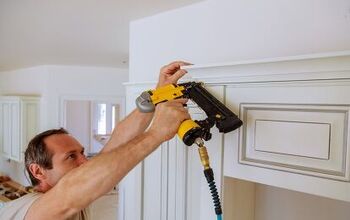
Step 4: Replace Nails
If there are any seams, remove them and replace them with 1 ½ inch drywall screws. To do this, use a drill and No 2 Phillips bit. The head should be covered by a coat of mud.
Step 5: Coat the Seams with Mud
First, get a drywall knife. Then, coat all the uneven seams with either a drywall joint compound or mud.
Allow this to dry overnight. Then, recoat all of the areas. Use a 6” knife.
Use a knife to widen the seam that feathers out into the wall. Use an 8” knife. Then, let this coat dry.
Step 6: Sand the Areas
Using an 80 to 150-grit sandpaper, sand all of the areas you are working on. A work light can help to make sure that all of the areas are smooth and even.
It is important to wear a mask at this step to significantly reduce the number of airborne particles. The mask should cover your mouth and nose.
Step 7: Apply Texture
Apply texture to match the existing texture on the wall by using either joint compound, texture sprayer, or a sponge.
Joint Compound: Using joint compound or drywall mud is a great choice because it is forgiving and good for beginners. This tool allows for many different textures that can be used to match the existing texture on your wall.
Texture Sprayer: A texture sprayer is a great choice for a tool because it is designed for evenly applying dense joint compound across large surfaces. This might be the best tool if you are fixing a large section of drywall.
Sponge: A sponge is an easily accessible, affordable option for creating a faux texture finish. This gives the appearance of texture without adding a layer of joint compound. This is an easy and affordable option – and no previous painting experience is required.
Once you have textured the whole section for repair or the whole wall, take a step back to check your work and see if any areas or sections look incomplete. If there are areas that need more texture, do spot touch-ups. You can add or remove the texture as needed.
Wait for the texture to dry fully before moving on to the next step.
Step 8: Apply Drywall Primer
Once the walls are dry, prime the repairs with drywall primer. Allow for complete drying before moving on to repainting the wall.
Choosing a Roller: The best roller to use for painting drywall is a 9-inch roller with a 1/2-inch nap. The roller should also be lint-free. Roll from the top to the bottom. It is important to never start in the middle of the wall.
Choosing a Primer: The best primer to use is one that is made for bare drywall. Primer is important to seal the surface of the wall, enhance the paint color, improve the gloss, and give the paint a uniform finish.
Step 9: Repaint the Wall
Once the primer is entirely dry, repaint the wall with the same color used before. If you need to paint the entire wall, you will want to prepare the wall thoroughly. This includes taking steps such as using painter’s tape to mark the areas you want to paint, using a drop cloth or tarp to cover areas which you don’t want painted, and removing light switches and outlet covers. It is important to take these steps as they can help you avoid having additional items to clean later.
Again, roll from the top to the bottom. Do not begin in the middle.
Related Questions
What safety procedures should I take before starting this project?
Before beginning this project, secure a mask that can be worn throughout the process. To protect the floor, lay down a plastic tarp to avoid creating a big mess.
What should I do if I don’t have the same color paint?
If you don’t have the same color of paint, the best thing to do would be to prime the entire wall and then paint the whole wall using the color that you do have.
How much does it cost to repair drywall?
It can cost between $250 and $800 based on a variety of factors. Repairing it on your own can save money, but there will still be associated costs.
Can I use shiplap instead of drywall on my DIY project?
Yes, shiplap can be an alternative to using drywall. However, this might be a more expensive option unless you are able to able to purchase the shiplap planks from a local vendor.
Do You Need Drywall Repair Services?
Get free, zero-commitment quotes from pro contractors near you.
In Summary
Imperfect drywall jobs are unfortunately somewhat common because a good drywall job requires high levels of attention to detail and patience. However, it is possible to fix your bad drywall job in order to transform your space. By following these steps, you will be able to fix your drywall and make your room look beautiful.
Related Guide

Elizabeth Yomantas is an accomplished educator, researcher, and writer. She holds a Ph.D. in education. While she loves all things related to teaching and learning, she also has a passion for making every house feel like a home. She loves writing about ways to improve your space to create meaningful memories with friends and family.
More by Elizabeth Yomantas


![How To Reset A Whirlpool Cabrio Washer [In 5 Easy Steps!]](https://cdn-fastly.upgradedhome.com/media/2023/07/31/9076531/how-to-reset-a-whirlpool-cabrio-washer-in-5-easy-steps.jpg?size=350x220)


