How to Cut Quarter Round With A Miter Saw
Quarter round molding is utilized in a wide variety of trim projects and can be a lovely finishing touch to most rooms. Essentially quarter round includes two sides forming a 90-degree angle and the third side is a curve equal to one-quarter of an entire circle. It’s a long trim consisting of very flexible lengths typically made of oak, wood, hemlock, MDF, pine and sometimes polystyrene.
It’s not only a very cost-effective way to achieve a nice trim, it’s also relatively simple for most homeowners and DIYers to cut and place. Although it may seem tricky to tackle corners, with some special care, you can effectively and properly cut your quarter round for corners, joints and door jams.
For a 90-degree corner, set your miter saw to the 45-degree angle position. The connecting cuts must be half of the entire angle. Remember to change the direction of the saw when working on different sides. For the cleanest cut, do this away from the door jamb. Make an end cap from a scrap of quarter round.
Do You Need to Hire a Flooring Contractor?
Get free, zero-commitment quotes from pro contractors near you.

Why Use Quarter Round?
Quarter round works especially great in instances where you’ve recently replaced your carpeted floors with wood, tile, laminate or even concrete flooring. In these cases, you will need something to fill the gap between the replacement floor and the baseboards.
Instead of taking on the cost and labor of removing and rehanging the baseboard, quarter round is an excellent and efficient way to close the gap. Consider this alternative and we’ll explain exactly how to properly cut it.
Materials You’ll Need
Although there are many different ways and saws you can use to cut quarter round, using a miter saw will be the easiest and quickest method. It will also result in the most accurate cuts.
Here’s everything you need:
- Miter Saw
- Quarter round molding
- Carpenter’s pencil
- Tape Measure
- Protective eye wear, earplugs and gloves
- Protractor
1. Prep and Measure
Like any project, you should always begin with careful measurements. To help you estimate the total length of quarter round that you need for the room you’re working in, measure along the base of the walls where you’ll be attaching the molding.
Use your tape measure to measure the correct length and transfer this measurement onto the quarter round, marking it with your carpenter’s pencil. You’ll want to leave an additional foot or two in case you run into any errors and you can always use these pieces for scraps to achieve the best angles.
You will need to take extra care in measuring the pieces that will assemble the corners. It’s essential that they are cut to the right length, angle and direction in order to fit perfectly. Always double and triple check your measurements.
2. Determining the Angle and Direction of Your Cuts
Since the quarter round will either end at a corner, joint or door jamb, it will almost always be cut at an angle. More often than not, this angle is 45 degrees. For joints, cut both pieces at 45-degree angles in the same direction. These pieces will fit together to form a straight line on the wall.
For corners, most of them will be 90 degrees. If this is the case, cut the corner pieces at 45-degree angles but in opposite directions. One will be angled to the left and one will be angled to the right to ensure that they fit together.
You’ll want to use a protractor to measure any angles that are not 90 degrees. Then, divide this number by 2 to determine the correct angle of your cuts. If your molding ends at a door jamb, use the 45-degree angle cut and affix a quarter round return.
3. Additional Tips for Measuring your Quarter Round
Here are just a few tips to consider and implement during the quarter round measuring process.
- Start your measurements from the outside or inside corner of the end of each room you’ll be installing the quarter round in.
- Mark your measurements on the back side of the quarter round to avoid any visible marks.
- The recommended way to mark each piece is by using a straight line or tri-square.
- Distinguish the extra piece of wood by marking a vertical line down the side. This helps you know exactly which side of the line you should be cutting on.
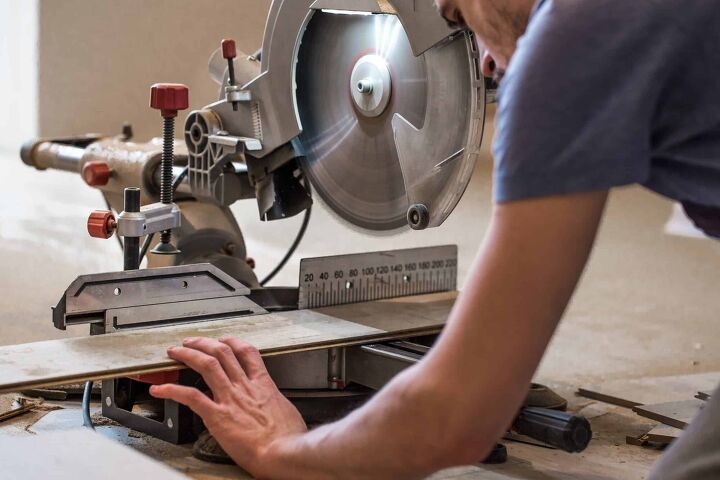
4. Cutting Your Quarter Round with The Miter Saw
Equally as important as obtaining the correct measurements is setting your blade to the proper angle. In order to do this, place one of the ends of the quarter round into your miter box, just like how it will be installed at the base of your walls, and use the pins to secure it in place.
For an accurate cut, make sure that the back of the molding is secure and flush against the fence. Determine the slot that corresponds to the particular angle you will be cutting. Accurate cutting formation is to hold the saw in your dominant hand and steady the box with your non-dominant hand.
Begin applying pressure with the saw and continue moving it back and forth over the molding until the cut is complete.
Remember: Always exercise caution when using a saw and wear protective eye wear, ear plugs and gloves.
5. Cutting Quarter Round Returns
In order for your quarter round molding to fit properly into a door jamb, you need to cut quarter round returns. Measure the proper size needed by placing a long piece of quarter round against your wall and making marks to indicate where the molding will meet the obstruction.
After placing your quarter round into the miter saw and securing it with the pins cut at a 45-degree angle away from the door jamb. Next, you’ll need to create the end cap. Do this by taking another small piece or scrap of quarter round and place this into the miter box.
Make a 45-degree angle cut in the opposite direction of the one you just completed. Then, shift the angle of your saw and make a straight cut that is about 0.25 inches from your previous angle cut. This will give you an end cap to match up perfectly with the longer piece of quarter round.
Safety Measures to Consider
The simple fact that you are using a power tool means that you need to be vigilant and use extreme caution throughout the project. We strongly advise that you are familiar with the miter saw before making any cuts to your quarter round.
Read the user manual thoroughly and create plenty of practice cuts on scrap material. Also, as always, wear the necessary eye protection, sturdy work gloves and, if desired, ear plugs.
Relevant Questions
Since quarter round is considered to be a finish trim, you’ll want to use finish nails to install it. These types of nails have smaller heads that standard nails.
Can you glue quarter round in place?No, you should only use nails to install quarter round. Since it often absorbs the impact of foot traffic and furniture, replacing it will be far too difficult if it has been glued down.
Do You Need to Hire a Flooring Contractor?
Get free, zero-commitment quotes from pro contractors near you.
Wrapping It Up
Quarter round is an excellent molding material used to help fill the gaps between your baseboard and brand-new flooring. However, cutting these pieces does involve some prep and research.
The process of cutting your quarter round is not very complicated once the steps are understood. Although it requires basic knowledge of the miter saw, most DIYers and beginners will be able to achieve successful quarter round cuts.
Straight cuts will always be very simple. Whereas, corner cuts, joints and door jams may seem daunting but if you’re measuring properly and determining the right angle and direction, you’ll have no issues!

Jessica considers herself a home improvement and design enthusiast. She grew up surrounded by constant home improvement projects and owes most of what she knows to helping her dad renovate her childhood home. Being a Los Angeles resident, Jessica spends a lot of her time looking for her next DIY project and sharing her love for home design.
More by Jessica Stone