


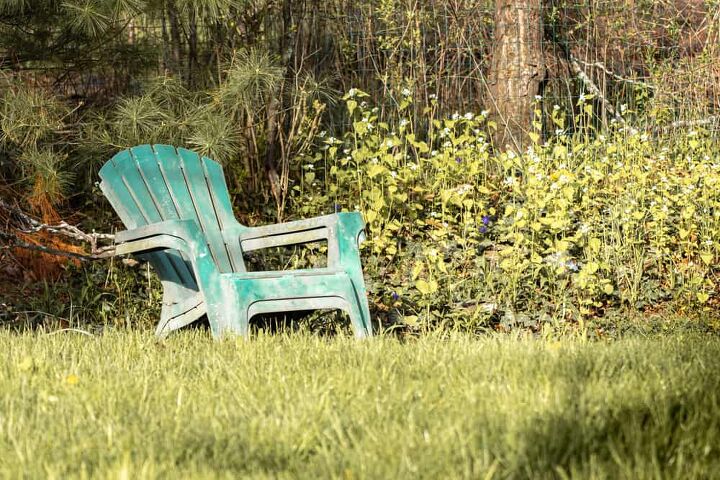
How To Clean Chalky Plastic Lawn Chairs (Quickly & Easily!)
Resin furniture, also known as Polywood, can be an attractive and versatile addition to a patio. Affordable and with a wide variety of styles to choose from, you can furnish your outdoor living space with tables and chairs, which will last for years. However, in common with other materials, unless they are correctly and regularly maintained, they can deteriorate over time. Your furniture can start to look dirty, chalky, and worn. So, how do you clean them when this happens?
Use a soap and water solution to clean chalky plastic lawn chairs. Once they are clean, let them set in a vinegar and water mixture before you rinse them. Then, it’s time to polish them with baking soda to get the rest of the grime off and make them look brand new.
The good news is that there are several easy methods of dealing with oxidation. Keep reading to discover how to clean your furniture and keep it looking new. Plus, we’ve thrown in several extra tips and tricks for you that you won’t want to miss.
Do You Need Furniture Cleaning Services?
Get free, zero-commitment quotes from pro contractors near you.

Why Do Plastic Lawn Chairs Get Chalky?
When any plastic is left outside, it will react to exposure to sunlight and oxygen. Although Polywood is expected to be more durable than other plastic materials, the chemicals in your tables and chairs will react to UV light over time.
After prolonged exposure, oxidation will occur, resulting in physical changes, which eventually result in the plastic becoming brittle.
The oxidation will give your plastic chairs a rough and chalky surface. Luckily, it’s simple to restore the look of your furniture using simple, readily-available household products. Just follow the 4-step process below and remove oxidation from your patio furniture.
How To Clean Chalking Plastic Lawn Chairs
Before you start, a word of caution. Remember that plastic can give off potentially harmful gasses when treated. Always work outside, and use gloves, masks, and protective eyeglasses when you are performing these tasks.
Step 1: Wash And Prepare Your Chairs
First of all, it’s essential to ensure that your chairs are free of dirt and soil. Using soapy water, lather and clean away any debris with a soft cloth.
Never use stiff-bristled brushes to scrub the surface of your chair, as it can only make the damage worse. Rinse the soap off.
Step 2: Apply A Water And Vinegar Solution
This step will remove any mold that has grown on your chair. Create a solution by mixing ¼ cup of white vinegar with a quart of water.
Transfer it into a spray bottle, and spray onto the chair, focusing on areas that seem to be more damaged. Leave the solution on the chair for 20 to 30 minutes, depending on the degree of soiling. After that time, rinse the solution off carefully.
If some debris or mold remains, do not give in to the temptation to scrub it away. Instead, use a soft cloth or a brush with very soft bristles dipped in distilled white vinegar.
Harsh materials will harm the appearance of your chair. Once you’ve completed this cleaning process, remove all the vinegar by rinsing thoroughly.
Step 3: Renew Your Plastic Chairs (3 Easy Ways To Choose From)
There are several different ways you can renew your plastic chairs. Each method does the same job. What you choose depends on what you’re comfortable doing.
Polishing With Baking Soda
Once you’ve cleaned and prepared the chair for restoration, you can start the treatment with baking soda.
As this does require a substantial amount, make sure you have an adequate supply in stock, especially if you’re going to treat several pieces of furniture.
- Spread baking soda on the oxidized areas. Sprinkle the baking soda, generously, over all areas of the chair that need treating.
- Create a paste. Using a damp sponge, apply it to the baking soda to create a paste, which you can then proceed to rub into the oxidized areas. Keep adding the baking soda until the whole chair is covered in the paste.
- Let it sit. Leave it for about 10 minutes to work, and then rinse off thoroughly.
- Dry your chair. Completely dry the item with an old towel or air dry it, ensuring it’s not in direct sunlight.
- Apply car wax. Finally to restore the new look to your Polywood furniture, use a clean rag to give it a quick treatment with car wax. Let this dry for 5-10 minutes, then polish to a shiny finish.
Remove Stains With A Dish Washing Liquid-Bleach Mix
For your safety, never choose a dishwashing liquid with ammonia as part of its composition. Ammonia and bleach create a dangerous combination which releases highly toxic chlorine gas. These products are typically labeled with the clear statement “Do Not Add Bleach,” so check that first.
Also, do not neglect to wear protective equipment before starting this procedure. Exposure to bleach can create skin irritations and even burns. Also, the bleach may cause plastic lawn furniture to discolor. This method is recommended for use on white plastic only.
Heat Gun
To do this, you’ll need a heat gun. Make sure the item is completely dry before you start. Begin by testing the effect of the heat gun on a hidden area of the chair to understand the impact of the heat on the plastic.
Pay special attention to the distance you need to maintain between the gun and the chair so that the plastic won’t bubble or melt under high temperatures. After all, the aim is to restore the chair, not to create further damage.
Instructions
- Set your gun on high. Start by plugging in your heat gun and choosing the ‘high’ setting.
- Disperse the heat slowly. Aim the gun towards your chair, slowly moving it closer until the plastic surface starts to soften. Focus on areas with the most visible damage and oxidation, until it starts to look new once more.
- Move rapidly from side to side to avoid bubbling. To prevent bubbling due to excessive heat, move the gun rapidly from side to side, over the affected areas. This will stop any spot from being heated to the point that could result in damage.
Additional Tips For To Keep Your Plastic Lawn Chairs Tidy
- Store them out of direct sunlight. Do not leave your furniture in the sun for long periods. Store it in a shed, garage, or shaded area when you’re not using it. This will increase their useful life and a new appearance by slowing down the oxidization process caused by UV light. If you don’t have the time or space to store the furniture safely, protect it with ready-made outdoor furniture covers.
- Clean and wax occasionally. To keep it in good condition, check your patio furniture monthly. Look out for oxidation marks, scratches, and build-up of debris.
- Repaint your Polywood furniture with spray paints. If your furniture has become discolored or oxidation marks are visible, why not consider repainting it? This will also allow you to personalize your furniture according to your taste. Use specialized paints for plastic, such as Rust-Oleum and Krylon, which are available on Amazon.
Products You Can Use To Restore Your Plastic Chairs
If you don’t want to use baking soda or heat on your plastic lawn chairs, you can use WD-40 or Vaseline. Both of these items do the same job as the others.
Except, unlike heat, WD-40 or Vaseline do not have the potential to burn holes through your chair or melt it.
WD-40
No problem. If you’ve got a can of WD-40 Multi-Use Product in the garage, your plastic-cleaning issues are solved.
Simply spray onto the area you want to clean and scrub a little with a rag until the plastic surface looks clean. Now you know how to polish plastic using WD-40, pick up a can today, and get cleaning!
Vaseline
If you have some old, faded electronics or other plastic gadgets in your house, you can make them look great again with just a dab of Vaseline.
Do You Need Furniture Cleaning Services?
Get free, zero-commitment quotes from pro contractors near you.
Our Final Take
The most effective way to keep your plastic patio furniture in good condition is to reduce exposure to the sun’s UV rays, which can cause damage. Even when this isn’t an option, there are several easy ways to clean and restore it by removing dirt and oxidation marks.
Using a few inexpensive household products or a heat gun, followed by treatment with an automotive body wax, you can soon make your furniture will look new again.

Heather is a passionate writer who loves anything DIY. Growing up, she learned everything from home repairs to design, and wants to share her tips with you. When she's not writing, she's usually hiking or searching for her next DIY project.
More by Heather Robbins


![Cost To Drill A Well [Pricing Per Foot & Cost By State]](https://cdn-fastly.upgradedhome.com/media/2023/07/31/9074980/cost-to-drill-a-well-pricing-per-foot-cost-by-state.jpg?size=350x220)
