


How To Clean A Whirlpool Refrigerator Coils
Whirlpool makes a ton of different household appliances. From stoves to refrigerators and everything in between, you can walk into millions of homes across the United States and find a Whirlpool product somewhere.
Each refrigerator has a somewhat complicated coolant system where the condenser coils play an important role. Using this step-by-step guide, you can keep those condenser coils clean and running efficiently. Most importantly, you can save yourself some major maintenance costs in the long run.
Do You Need Appliance Repair Services?
Get free, zero-commitment quotes from pro Appliance Repair near you.

What Role Do the Condenser Coils Play?
In the coolant system of a refrigerator, there are condenser coils that are located either across the bottom of the fridge or at the back. These coils are what help to condense and cool the refrigerant that ultimately keeps your fridge cool.
When the coils become clogged with dust and dirt, they aren’t able to efficiently release heat that enters the fridge. When they break due to excessive wear and tear, you will need to replace the coils at best and the entire refrigerant system at worst. So, the moral of the story is to keep your condenser coils clean and free of debris.
Step 1: Disconnect the Power
Whenever you are working with appliances that require electricity, safety is paramount. Make sure that you either unplug the appliance or flip the breaker to cut power off to that room. Either will work fine but make certain that there is no power going into your fridge.
If you store your fridge in a little cubby, it might be a good idea to move the fridge out of that space. Working in the cubby can be a bit of a tight fit and giving yourself more space to work in is only a good thing.
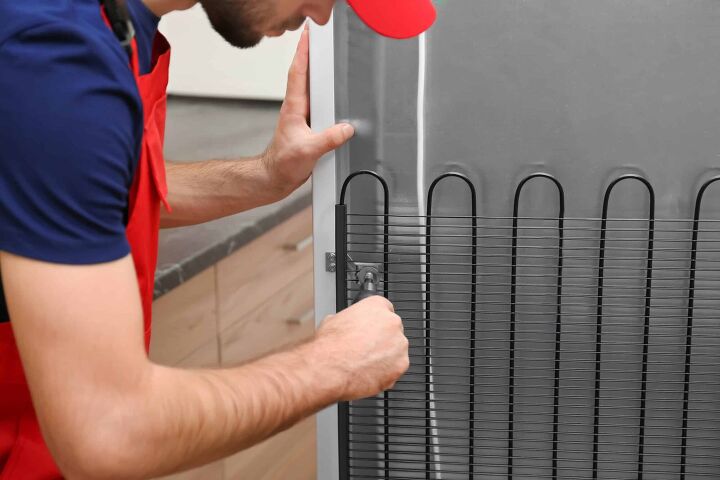
Step 2: Remove the Base Grill
Just about any fridge that you’ve ever seen will have a grill at the base of the refrigerator. To get to the condenser coils, you will need to remove that base grill before moving forward.
To remove the grill at the bottom of your fridge, you will need to open the doors and move your hands along the ends of the grill. Push in at the top of the grill as you pull up on the bottom. This should pop it right off, allowing you access to the internal components of the fridge.
Step 3: Cleaning the Condenser Coils
The two best ways to clean condenser coils are either through the use of a soft brush or a vacuum cleaner. The soft brush may not cover as wide an area as the vacuum cleaner, but you will get greater precision and cleaning power.
Make sure that you clean the grill itself as well as the open areas that are behind the grill and the front surface area. It is important that you either get a brush specifically designed for condenser coils or something that has very fine bristles. Whirlpool actually has a maintenance brush that can be ordered through their website.
Scrub the coils thoroughly to ensure that all dust and dirt has been removed. The cleaner you leave the condenser coils, the more efficient and effective they will do their job.
Step 4: Replace the Grill and Restore Power
When you’re confident that the condenser coils have been completely cleaned, it’s time to put everything back together. After putting the condenser coils back into their spot, you’ll need to replace the grill as well.
You can return the grill back into place by lining up the support tabs on the grill with the metal clips. Push the grill firmly into place; you will hear a snapping sound when they have been secured properly. If you don’t hear the click, take the grill back off and start over again until you hear that clicking noise.
Lastly, reconnect the power and return the fridge back into its cubby if that is where it was stored. Cleaning the condenser coils every so often is a good way to keep your fridge running efficiently and should also help you to avoid costly repair bills anytime in the near future.
What Happens if Refrigerator Coils are Dirty?
When the coils get dirty over time, whether it be due to dust, dirt, or pet hair, it can hinder the refrigeration process. It may not be instantaneous, but over time, the cooling process will begin to degrade.
At some point, the coils will stop working effectively or break altogether. This can lead to increased energy bills (up to 35%), spoiled food, and a broken-down appliance that should have lasted for 12-14 years.
Will a Dirty Condenser Coil Cause Freezing?
When you run a refrigerator with a dirty air filter, dirt can begin to build upon the coils over time. This in itself should not cause the coil to freeze, but that doesn’t mean that freezing is not possible over time.
Freezing happens when the refrigerant levels are lower than they should be. If you have a leak in your refrigerant system, that means there isn’t enough to absorb the heat that will make its way into the fridge. Consistently low refrigerant amounts can and will eventually cause the condenser coils to freeze up. When this happens, they will need to be replaced immediately.
What are the Signs of Coil Freeze?
Finding out that you have frozen condenser coils can be a harsh reality. Being able to recognize the signs of freezing before it actually happens can mean the difference between a quick fix and a costly refrigerator repair bill.
Some of the signs that your coils may be freezing include reduced air flow from the vents, a continuously operating system, a seemingly instant decrease in performance, and an uncomfortable interior temperature.
You may also notice a buildup of ice on the outdoor refrigerant line, a large amount of condensate drainage, condensation forming on the indoor air handler or on the condensate drain itself. For those unfamiliar with the inner workings of the fridge, the best way to notice this is a sudden decrease in performance. Fridges tend to not just drop off in performance without there being something seriously wrong.
How Often Should Condenser Coils be Cleaned?
Like any other appliance, proper and regular maintenance is necessary to keep your condenser coils working properly. Not only will this help to reduce utility costs, but it can also actually help to minimize energy usage over the life of the fridge.
The condenser coils should be cleaned at least once per year. It has been estimated that dirty condenser and evaporator coils can increase the energy usage of your fridge by up to 30 percent. That is nothing to sniff at and can mean serious dollars over the life of the fridge.
Do You Need Appliance Repair Services?
Get free, zero-commitment quotes from pro Appliance Repair near you.
How Much Do Refrigerator Repairs Cost?
Depending on the severity and complexity of the issue, it can run anywhere from $40 all the way up to $1,000 to fix your fridge. The condenser generally runs between $200 and $300 because of the part cost as well as the need for removing the grill.
Doing the project yourself can eliminate costly labor expenses but there is also a chance that you may perform the installation wrong. Weigh these factors when it comes time to replace the condenser in your fridge.

Ryan Womeldorf has more than a decade of experience writing. He loves to blog about construction, plumbing, and other home topics. Ryan also loves hockey and a lifelong Buffalo sports fan.
More by Ryan Womeldorf


![12 Washing Machine Brands to Avoid [with Recall Data]](https://cdn-fastly.upgradedhome.com/media/2023/07/31/9075781/12-washing-machine-brands-to-avoid-with-recall-data.jpg?size=350x220)


![Cost To Drill A Well [Pricing Per Foot & Cost By State]](https://cdn-fastly.upgradedhome.com/media/2023/07/31/9074980/cost-to-drill-a-well-pricing-per-foot-cost-by-state.jpg?size=350x220)
