How To Build A Wrap Around Porch (In 5 Easy Steps)

The addition of a wrap around front porch can be one of the greatest ways to enhance the exterior of your home and increase your living space. They provide an excellent location for entertaining guests, enjoying gorgeous views, lounging in a rocking chair and sipping on lemonade.
When it comes to front porches, there are many different shapes and styles to choose from. Wrap around porches, or sometimes referred to as colonial-style or veranda-porches, are more commonly seen on older homes but becoming increasingly popular in new constructions.
Installing a wrap around porch on your home can not only increase the curb appeal of your home, they can also drive up its overall value. Although building a wrap around porch may be better suited for the professionals, if you have construction experience, the process can be broken down into a few steps.
Aside from the actual building process, there are many other things to consider when it comes to wrap around porches. We’ll outline the step by step process for “how to build a wrap around porch” as well as provide you with some overall pros and cons.
Do You Need an Addition or Remodel Contractor?
Get free, zero-commitment quotes from pro contractors near you.

How Do you Build Your Own Wrap Around Porch?
There are several steps you will need to take in order to build your own wrap around porch. We’ve included these steps below for you to follow so that you can do this accurately. However, before beginning, it’s important to find out if you need a building permit to do a project such as this one.
Step 1: Choosing The Location Of Your Wrap Around Porch
Choosing the physical location of your new porch may seem like a no brainer however, a wrap around porch can be installed on the front or back of the home. It’s important that where you will be installing it doesn’t interfere or cause issues with the rest of the house.
The most common problem when it comes to deciding on porch location is related to daylight. Adding a wrap around porch to the front of your home could possibly reduce daylight in the living room while a back porch may drastically cut off daylight to the kitchen.
Make sure that you plan out your wrap around porch location carefully so as to not significantly darken an area of the existing house.
Step 2: Prepping The Project Area
Once you’ve determined the location for your wrap around porch, you should start thinking about your budget, choose a porch style and secure a building permit. Gather prices for the materials your project requires and, if you’d like to save money, consider purchasing reclaimed materials.
Next, prep the project area by surveying the land around the perimeter of your home and take measurements for how wide the porch will be. Keep in mind that you’ll need to allow for any natural dips or slopes on the property that will affect the install of the porch. Also, consider that the height of your porch needs to allow for the slope of the roof.
Step 3: Pour The Concrete Footers
Check with your local permitting department in regards to the recommended footer depth. Dig three holes, 6 feet away from the house at the required depth. You’ll end up having two end holes that are 12 feet apart and the third hole directly in the center of the two. You’ll repeat this step for the side porch as well, adapting it accordingly.
Create a gravel base that is about 6 inches deep by laying out two bags of gravel between these holes. Then, put the form tubes into the three holes and mix and pour the concrete. You’ll finish this step by installing the bases of the metal or wood columns at the top of each form tube.
Step 4: Installing Deck Framing And Joists
Mark where you’ll be installing the deck framing level to the top of the foundations. Put the decking frame in place attaching the ledgers to the foundation wall and securing using carriage bolts. You’ll then attach the joists to the frame using hurricane clips.
Keep in mind that you’ll need to have extensive framing on the corner where the side porch meets the front porch. This will help the area support weight and won’t cause any spongy dips in the corner.
Step 5: Laying The Decking
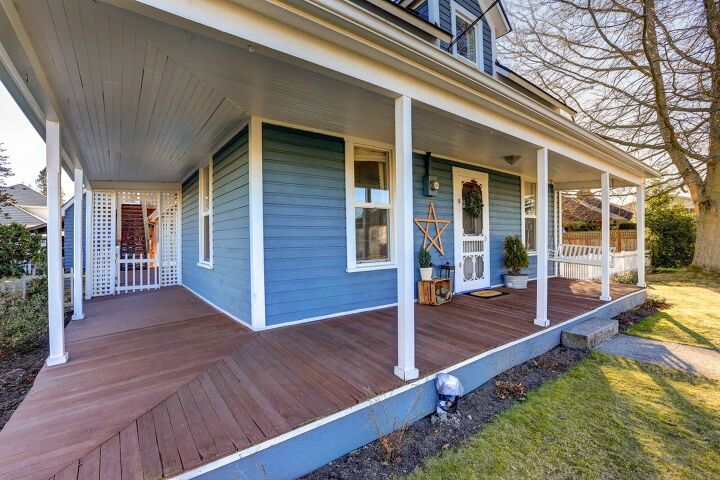
Before you lay down any of the decking, you’ll want to ensure that the frame and joists are completely level. When it comes to wrap around porches, you have a few options when laying the decking. You can either use straight decking beginning at the wall of the house and extend outward to the edge, changing directions at the corner or create a diagonal join at the corners.
Consult plenty of design patterns to decide on the decking install option that best suits your particular project.
Installing The Roof On Your Wrap Around Porch
With the decking installed, it’s time to move onto the roofing and making sure it blends seamlessly with the existing house. Mark where the roof of the porch will attach to the exterior of the house and use carriage bolts to secure the roof struts. You’ll use hurricane clips to affix the joists and outer struts.
Beginning at the corners of the porch, place decking posts at regular intervals and leave a gap of around 10 feet between them. These measurements may vary depending on the particular length and width of your porch.
Using roofing nails, secure the roofing materials and seal the joints between the house and roof with roofing tar. Make sure you do this step before installing any shingles or roofing felt. If you’ve chosen to follow the same design as your existing roof you’ll want to purchase the same materials and install them in a similar direction.
Around the porch perimeter, attach the posts and balusters. Install the fascia boards on the face of the porch and your guttering to the front of the fascias. Many homeowners decide to opt for rain chains as a more attractive alternative to roof gutters on their wrap around porch.
Building The Steps
Use the treads and risers to build the steps of your wrap around porch keeping in mind that your steps must also adhere to regulation size. Speak with your permitting office to ensure that you’re following all the relevant state and local laws.
You’ll complete the steps by adding the banister rails and posts. For an optional added step, you can also consider adding lining and tongue-and-groove paneling. Although not required, sometimes this adds a nice finishing touch to a wrap around porch.
Pros And Cons Of Wrap Around Porches
While installing a wrap around porch can be an attractive way to add onto your home, you should consider all of the advantages and disadvantages associated with these types of porches.
Advantages
- Scenic views. One of the best reasons for installing a wrap around porch is to enjoy the views. This is especially true if your home is situated on a hillside or in the countryside with panoramic views. A porch like this will allow you to enjoy these views from every angle.
- Outdoor protection. With a wrap around porch, you can enjoy the outdoors from a comfortable spot, regardless of weather conditions.
- Expanded living space. Like any addition to the home, a porch extends your living areas. It also provides an opportunity for some creativity in creating an inviting area when guests arrive on your front porch.
- Extra Accessibility. With wrap around porches circling most, or all, of your house you’ll have more than one entrance. This additional accessibility makes traveling throughout your home much simpler.
Disadvantages
- Added cost. Adding onto your home will always come at a cost. The price will largely depend on the design, style, specific features and whether or not you hire a contractor. You could DIY a porch for relatively cheap but the average cost of installing a porch is around $21,000. However, if you’re looking to install a wrap around porch that features windows and screens, you can expect to pay $30,000 or more.
- Required land. Wrap around porches only work if you already have a decent amount of property. These types of porches are almost impossible if you live in a city setting or are situated close to your neighbors.
- Maintenance. With the extra space to account for, it will also require maintenance. The amount and frequency of maintenance will depend on the building materials you chose.
- Install Difficulty. While it may seem like installing a wrap around porch is just like any other porch, making the corner transitions seamless can be difficult. If you have little to no construction experience, building a wrap around porch may be best left to the professionals.
Do You Need an Addition or Remodel Contractor?
Get free, zero-commitment quotes from pro contractors near you.

Wrapping It Up
Wrap around porches are awesome additions to your home, and they’re a great DIY project. However, you’ll need to make sure you don’t need a building permit before starting. Take your time and work through each of these steps so that you can build an awesome porch for you and your family to enjoy. Good luck!
Related Guides

Jessica considers herself a home improvement and design enthusiast. She grew up surrounded by constant home improvement projects and owes most of what she knows to helping her dad renovate her childhood home. Being a Los Angeles resident, Jessica spends a lot of her time looking for her next DIY project and sharing her love for home design.
More by Jessica Stone


![The 10 Best Table Saws - [2022 Reviews & Buyer's Guide]](https://cdn-fastly.upgradedhome.com/media/2023/07/31/9070645/the-10-best-table-saws-2022-reviews-buyer-s-guide.jpg?size=350x220)


