How To Build A Floating Shower Bench (Do This!)

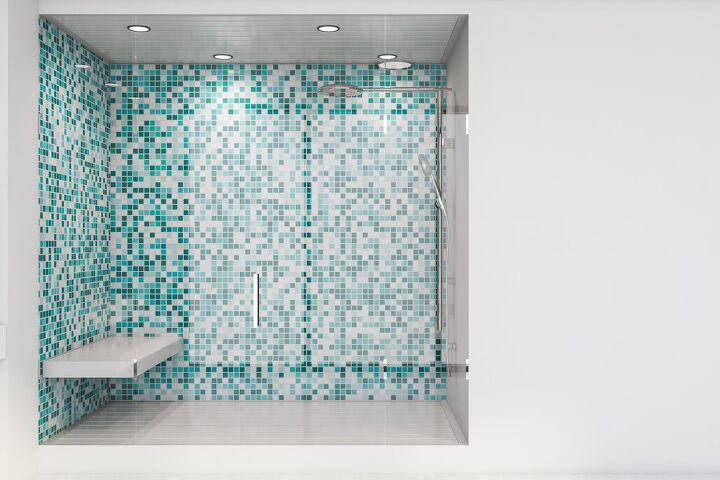
Showers are great places to relax and revitalize yourself, but only if they have the right surroundings. Part of being able to kick back and relax in your shower is being able to lounge around in it. That’s why floating shower benches are so popular. They look sleek, give you the perfect place to chill out, and also seem to just act as a great place for storage. But, how do you mount one?
To build a floating shower bench you will need to follow the steps below:
- Buy the shelf materials and a free-hanging bench bracket kit.
- Remove the tiling from the wall where you want the shower bench to be, as well as a portion of the wall.
- Install concealed brackets onto the wall framing.
- Hang two of the free-hanging shelf brackets up against the wall studs.
- Bolt the shower bench to the brackets using bolts that came with it.
- Finish by sealing the area and retiling the area as necessary.
Honestly, building and installing a floating shower bench is not a good idea to do on your own, especially if you are not used to doing bracket mounting or masonry. Still, we’re going to try to give you a run-through for this.
Do You Need to Hire Shower Installers?
Get free, zero-commitment quotes from pro contractors near you.

Is This A Good DIY Project?
Honestly? It’s not. It is a rather complex project and requires a working understanding of masonry and woodworking. If you don’t know how to cut tile, or are worried about harming the potential structural integrity of the house, then you shouldn’t try this on your own. This is more of a “team” project anyway.
This is particularly true if your bathroom has already been tiled up and finished. This means that you will need to tear down a portion of your bathroom in order to make sure that you have access to the studs and supports for your bench.
How Much Do Floating Shower Brackets Support?
A floating shower bracket set should be able to support at least 400 to 600 pounds. If you were worried that you were going to make the bench collapse with your weight, don’t be. Floating shower benches are meant to carry above and beyond the norm. As long as you install it well, it’ll work to hold your weight.
How Much Does It Cost To Install A Floating Shower Bench?
This is all dependent on how you choose to do it. Floating shower bench kits will cost around $300 to $400 for a full-sized, sit-down shower bench. If you want to have a professional install it, the work rate will be between $50 to $80 per hour in most areas.
In total, you should expect to pay at least $500 to get a floating shower bench installed professionally. If you have to tear down parts of your wall, the price could be as high as $1000. Custom benches cost even more.
How Big Does A Shower Have To Be To Get A Bench?
The minimum size for a shower with a shower bench is around 30 square inches, but with that, you can only do a corner bench. Getting a shower with a bench is one of those things where it’s a matter of more space is always better. If you have a spacious bathroom (like four square feet), then that’s usually ideal for a nice sit-down bench.
Building A Floating Shower Bench: How To Install It
Now that we’ve gone through the general steps of building your bench, let’s talk about how you get the bench where you want it to float, and making the bench work for you. Note: If you have specialty shower bench brackets or a floating shower bench kit, refer to the instructions included with the kit instead.
Buying The Materials
You will need to have a floating shelf slab, ideally made out of stone or granite. You also should get a floating bench kit, such as the ones that are sold by Hollspa. The floating shelf slab should also have some holes or slats that make it easy to install. We suggest asking for a floating shower bench slab specifically when you’re shopping.
Before You Begin: Prepping The Area
Getting a floating shower bench is something that should be done before you tile up the area. Ideally, it’ll be done before the walls are installed in the tile. Here’s what you will need to do to prep the area:
- If you already have a wall there, remove any tiling and walls that would impede the area of the floating bracket. If you don’t have walls installed yet, skip this step.
- Measure where you want to have the bench seat. Mark those areas off, and make notes on the side of the support beams. Most people want to have it at least 17 inches from the floor. Make sure your marks will have the brackets positioned evenly, and that you have the positioning of your soon-to-be brackets level.
- Install your free-floating shelving brackets. To do this, you usually will have to add concealed brackets to the wall framing.
Installing Your Bench On The Brackets
- Add plastic inserts and a tiling plate to complete the bracket portion. You should have two slats sticking out of the wall horizontally when you’re done. The inserts are going to be where your bracket arms are going to sit.
- Add the walls back, or if you never had tiling there, add it in the first place. This is an entire project in and of itself. You will need to add the tiling and mortar to the tiling plate and also add drywall to the area that is not covered by the plate. Leave the brackets sticking outside of walls. A small gap between the tiling and the brackets is fine, but don’t let it be more than 1/8 inch.
- Give time to let the tiling dry and cure. It is best to let it sit for a day or two before you continue. If you notice any kind of tiling issues, now would be the time to adjust them.
- Click the “bench holders” onto the bracket. These are the long “arms” that will be held up by the bracket. This is what your slab will be held on. Most floating shelf brackets will have a way to click it into place.
- Next, place the slab on top of the two bracket arms. Use the toolkit that was provided (or a pair of bolts) to fasten the floating shelf in place.
- Finally, clean up your workspace. It’s good to have a clean bathroom before you use it, don’t you think?
An Important Note About Extra Long Shower Benches…
Most shower benches are meant to be about two to three feet in length. This is enough for a typical person to sit or even splay comfortably without issue. These benches work well with brackets that are spaced 24 to 36 inches apart. However, if you have an extra long shower bench (think four to five feet), then having two brackets supporting the weight of the stone might not be enough.
When putting together extra long shower benches, you might need to add a third (or even a fourth) bracket to fully support the bench. When spacing out your brackets, make sure to do it evenly. The ideal layout will have each bracket covering and supporting the same length of bench.
What’s The Best Material For A Floating Shower Bench?
The best material for a floating shower bench is usually going to be stone—such as granite, marble, or quartz. Floating shower benches *can* be made out of wood, but the truth is, they’re not good choices. Wood, even if meticulously cared for, will start to rot when exposed to enough water. This is even true for woods like teak.
If the shower bench was removable, then it would be a different story. Woods like teak can hold up against high levels of moisture fairly well, but would still need to be replaced once every five to 10 years. Teak shower benches also have the added perk of being warmer and cozier to sit on.
Do You Need to Hire Shower Installers?
Get free, zero-commitment quotes from pro contractors near you.

Related Questions
What is the best wood to make a shower bench from?
Teak is generally considered to be the best wood for making a shower bench. This is because teak is highly resistant to moisture and has natural compounds that protect it from mold, bacteria, and rot. This also makes it a great pick for almost any item in your home spa, including sauna benches or wooden bath mats.If teak is a bit too pricey for your wallet, you can find a good second choice in cedar. Cedar has been a go-to wood for spas for centuries because of its durable build and anti-fungal properties.
What is the best way to protect the wood in my bathroom?
If you’ve decided to go with the daring option of having wood in your bathroom, you need to take a lot of preventative measures to keep it safe from moisture. Keeping wood dry whenever possible, avoiding high humidity, and giving your wood a wipedown with Tung oil all can help.When in doubt, the best thing you can do is search up individualized instructions for maintaining the wood you have. When in doubt, regular oil treatments and keeping the wood clean should do the trick.
Is it okay to use manufactured stone as a shower bench material?
Absolutely. When it comes to the way that stone reacts to water, the expectation will always be the same. Both manufactured and natural stone will be highly water-resistant. As long as you choose a nonporous stone type, you should be good to go.

Ossiana Tepfenhart is an expert writer, focusing on interior design and general home tips. Writing is her life, and it's what she does best. Her interests include art and real estate investments.
More by Ossiana Tepfenhart


