How Do You Bypass A Washing Machine Door Lock?
Technology is great but sometimes it can be a problem. For example, if your washing machine has a lid lock sensor that locks automatically, that is awesome, right? But what if your washing machine thinks the lid is open when it is shut? The washing machine will not work until you convince your machine that it is shut.
Although different types and models of washing machines have different lid locks and sensors, they are all similar. Bypassing the lock is usually pretty easy and can be done in a few simple steps. It will require a magnet or some uncomplicated wire cutting that anyone can do.
Do You Need Appliance Repair Services?
Get free, zero-commitment quotes from pro contractors near you.

Check Your Warranty First
Before you begin, you need to know that if your washing machine is still under warranty, it is best to have the door fixed by one of their professionals. Because if you make these changes to your machine, you will likely void the warranty. Check the warranty date first. If you still want to bypass the door lock, read on for a couple of different ways.
Try the Magnetic Fix First
The easiest way to fix this problem is with a magnet. All you need for this job is a small thin magnet like a refrigerator magnet, a flathead and Philips head screwdriver, and some duct tape.
Important Tip:
Before you take apart the washing machine, wait for about an hour and see if the problem fixes itself. Some machines have a heat-activated door lock that will not let you open them until they cool off.
Step One: Unhooking it All
Unplug the washing machine from the wall. Tape it to the washer out of the way so it will not get wet or damaged while you are working on it.
Step Two: Shut Off the Water
You do not have to shut off your main water supply to the house. Just shut off the two hoses that are connected to the back of your washing machine. They may be near the utility sink if your laundry room has one. Turn them to the left until you cannot turn them anymore.
Step Three: Opening the Top Panel of the Washing Machine
Although brands differ a bit, most washing machine tops lift off by putting pressure on the retention clips hidden underneath on each side. Use the flathead screwdriver to push against the clip until it releases. Do the same to the other side.
Important Tip:
Some models have hinge screws you may have to unscrew on the back of the upper control console.
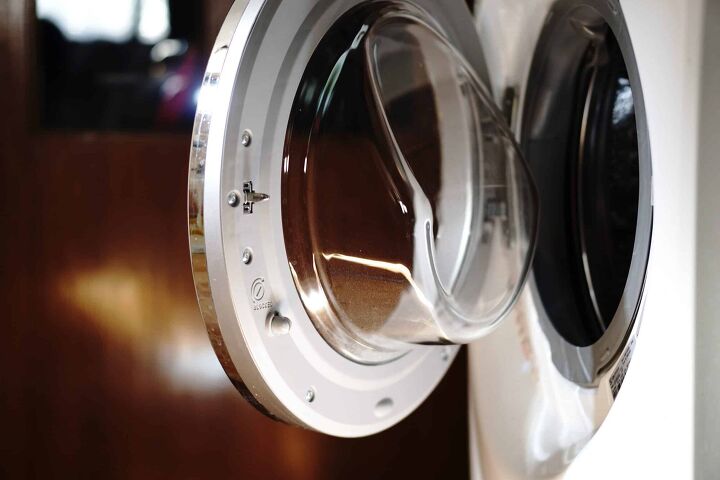
Step Four: Find the Lid Lock Switch
The electronic mechanism that is causing all the problems for you should be just under the hood. It is often made of black or gray plastic. It will be attached to a wiring harness, which is why you had to unplug the machine.
Step Five: Do the Magnet Trick
Find the spot where the lid lock meets the top of the machine. Put the magnet on top of this piece. This tricks the machine’s technology into believing the lid is closed. Tape it on so it will not fall into the machine.
Step Six: Putting it All Back Together
Replace the top panel that you removed. Make sure the lid locks into those retention clips securely. Also, if you had to remove any screws, be sure to put them back.
Step Six: Run a Test Wash
Turn the water back on and plug the machine back in. Run a test wash to see if everything works alright. If the washing machine is still not behaving properly, open it back up and try moving the magnet a bit. Make sure it is lined up with the spot on the lid where the lock sits.
Important Tip:
Make sure the magnet is facing the right way. The attractive side should face down. Attractive does not mean good looking here. It means the side of the magnet that is attracted to metal or other magnets.
Cutting the Electrical Connection
If it is not your magnet that is the problem, you are going to have to do the wire splicing fix. This is a bit more difficult but still pretty easy. You will need a quarter-inch nut driver, a set of screwdrivers, wire cutters or sharp scissors, wire strippers, and a wire connector or electrical tape.
Step One: Get to the Lid Lock Assembly Switch
Repeat steps one through four above to get back to your washing machine’s lid lock assembly switch.
Step Two: Remove the Assembly
Use the nut driver to loosen the two mounting screws at the bottom of the assembly. Put the screws in your pocket or somewhere else safe so you do not lose them. You can let the assembly dangle from the wire harness while you work on it.
Step Three: Remove the Cover from the Assembly
The cover usually just pops off of the assembly unit really easily. There should be retention clips holding it together that you can easily move with your fingers to take the cover off. Put the cover aside somewhere safe.
Step Four: Check the Tech
If you have your washing machine’s tech sheet, have that available for this part. The tech sheet is usually found in the owner’s manual that is taped to the back of the machine. If you do not have it, you should be able to find it online or order it from the manufacturer.
Step Five: Find the Right Wires
Look for the wiring diagram labeled lock switch or lid switch. They typically have three or four color-coded wires. If your switch has three wires, the wires you want will be the first and third wires. If there are four wires, you want the first and fourth wires. These are the lid switch and the lock switch. Leave the one(s) in the middle alone.
Step Six: Cutting the Wires
Go ahead and cut through the middle of both of the wires. This breaks the connection to the lid lock. That means the lid will no longer be locked. Use the wire strippers to remove about an inch from each piece of wire that you cut. Be careful you do not pull the wires out of the assembly box.
Step Seven: Bypassing the Switch
Twist the ends of the wires together so you have connected the lock switch and lid switch wires. Screw the wire connector onto the bare wires to cover them completely. If you do not have wire connectors, you can use some electrical tape. Just make sure there are no bare wires you can see.
Step Eight: Wrap it Up
Once you are done, tuck the wires back into the assembly and press the cover back in place until it clicks. Reposition it exactly as it was and put the screws back in with the nut driver. Run a test wash to make sure the lid opens when you want it to.
Do You Need Appliance Repair Services?
Get free, zero-commitment quotes from pro contractors near you.
Be Careful of the Agitator
Now that you have the lid unlocked permanently, you will need to be careful when opening the lid during a wash cycle. With lid lock washing machines, they do not stop spinning when you open them after bypassing the lock mechanism.
Do not let your jewelry, clothing, hair, or hands get too close to the agitator. It is best to keep children away from the machine at all times.

I am a DIYer who loves writing about anything home-related. When I am not writing, you can find me studying for my PhD in Psychology, photographing nature, and swimming at the lake with my grandkids.
More by Patricia Oelze


![The 5 Best Angle Grinders – [2022 Reviews & Buyer's Guide]](https://cdn-fastly.upgradedhome.com/media/2023/07/31/9071326/the-5-best-angle-grinders-2022-reviews-buyer-s-guide.jpg?size=350x220)