Garage Door Won't Close And Light Blinks 10 Times? (Fix It Now!)
A garage door that won’t close can cause frustration as well as leave your home vulnerable. The garage door sensors protect your family and your possessions in your garage and home. If you’re struggling with your garage door, first examine the sensors.
If the garage won’t close, there is typically something wrong with the sensors. The sensor light blinking 10 times will indicate that there are misaligned or obstructed safety sensors.
Do You Need a Garage Door Opener Repair or Adjustment?
Get free, zero-commitment quotes from pro contractors near you.

How to Align Garage Door Sensors
Garage door sensors protect homeowners, their pets, and belongings by preventing the door from closing if something is blocking its path. They can accomplish this by using an electric eye sensor that crosses the doorway. If the sensor doesn’t receive the beam from the opposite sensor, the door won’t close.
However, if your sensors are out of alignment, they won’t close at all. The sensors typically alert you to this issue by blinking 10 times. To resolve this problem, realign the sensors, and the garage door will open and close again with ease.
Materials You Will Need:
- Screwdriver
- String
- Level
Step 1: Disconnect Power to the Sensors
Turn off the power to the sensors by tripping the fuse in your home’s breaker box for the garage. Though you won’t be working with electrical wiring, it’s best to do this whenever working with electricity.
Step 2: Loosen the Screws on the Sensor Mounts
Loosen the screws that mount each garage door sensor. Do not take the screws completely out. They should be loose enough so that the mounting brackets can slide up and down with assistance.
Step 3: Slide the Sensors Downward
Slide each garage door sensor downward as low as possible without unscrewing the mounting brackets.
Step 4: Attach a String to the Garage Door Sensors
Tie a piece of string from one sensor to the other. When pulled across the garage doorway, it should run across the center of the sensor. Position the knot so that the string will run across the center of the opposite sensor, too.
Step 5: Check that the String Is Level
Place a level along the string to determine if it is level. If the line of the string is not level, adjust the sensors by sliding the mounting bracket upward. Continue this until the sensors are level.
Step 6: Tighten the Screws to Secure the Sensors
Once level, tighten the screws to secure the garage door sensors in the new position. The sensors may come out of alignment when tightening the screws, so check that the string is level once again.
Step 7: Restore Power to the Garage
After the sensors are level, remove the string and restore power to the garage.
Types of Garage Door Sensors
There are several types of garage door sensors, each used for a different purpose.
Safety Sensors
There are two types of safety sensors – infrared sensors and pressure sensors. The purpose of each sensor is to prevent the garage door from slamming into the ground. These sensors provide safety to objects, children, and pets.
The infrared sensor has two sensors installed in the rails of the garage. These sensors align with each other and are connected with an infrared beam. If something is obstructing the beam, they prevent the garage door from closing.
A pressure sensor is installed at the bottom of the garage door. When something bumps the bottom of the garage door as it is coming down, it triggers the door to retract.
Monitor Sensors
Monitor sensors are more of a monitoring device of the garage door. These sensors will alert the homeowner if the garage door is left open. The sensor is attached to the garage door, and there is a panel installed inside the home.
You can program some monitor sensors by time. The homeowner can set the time when the garage door should be open or closed. You can also program how long the door stays open before it closes.
CO2 Sensors
CO2 sensors are one of the more advanced garage door sensors available. These sensors determine the amount of CO2 in the air in your garage. If it reaches a dangerous level, it will automatically open the garage door to let in fresh air.
Reasons Why a Garage Door Won’t Close
When the garage door does not close, there could be faulty parts.
The most common garage door issues are:
Faulty safety eyes (or sensors) are also a common issue. Once again, the light will blink ten times to signal a problem with obstructed or misaligned safety eyes. To troubleshoot the safety eyes, follow the steps below.
How to Troubleshoot Faulty Safety Eyes
Step 1: Determine If the Sensors Are Blocked
Small objects can trigger the garage door opener’s safety sensors. Remove any items that may be blocking the sensor and try to close the garage door. If it does not close, continue to step 3.
Step 2: Check that the Sensors Are Aligned
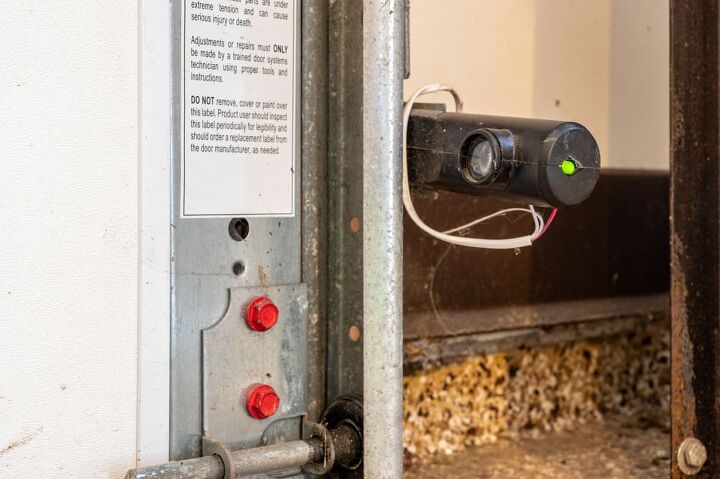
Garage door sensors are either sending sensors or receiving sensors. The sending sensor has a yellow or orange LED light that should always be viable. The receiving sensor has a green or red LED light that will only be visible when functioning correctly.
Check that both the sending and receiving lights are on. If the receiving lights are off, adjust the sensors until the light appears. If the yellow and orange lights reappear and are solid, the sensors are aligned.
Try closing the garage door as usual. If it closes, the issue is misaligned sensors. If it does not close, continue onto the next step.
Step 3: Test the Safety Sensors on the Garage Door Motor
Testing the safety sensors directly on the motor unit can determine if the sensors or wires are defective.
To test the safety sensors, first, remove the sending sensor from its bracket. Disconnect the sensor from the wire by cutting it 12 inches from the end. Strip the wires on both ends and twist the matching color wires together on each sensor.
Disconnect the wires from the operator terminals and reconnect them according to color. Direct the sensors at each other. If the lights on both sensors light up, there is a problem with the wiring, and you should replace it.
However, if the LED lights do not light up after reconnecting the wires, replace the sensors. Finally, if the LED lights do not light up after replacing the wires and sensors, replace the logic board.
Other Garage Door Sensor Error Codes and What They Mean
When sensors begin to blink, you need to troubleshoot them to determine why they are alerting you. To diagnose the issue, check the opener’s LED light located on the motor unit. How the lights will flash will depend on the type of garage door opener you have.
If you have a Liftmaster, Chamberlain, or Craftsman garage door opener that has one LED light:
- One blink indicates the sensor wires are disconnected.
- Two blinks indicate the wires have shorted.
- Four blinks indicate that the sensor eyes are misaligned.
If you have a Liftmaster, Chamberlain, or Craftsman garage door opener that has up and down arrows:
- One blink up and one blink down indicates the sensors installed incorrectly. This could also indicate that the sensors are faulty.
- One blink up and two blinks down indicated the sensor wires have shorted. This could also suggest that the sensors are reversed.
- One blink up and four blinks down indicates that you have an obstructed or misaligned sensor.
- Four blinks up and six blinks down indicate the sensors are temporarily obstructed or misaligned.
Do You Need a Garage Door Opener Repair or Adjustment?
Get free, zero-commitment quotes from pro contractors near you.
Related Questions
What is the average cost of a garage door sensor?
If you discover that your garage door sensors have failed, replace them. Only replace the sensors with a manufacturer-approved replacement. Off-brand sensors may not connect properly and can lead to further damage to your garage door. Like most things, replacing the sensors yourself will cost less than having a professional replace the sensors. The replacement sensors should cost between $85 to $95. You can find them at most home improvement stores.If you are unsure or uncomfortable about replacing the sensors, it is best to contact a professional. The cost of replacement sensors installed by a professional will cost around $170. This will give you peace of mind knowing that the sensors are installed correctly, and your issue is resolved.
How often should you replace garage door sensors?
The average lifespan of garage door sensors is 10 to 15 years. During this time, you should not have to replace them unless they are damaged. To ensure that your sensors operate to their full potential, you should regularly service them. Every three to five years, you should change the batteries in the sensors. You should also regularly clean any debris, dust, or spider webs off of the sensor eyes. Use a microfiber rag to reduce the risk of scratching the sensors, so you prolong the sensors’ lifespan.

Stacy Randall is a wife, mother, and freelance writer from NOLA that has always had a love for DIY projects, home organization, and making spaces beautiful. Together with her husband, she has been spending the last several years lovingly renovating her grandparent's former home, making it their own and learning a lot about life along the way.
More by Stacy Randall


![How To Reset A Whirlpool Cabrio Washer [In 5 Easy Steps!]](https://cdn-fastly.upgradedhome.com/media/2023/07/31/9076531/how-to-reset-a-whirlpool-cabrio-washer-in-5-easy-steps.jpg?size=350x220)