Drywall Sticks Out Past Door Jamb? (Here's What To Do)
Interior door trim can be adapted to complement any décor and will give the rooms in your home a very classic look. In order to install trim correctly, it’ll take some precision and skill to match professional carpenters.
One of the most common problems in carpentry is when the drywall protrudes much more than the door jamb. This creates a considerable gap between the jamb and the casing and doesn’t allow for flush installation of the trim. There are a couple of different methods for remedying this issue.
In order to fix drywall that sticks out past the door jamb, you can either scrape out the excess drywall so the trim rests in place beat the drywall with a hammer until it’s flush, or install a jamb extension. We’ll explore the specifics of each method as well as provide you with some general trim tips.
Do You Need Drywall Repair Services?
Get free, zero-commitment quotes from pro contractors near you.

Diagnosing the Problem
The first step in fixing the issue of drywall sticking out past the door jamb is to assess the extent of the problem. This is a very common issue in remodeling and new construction that requires a solution in order to properly install the trim. You can use a scrap piece of casing trim to determine where exactly the issue lies.
Run the casing along the entire door jamb to look for areas that it doesn’t lay flush and gaps occur. In the areas where you notice gaps between the casing and jamb, you’ll either need to beat the drywall back, carve it out or create a jamb extension to fill the space.
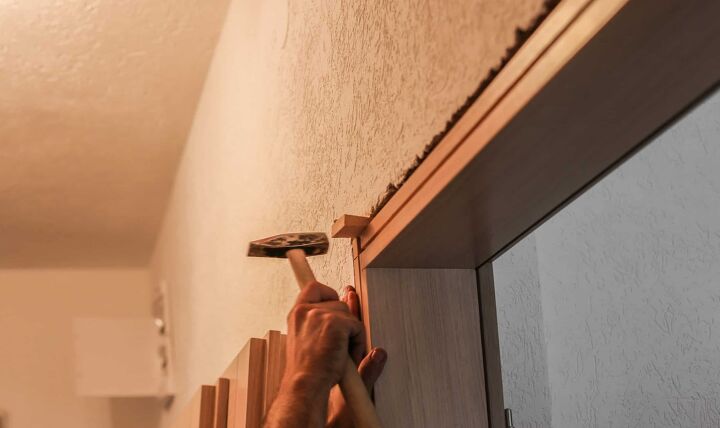
Method #1: Beat to Submission
Arguably the quickest and most efficient method for fixing protruding drywall when trimming is to simply pound the drywall with a hammer. Use a hammer to beat back any drywall that sticks out beyond the door jamb. Smash the drywall enough until the trim is able to sit flat.
While this may seem like an aggressive way to ensure flush installation of your trim, beating the drywall “to submission,” is actually the preferred method among most DIYers and professional carpenters alike. However, be sure to use special care not to damage the jamb during this process and stay within the borders of where the casing trim will be mounted.
Method #2: Carve out and Scrape the Drywall
This method is probably more of an extreme hack but will ensure that the casing fits perfectly against the door jamb.
- Using your trim, place it exactly where it will be installed along the doorway. Run it along the door jamb, marking the problem areas with a pencil. Some areas of the drywall may be acceptable and these spots will not need to be carved out.
- With a straight edge, line it up against the mark that you made and make a cut using a box cutter or utility knife. Cut twice along the line to ensure complete penetration of the drywall paper. This task will be much easier with a new, sharp, clean blade.
- Once the paper facing has been peeled away, use a chisel to scrape away the excess gypsum. If a chisel doesn’t work for you, you can try using a Surform tool or rasp for this step.
- If you encounter any nails or drywall screws, simply drive them in further so that they won’t interfere with the casing.
- After you’ve finished scraping away all the extra drywall, vacuum up any pieces that fell on the floor.
- Take your casing trim again and use it to verify that enough of the material was removed. The trim should now rest seamlessly in the groove you’ve made and be flush against the door jamb.
As opposed to the first method, this option takes much more time and effort but is more of a calculated, professional approach. However, it’s worth mentioning that some carpenters do not prefer this method because they argue that it weakens the drywall and can lead to cracking in the areas where the drywall was carved out.
Method #3: Install a Jamb Extension
The final method for fixing drywall that sticks out beyond a door jamb is to install a jamb extension. This tactic works best for extreme cases where the drywall extends out considerably far from the jamb. Instead of correcting the problem at the drywall, a jamb extension will add width to the jamb so that both the door jamb and the drywall match up appropriately. Jamb extensions are generally MDF or ¾” boards and work to create a clean edge for the casing trim to be nailed to.
- Using a tape measure, measure the gaps between the casing and the jamb.
- Calculate this difference in several areas including the top and each side, as the drywall will most likely vary in thickness around the whole doorway.
- Measure the width of the existing jamb boards and use this measurement to purchase lumber that matches.
- Set up a table saw to the intended width for the jamb extension. Cut three boards: two for the sides and one for the top.
- Make sure that these three pieces are long enough to correct the issue in these areas. Determine the lengths needed by measuring the jamb and then cut accordingly.
- Test these boards first to ensure that they will fit and then use liquid nails to affix the extension to the door jamb on all the necessary sides. Finish off by nailing them into place.
- Use wood filler to close up any gaps where the extension and the door jamb join and sand.
- If the extended jamb protrudes at all, you can simply trim off the excess using a plane.
For an even easier install, door jamb extension kits can be purchased from some home improvement centers. This approach does not require any cutting or pounding of the drywall and greatly reduces any risk of possible damage. Any destruction to the paper can cause the drywall to completely lose its strength.
Related Questions
What should the reveal be on a door casing?
The standard reveal for both door trim and window molding is ¼ inch. However, this can be adjusted slightly depending on your individual situation.
How wide should door casings be?
Proper trim sizing is essential to avoid drawing the eye to the wrong area and creating imbalanced aesthetics in your home. Trim pieces are generally found in ¼ inch increments. The standard width for both door and window trim is 2 ¼ inches. For baseboards, they are typically 3 inches wide and crown is roughly 4 ½ inches.
Should door casings and doors match?
This is a commonly misunderstood subject among homeowners and the truth is, door casings and doors do not have to match. In fact, you can create a very modern look by pairing light colored casings with a darker colored door. However, you should try to stick to simple shades should you ever need to do any repainting down the line.
Do You Need Drywall Repair Services?
Get free, zero-commitment quotes from pro contractors near you.
Wrapping It Up
Drywall that sticks out from the door jamb is an incredibly common problem during both new construction and remodeling projects. In order to ensure that your trim casing is installed correctly and fits flat against the jamb, you need to first correct the drywall issues. Whether you go for the “beat to submission” approach, install jamb extensions or carve out the excess drywall, the choice ultimately comes down to preference. However, beating the drywall in place is the most preferred method and just sounds like a fun way to fix it!
Related Guides

Jessica considers herself a home improvement and design enthusiast. She grew up surrounded by constant home improvement projects and owes most of what she knows to helping her dad renovate her childhood home. Being a Los Angeles resident, Jessica spends a lot of her time looking for her next DIY project and sharing her love for home design.
More by Jessica Stone


![How Much Weight Can a 4×4 Support Horizontally? [It Depends!]](https://cdn-fastly.upgradedhome.com/media/2023/07/31/9070333/how-much-weight-can-a-44-support-horizontally-it-depends.jpg?size=350x220)