How To Change Blades On Riding Mower Without Removing Deck

Your riding mower needs to have its blades maintained to keep them working well. When your riding lawn mower’s blade wear out, you can easily change them by lifting the lawn mower up, removing the mounting nut and installing new blades.
As the blades start to wear out, your mower will become less effective at cutting grass. If you’ve never changed the blades on a riding mower, it may sound like a daunting task. You’ll be surprised how easy it is to do without removing the deck. This piece will guide you through the process.
Do You Need a Mower Repair Service?
Get free, zero-commitment quotes from pro contractors near you.

What’s Involved with Changing the Blades on a Riding Lawn Mower
If you have never owned a riding lawn mower or changed its blades, this is a question that might come up. Some lift the riding mower in order to change the blades. This is a common method for many riding mower types. Unfortunately, it is not the easiest way to change the blades. This article will demonstrate an easier method to use when the blades need to be changed.
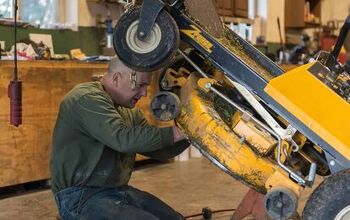
The mower’s blades are on the bottom of the riding lawn mower. To access them, you’ll need to have a jack or similar means to lift the mower up and expose the blades. The lawn motor will need to be held up safely. However, you decide to lift of the lawn motor, take every safety precaution to prevent anyone from being injured.
Once the riding motor is safely lifted, proceed through the following steps to easily change the blades. You’ll find that this is the easiest method for changing the blades without ever having to remove the deck.
The Process of Changing the Blades on a Riding Mower Without Removing the Deck
1. Examine The Condition of the Mower’s Blades
The first step is to examine the condition of the blades. This is an important step because if they are in good condition, you won’t have to change them. This saves you money. If there is a slight dullness, you can use a grinder to sharpen them. When the blades become damaged or are very dull, the blades need to be changed. Without it, they won’t cut grass efficiently.
2. Park the Riding Mower
If the blades do need to be replaced, you’ll need to park the mower on a flat surface where you can work. Make sure the mower is switched off and remove the key. Also, put on the brake to prevent the mower from moving while you are working on it. These extra steps will prevent the blades from moving while you are working on them.
Attempting to change the blades when the mower is in the on position is extremely dangerous.
3. Remove the Spark Plug
Removing the spark plug is an additional safety precaution. Simply open the mower’s hood and disconnect the black wire that connects the spark plug to the engine.
4. Lift the Mower with the Jack
The next step is to lift one side of the riding lawn mower with a jack. Be sure to use a jack that it strong enough to bear the weight of the mower. If you don’t have a jack or believe that your may not be strong enough, you can always use cinder blocks or bricks to lift the riding mower.
5. Remove the Mounting Nut
Lifting the riding lawn mower up will expose the blade. To take the blade off, you’ll need to remove the mounting nut that is located in the center of the blade. As you turn the mounting nut, the blade will loosen up. When it is removed, you can simply take the old blade off.
6. Put the New Blade On
After you take the old blade off, simply slide the new blade on to the shaft. Replace the mounting nut and ensure that it is tight. The new blade should be snugly held in place.
7. Lower the Riding Lawn Mower
The final step is to safely lower the riding lawn mower with the jack. Changing the blades on a riding lawn mower without removing the deck is not a difficult chore. With just a few steps, you’ll have a new blade in place. This keeps your riding mower performing efficiently. A dull blade won’t cut grass very well so take the time to replace it when it needs it.
Having access to a jack will make the process of changing a riding lawn mowers blade much easier. You can still change the block though if you don’t have a jack. Using bricks or concrete blocks may be more of a hassle but it still works. You shouldn’t have too much trouble changing the blades.
Safety Considerations
The most important part to pay attention to while changing a riding lawn mower’s blade is safety measures. A riding lawn mower can be a dangerous piece of equipment when the blade is exposed.
Taking the extra steps to ensure that the motor is in fact off can prevent accidents from happening. Also, stabilizing the blade will prevent nicks and cuts.
Regularly Maintaining Your Riding Mower
Your riding motor needs regular maintenance to keep it functioning efficiently. It’s a good idea to get into the habit of examining the condition of your riding mower every time that you use it. This will keep it in top condition. When you are regularly checking the mower, you’ll be able to spot any signs of potential problems. You’ll also find signs of wear and damage before they become significant issues.
Changing the blades on your riding lawn mower may seem that a challenging task. It’s easy to see, though, that its not that difficult to do. Regularly check the condition of the blades will let you know when they need to be changed. Also, regularly examinations will let you know if they simply need to be sharpened with a grinder. Avoiding replacement of the blade with save you money.
Keep Your Riding Lawn Mower in Great Shape
Your riding lawn mower is an effective tool to keep your lawn looking great. When the blades are sharp, they make easy work of cutting the grass. That’s why it’s so important to keep it well maintained. You’ll use your riding lawn mower frequently, particularly during the spring and summer months.
Invest in Your Riding Lawn Mower
When you invest a little time into the care of your riding lawn mower, it will work well for many years to come. Changing the blades yourself will ultimately save you money. Plus, its an easy maintenance task to take care of.
When your riding lawn mower needs new blades, don’t feel intimidated! You’ve now go the tools to tackle the project yourself.
Do You Need a Mower Repair Service?
Get free, zero-commitment quotes from pro contractors near you.
Related Questions
How often do riding lawn mower blades need to be changed?
Most people find that they need to replace their riding lawn mower’s blades once year.
What are the signs that the riding lawn mowers blades need to be sharpened or replaced?
There are several signs that the blades have become worn or damaged. When you start noticing that in some areas, the grass is cut unevenly or the grass is torn, this indicates that your riding mower needs maintenance.
Related Guides

We are a team of passionate homeowners, home improvement pros, and DIY enthusiasts who enjoy sharing home improvement, housekeeping, decorating, and more with other homeowners! Whether you're looking for a step-by-step guide on fixing an appliance or the cost of installing a fence, we've here to help.
More by Upgraded Home Team