Is 30/50 Or 40/60 Pressure Switch Better for a Well Water System?

Many people who have a domestic water well system are confused about the difference in pressure switches. Pressure switches are at the heart of your water well system. Its purpose is to tell the water pump that delivers water to your home when to turn on and cut off. The question often comes up about which one is the right choice for your home, a 30/50 or 40/60 pressure switch?
Choosing between a 30/50 or 40/60 pressure switch comes down to the size of your home, the age and condition of your plumbing, pump, and water well, and your own preferences. Generally speaking, a one-story home can make do with a 30/50 setting while a home with water fixtures on two or more floors should opt for a 40/60.
Understanding how a pressure switch operates within your water well system is important for choosing the proper switch. Making a wrong choice can lead to issues with your water supply system. Before you make any decisions, read on to learn more about pressure switches and your domestic water well system.
Do You Need Well Pump Installation or Replacement?
Get free, zero-commitment quotes from pro contractors near you.

What Does the Pressure Switch Do?
As the name implies, the pressure switch controls the pressure in the water lines in your well water system. The pressure switch also controls the pump. The numbers indicate the pressure at which the water pump will turn on to supply water and cut off once more.
For best results, you should try to maintain a 20-point differential. This will ensure your home receives decent water pressure without putting too much strain the system over time.
The pressure switch senses the water pressure in the waterline. When the water line’s pressure falls below the lower setting on the pressure switch, the switch tells the water pump to start. Someone in the home causes this pressure to fall by opening a water tap or flushing a toilet.
When the tap is closed, or the fill valve on the toilet finishes, the line’s water pressure rises to the switch’s upper limit. This rise in pressure sends a message to the water pump to stop pumping.
To tie this all together, a 30/50 pump will turn the pump on when the pressure reaches 30 PSI (pounds per square inch) and cut it off when it reaches 50 PSI. A 40/60 pressure switch will do the same at the values 40 PSI and 60 PSI.
So, Is a 30/50 or 40/60 Pressure Switch Better?
There are a few different considerations you should make before you choose how to set your pressure switch. The pressure switch settings will affect how the water feels when it comes out of your plumbing and how much strain it is putting on the entire system. For this reason, you should consider things like…
- The age and condition of your plumbing
- The age and condition of your pump
- The condition of your water well
- Your personal preferences
Your Plumbing and your House
If you have had a 30/50 pressure switch in your system and are considering a 40/60 switch, your plumbing is a factor. The older your plumbing, the less likely it is to survive the higher pressures.
Most older homes have copper water pipes. Copper tends to become brittle with age. This brittle nature can lead to cracks, leaks, or burst pipes if you increase the water pressure in those pipes.
A good plumber can inspect your copper pipes and give you a good idea of their condition. Having such an inspection is probably a good idea before boosting the water line pressure in older homes with copper water pipes.
Pump Size and Condition – More Pressure Equals More Work
Another consideration is the age and condition of your well pump. The size of your pump may also come into play. Before you up the pressure in your domestic water system, make sure your pump is up to the increased demands.
More pressure will cause your pump to work harder and, in some cases, longer to maintain the higher pressures. On older well pumps, that may lead to a shorter life span and earlier failure. Your water well pump may not have the needed capacity to keep up with the increased demand.
Before raising the water pressure in your domestic water well system, it would be wise to consult with a water well specialist familiar with your pump. These professionals can calculate the additional demand and workload on the pump and advise you if your pump is up to the task.
Is Your Well Able to Handle the Demands
The single biggest issue with most water wells is the recharge rate. The recharge rate is simply the time it takes for the water to return to an acceptable level after being pumped down. Most wells don’t refill instantly. It takes time for the water to percolate back into the well from the surrounding water-bearing rock.
Several factors can affect the recharge rate of the water well. The type of water-bearing strata can certainly affect how fast the water travels. Issues with the age of the well are also important. Over time, screens at the bottom of the well may corrode and clog. Sand may infiltrate the well casing and inhibit the amount of water available
A reliable water well drilling company or your local water district office can often provide you with more information. You may need to have down well inspections made by a well drilling service.
Which is Better for You?
In the end, the choice is yours and depends on your personal preference. If more water at the fixtures in your home is important, then an upgrade to a 40/60 pressure switch is the answer. While the cost of a pressure switch is relatively low, the upgrades to your home or well will probably be much more expensive.
Balancing the cost against the end goal is the bigger question and is yours to make.
Water Well System Pressure Tanks
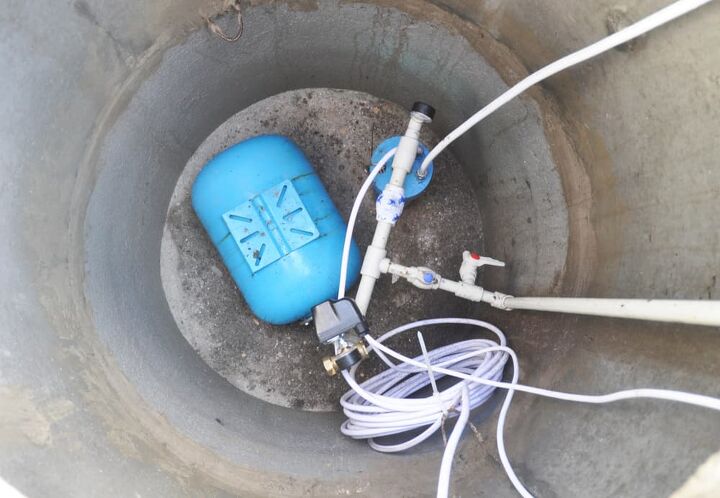
The pressure tank in your water well system works to smooth the flow into your home. Without the pressure tank, there would be a drop in flow and water pressure until the pump could catch up. The pressure tank ensures a constant flow at a constant pressure.
It is important to set the tank pressure correctly to work with the pressure switch. A correct setting allows your entire water system to operate most efficiently. To set the pressure on your water tank takes just a few steps and a few minutes of your time.
Adjusting the Water Pressure Switch
If you’re not happy with your current water pressure settings, you can easily adjust them on your pressure switch. All you’ll need is a small nut wrench and to know where the pressure switch is located. Once you’re at the switch, you will see two springs—a small and a large one. You can simply use the nut wrench to turn the corresponding springs that control the cut-on and cut-off limits.
- The small spring controls the cut-off pressure for the switch. If you turn the spring clockwise, it will compress and raise the cut-off limit. Counterclockwise, on the other hand will lower it.
- The larger spring will control both the cut-on and cut-off pressures. So, compressing this spring will raise both values in unison while turning it the other way will lower both limits.
NOTE: Adjusting the nut on the smaller spring will change the differential from the recommended 20 PSI. First, check with a professional to be sure your system can handle a greater difference between the cut-on and cut-off points.
Adjusting the Pressure Tank
If you are manually changing the settings on the water pressure switch, you also need to adjust the pressure tank. A properly adjusted pressure tank will keep your system running smoothly. Luckily, you can do this by yourself as well if you don’t feel like calling in a professional. Just follow these simple steps.
Step 1: Work Safely
To ensure your safety, follow the proper safety procedures when working around your pump and the electricity to which it is connected. The most important safety consideration is to turn off the breakers that control the pump and any other electrical equipment in or around your well house.
You should always wear safety goggles or glasses to protect your eyes. When working with anything under pressure, even water, there is a risk of damaging your eyesight. If you are going to tackle this project on your own, be smart and work safely.
Step 2: Open a Faucet
Drain the pressure tank and relieve the tank’s pressure by opening a faucet somewhere in the system. Leave the faucet open while you are working on the pressure tank. Once the tank is empty and the pressure is off the system, you can go to the next step.
Step 3: Find the Air Valve Cap
Locate the cap that protects the air valve on your pressure tank. Make sure no water is leaking from the air valve. If there is water leaking from the air valve, the rubber bladder in the pressure take is probably leaking and you must replace the tank.
Step 4: Check the Pressure
Use an air pressure gauge to test the pressure in the tank. You can check the pressure with a tire gauge, but you may need an adapter. Add air or release air to set the pressure in the tank.
Ideally, the tank’s pressure should be 2 lbs. per square inch less than the pump start pressure on your pressure switch. For example, if you have a 30/50 switch, the tank’s pressure should be set to 28 lbs. per square inch.
We advise against using a compressor to add air to your pressure tank. By doing this, you can easily overpressure your tank and damage the tank or rupture the bladder. Instead, use a bicycle pump to add pressure to your pressure tank.
Step 5: Replace the Protective Air Cap
The next thing you should do is put the protective cap back on the air valve on the tank. Allowing any dirt or debris to get into the air valve on the tank can cause problems the next time you need to service the tank pressure.
Step 6: Close the Faucet and Turn on the Breaker
Finally, close the faucet you first opened to relieve the pressure in the tank. Then, turn on the breakers that service the well and the well house. After that, the pump should start and begin to build pressure in the pressure tank. When all is said and done, you should always check the system for leaks.
Do You Need Well Pump Installation or Replacement?
Get free, zero-commitment quotes from pro contractors near you.

Final Thoughts: Should You Choose a 30/50 or 40/60 Pressure Switch?
At the end of the day, the final decision for your pressure tank settings comes down to the size and condition of your home and your own wants and needs. If your plumbing, pump, and well are up to the task, there is no reason not to choose a 40/60 pressure switch. You will enjoy more water pressure in your home, which can make things much more enjoyable.
That said, 30/50 PSI settings are also acceptable for smaller, one-story homes. Now that you know a bit more about water pressure switches, you can make a choice for your home. We hope the information and steps in this article gave you a better understanding of your domestic water system, so you can make the best decision.
Related Guides

Dennis is a retired firefighter with an extensive background in construction, home improvement, and remodeling. He worked in the trades part-time while serving as an active firefighter. On his retirement, he started a remodeling and home repair business, which he ran for several years.
More by Dennis Howard




![10 Best Cordless Leaf Blowers – [2022 Reviews & Ultimate Guide]](https://cdn-fastly.upgradedhome.com/media/2023/07/31/9070789/10-best-cordless-leaf-blowers-2022-reviews-ultimate-guide.jpg?size=350x220)
![10 Best Scroll Saws for 2022 [Ultimate Reviews & Buyer's Guide]](https://cdn-fastly.upgradedhome.com/media/2023/07/31/9070684/10-best-scroll-saws-for-2022-ultimate-reviews-buyer-s-guide.jpg?size=350x220)




![10 Most Dangerous Neighborhoods in Baltimore [Updated]](https://cdn-fastly.upgradedhome.com/media/2023/07/31/9075655/10-most-dangerous-neighborhoods-in-baltimore-updated.jpg?size=350x220)


